fbpx

A Cyclist’s Guide to the Wildflowers of Santa Cruz

A Cyclist’s Guide to the Wildflowers of Santa Cruz

Pedaling to petals, it’s almost too good to be true.

Add a little color to your bike ride with this mobile wildflower guide from the Santa Cruz Museum of Natural History. This flower field guide and bike route map will help you on your treasure hunt. Wildflowers can be fleeting so keep these routes on rotation to avoid missing the show!

Wildflower season varies from year-to-year, usually starting in March, picking up in April, and winding down in May. Some of these flowers pop-up early in the season, while others are late bloomers.

This guide was created in honor of Bike Month in partnership with Ecology Action. Learn more.


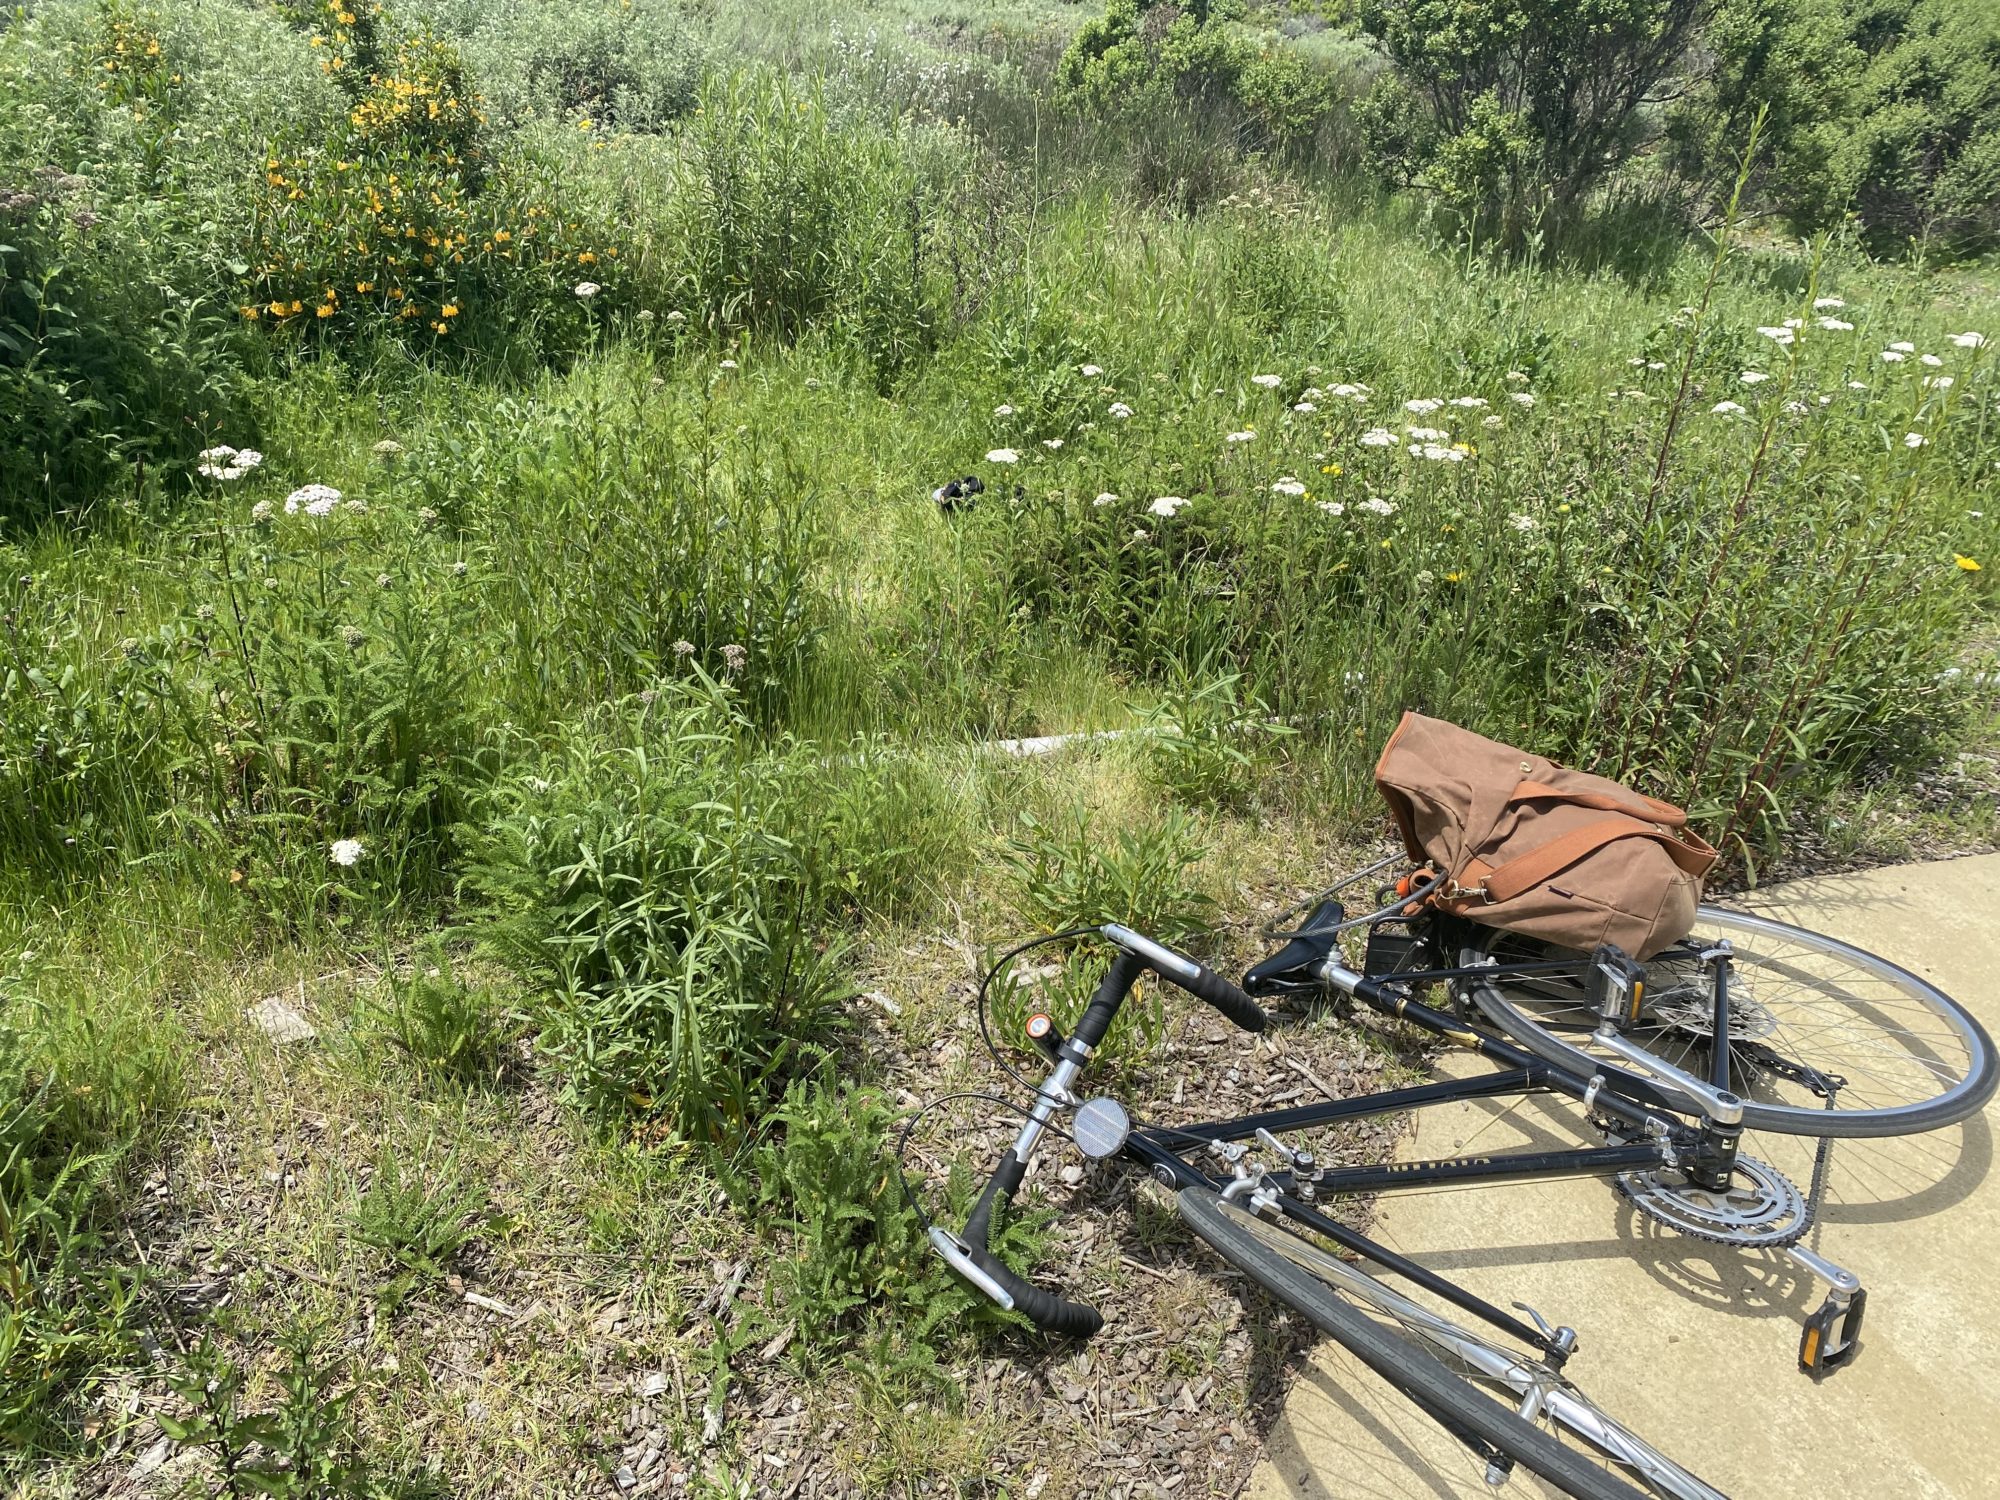
COASTAL CRUISING | Easy

This easy route takes you through some of the best wildflower viewing in the heart of town. You might think wildflowers belong in the wild, but with habitat loss such a huge threat to plant diversity, creating space for native plants in our urban areas is more important than ever.
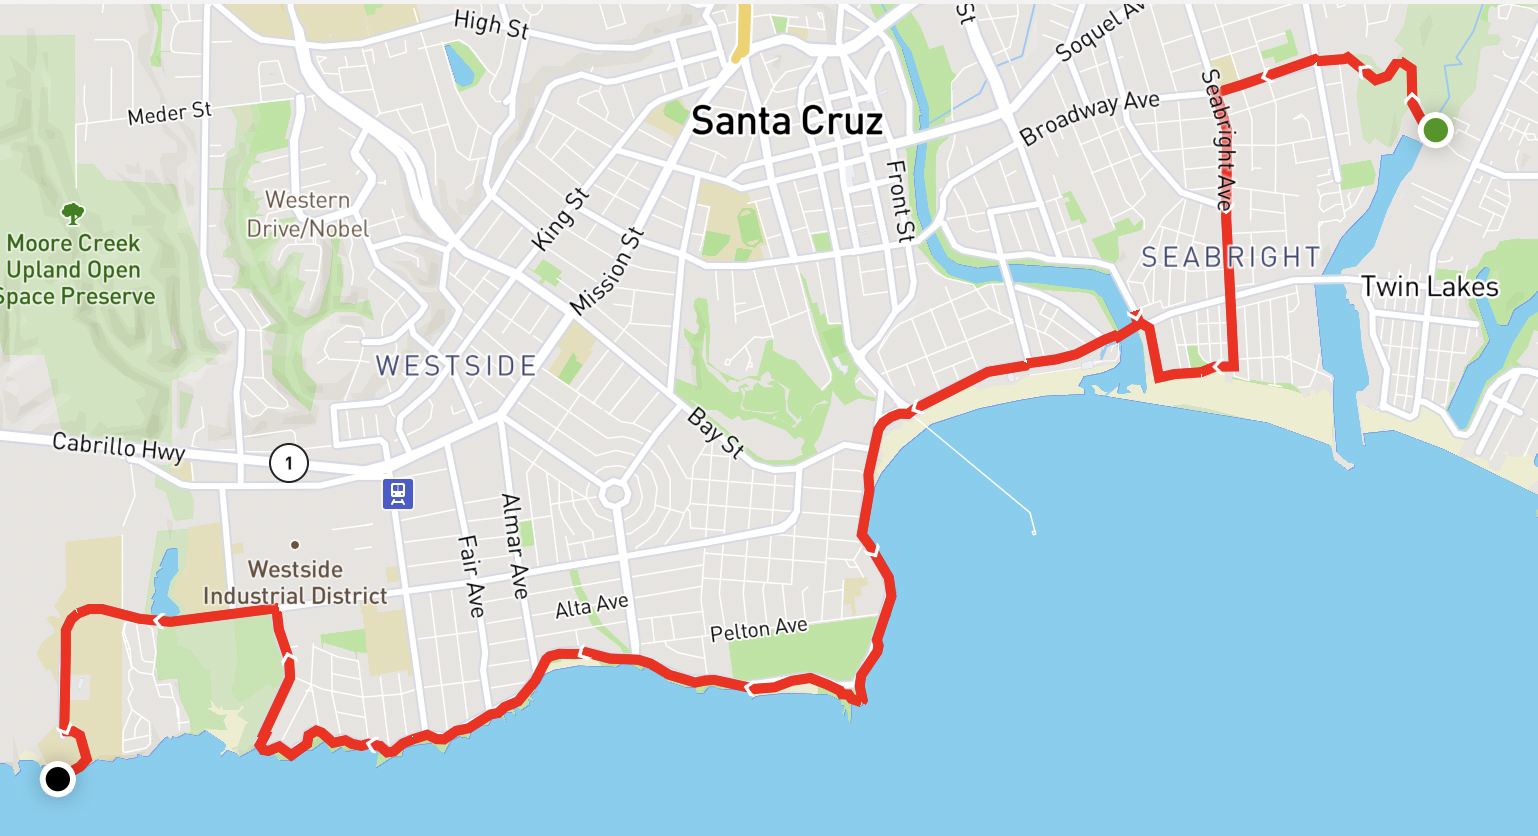
Getting There

All Trails Route | Distance 7.05 mi | Elevation Gain 203 ft
This route cuts through town and along the coast, starting at Arana Gulch, then heading to the Santa Cruz Museum of Natural History, and ending at the UC Santa Cruz Coastal Science Campus. Then double back and see if you missed anything!

Santa Cruz Tarplant (Holocarpha macradenia)
Location: Arana Gulch

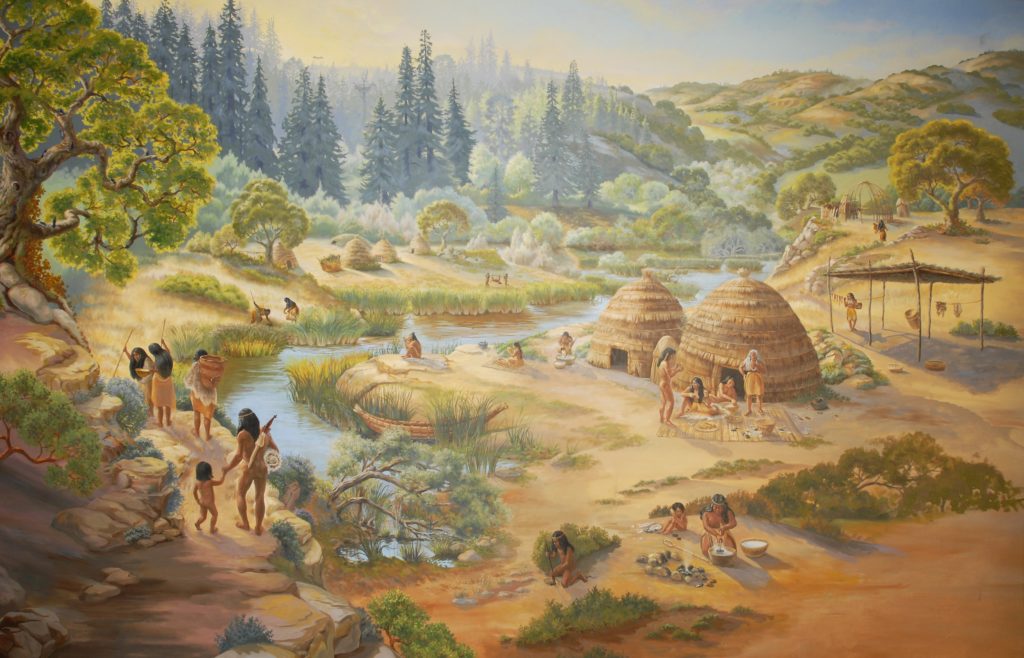
This rare and endangered plant endemic to Northern California is the reason we have Arana Gulch Open Space. The City manages the park in a way that promotes the success of this species. Adapted for disturbance historically common in coastal prairies, cows graze the landscape much like megafauna used to thousands of years ago.

Photo from Friends of Arana Gulch.

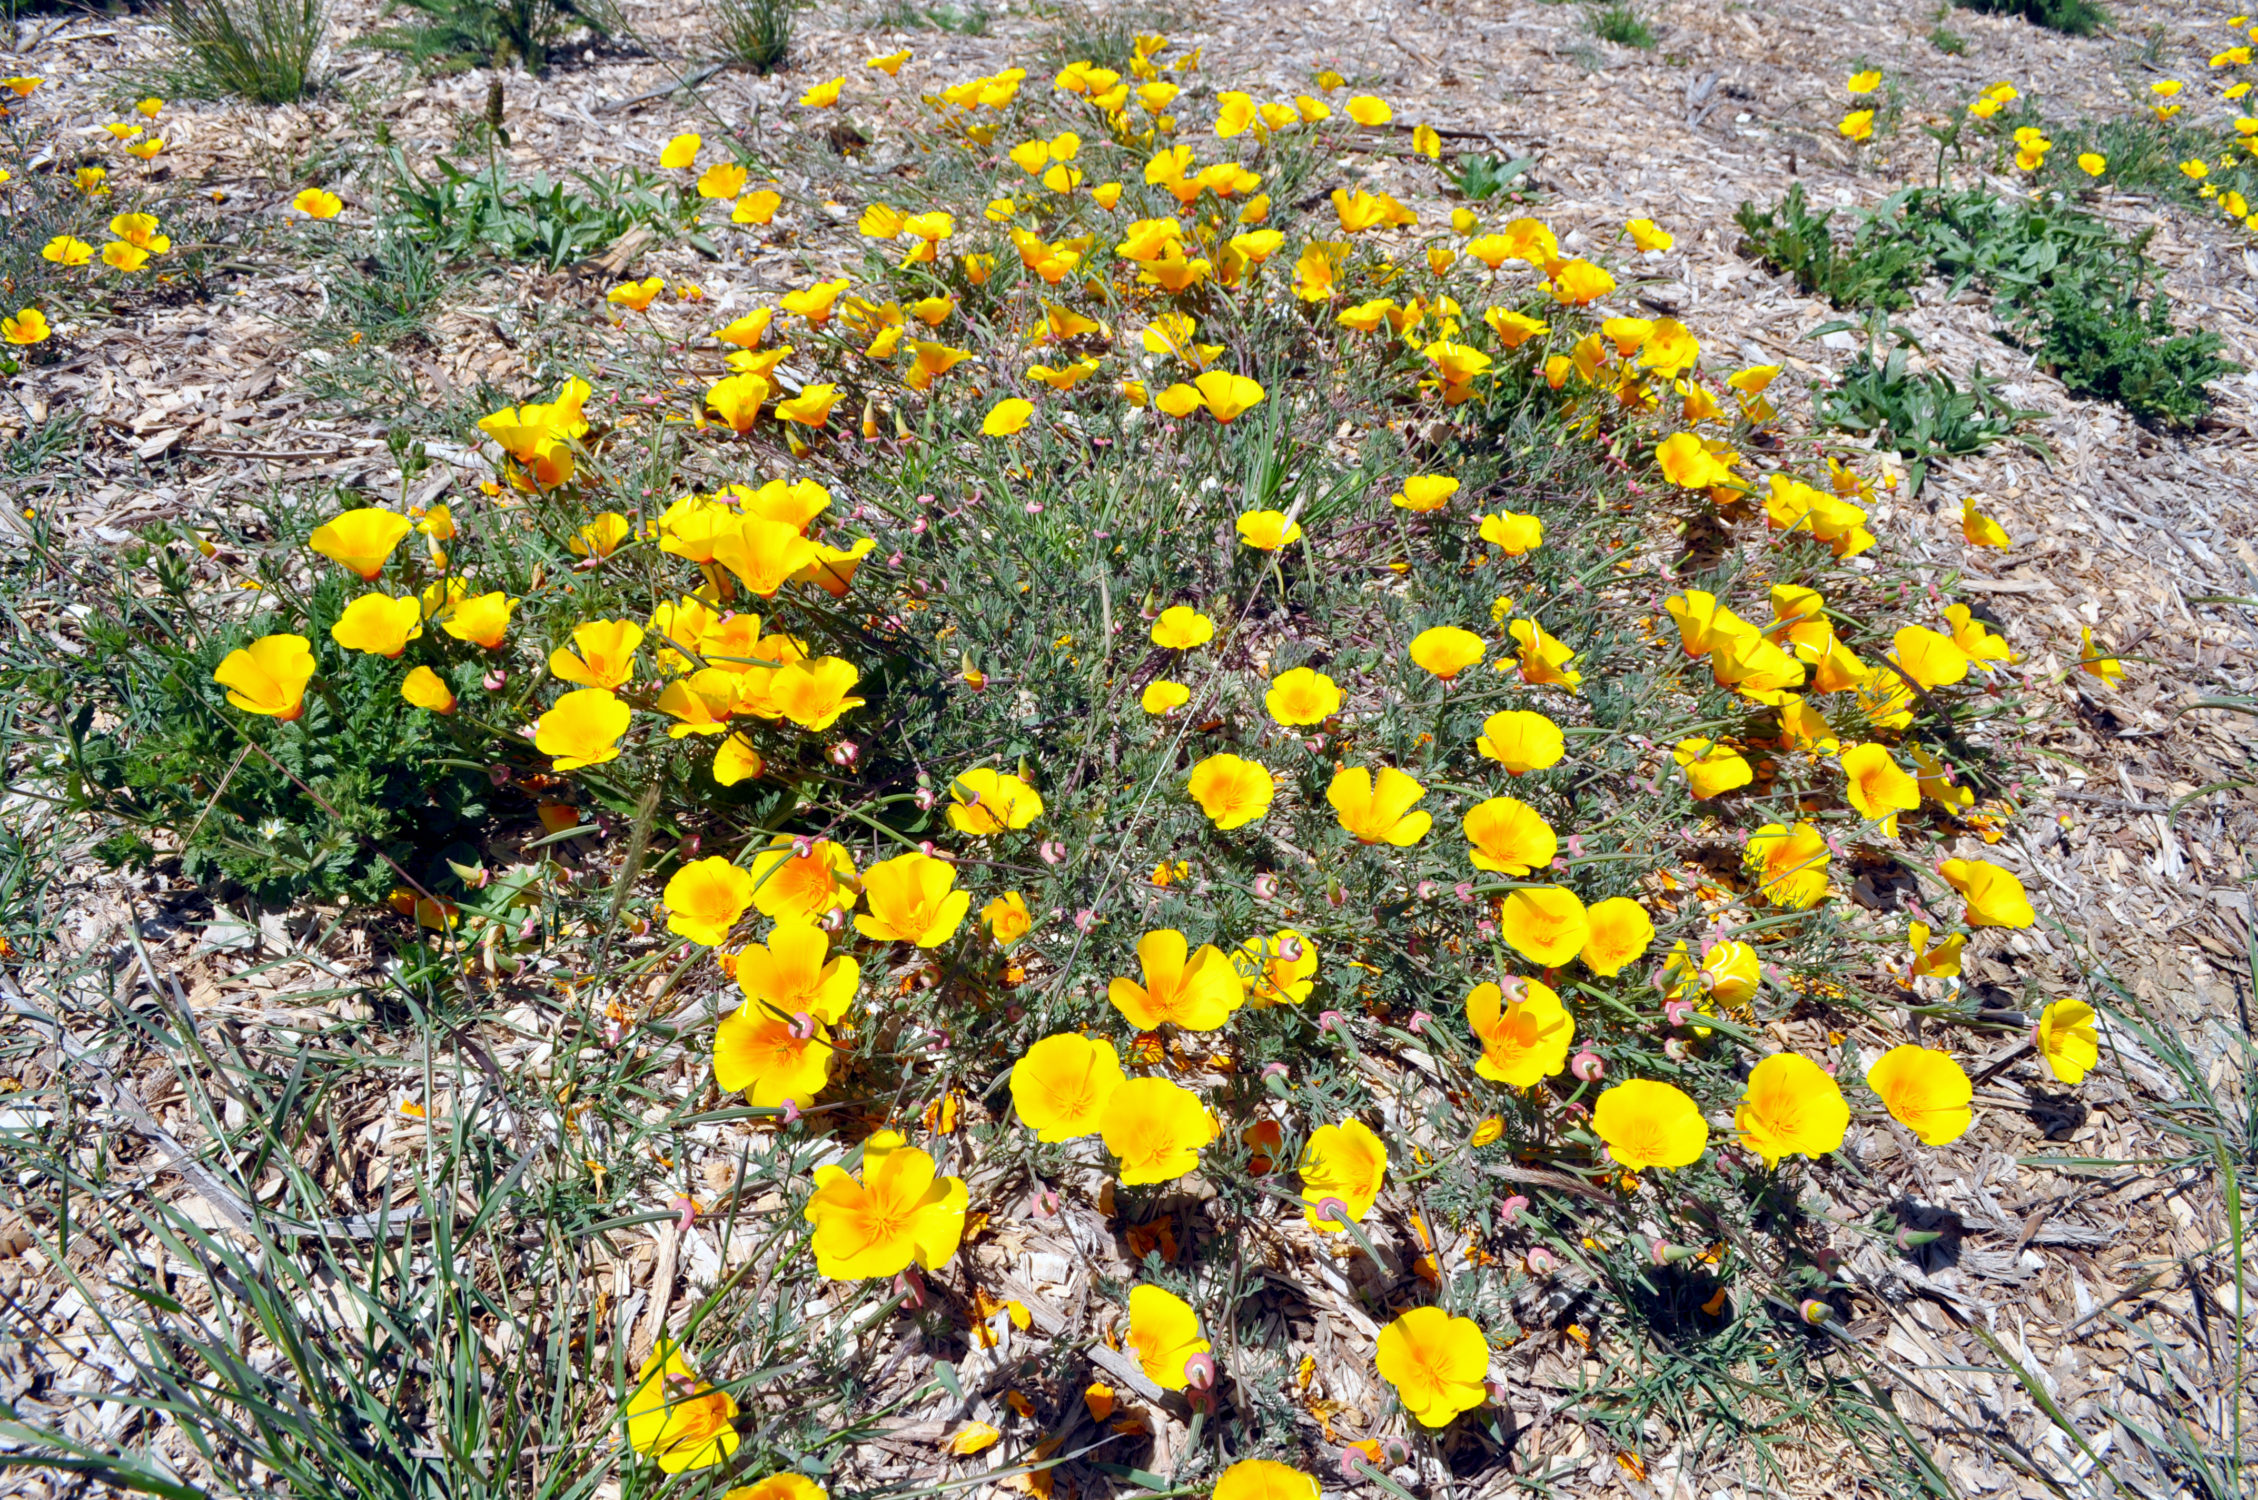
California Poppy Maritime Variety (Eschscholzia californica var. maritima)
Location: Santa Cruz Museum of Natural History

The Garden Learning Center at the Museum features several habitats. The front garden is a coastal prairie featuring our local variety of California poppy in abundance! Our maritime variety has a darker center with light edges, whereas the standard poppy is more orange throughout.

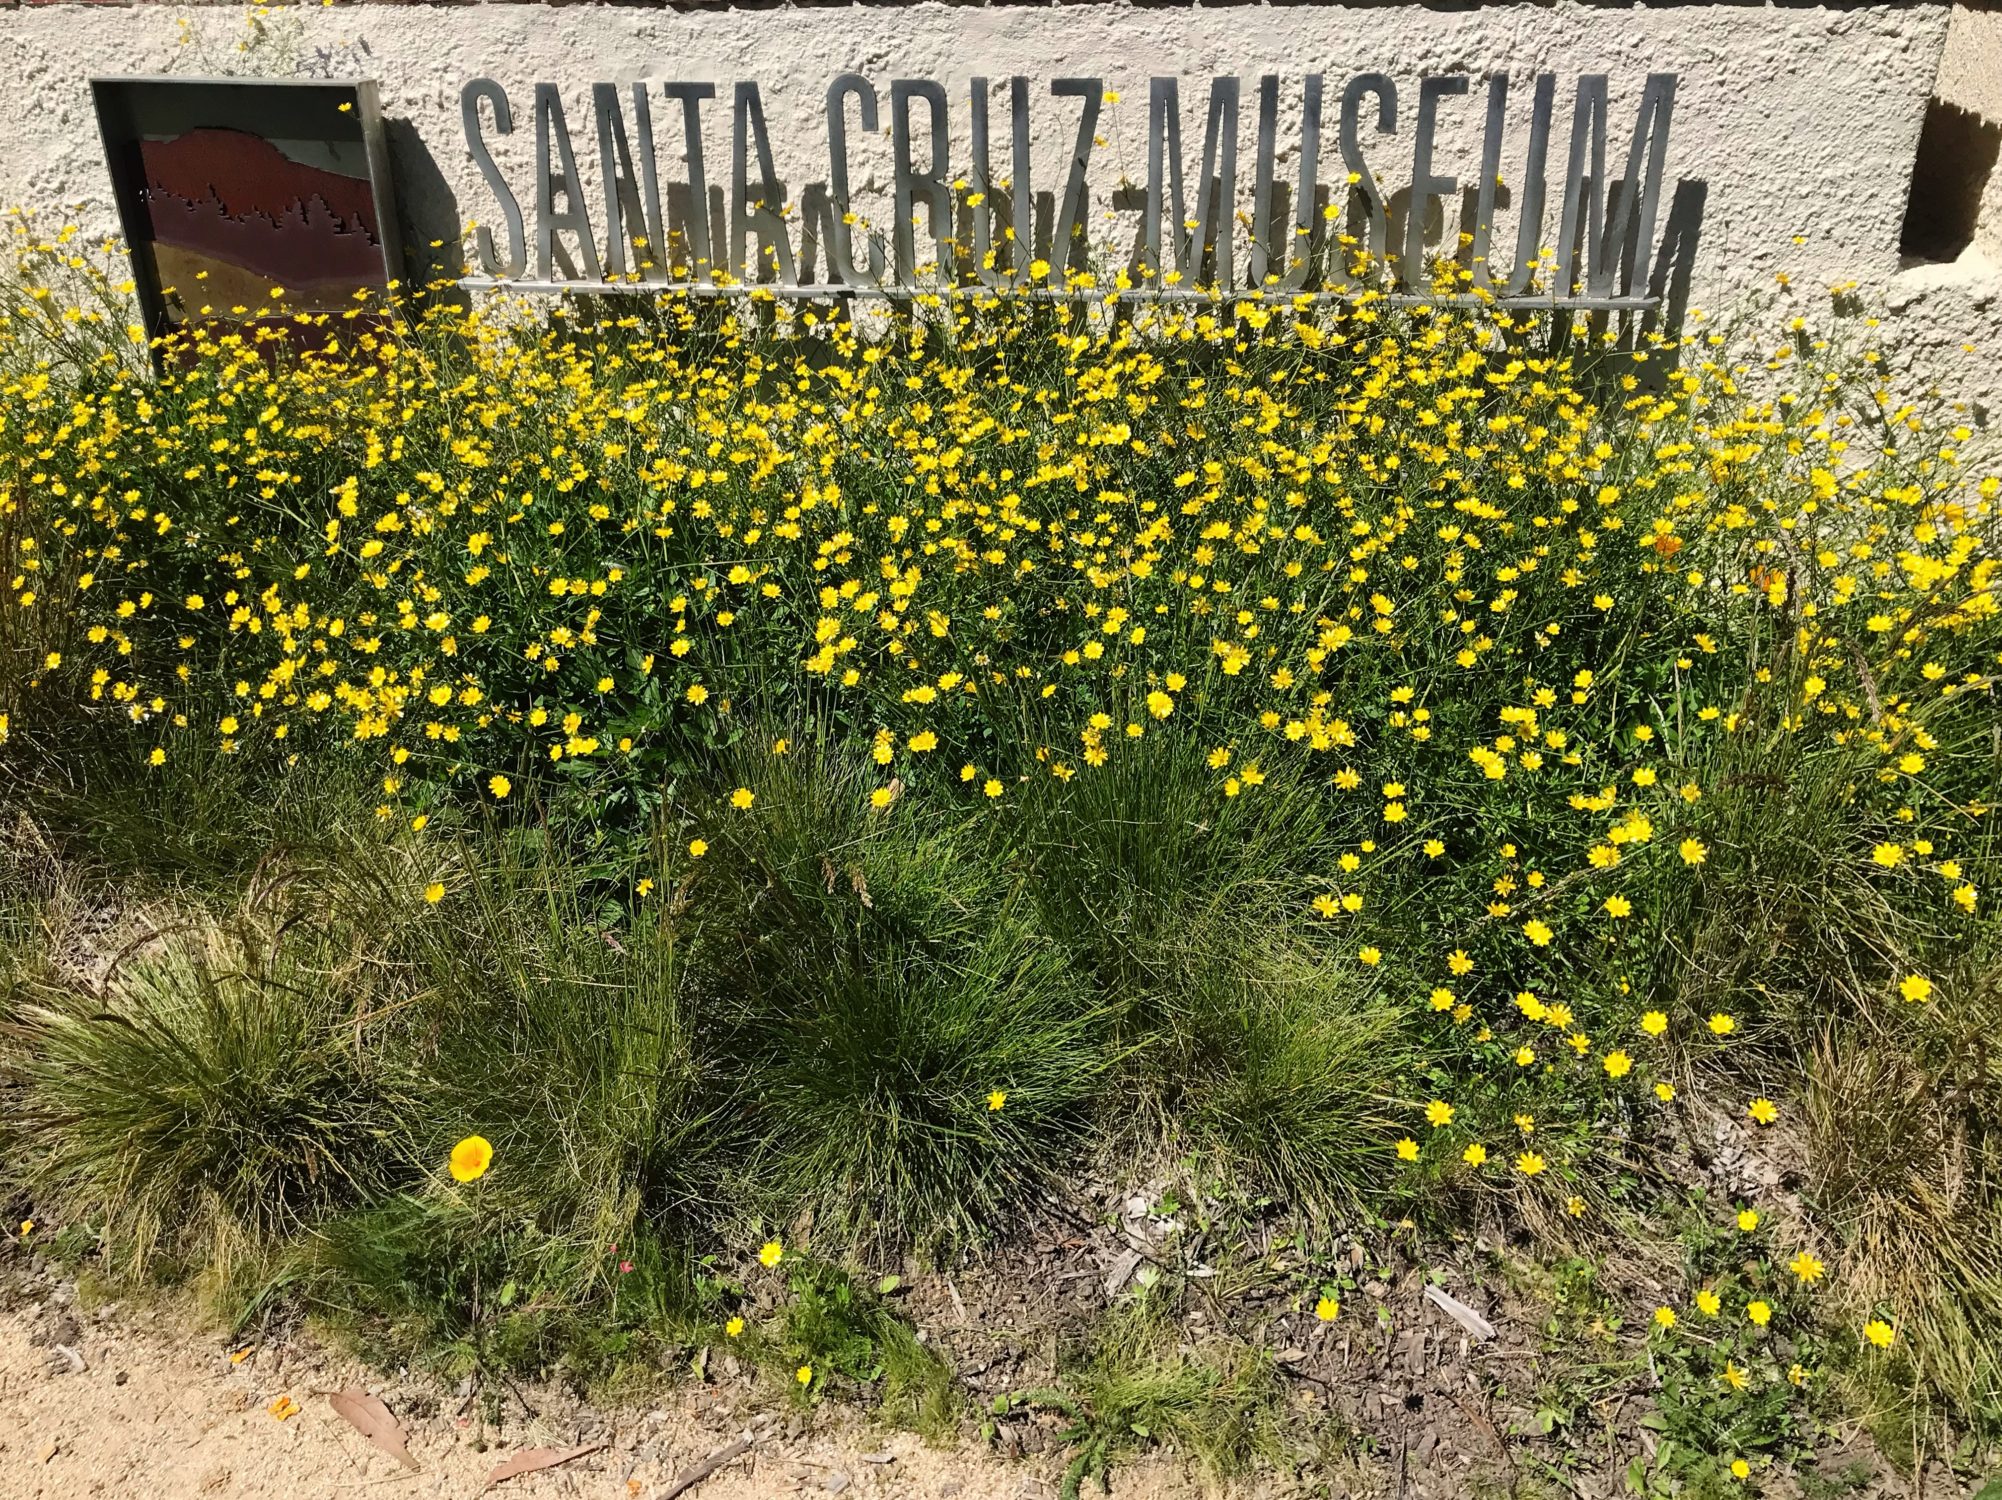
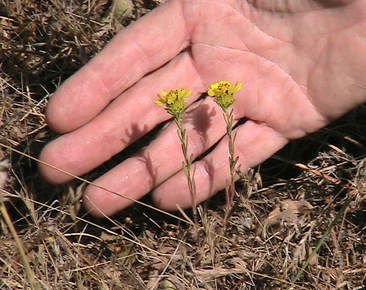
California Buttercup (Ranunculus californicus)
Location: Santa Cruz Museum of Natural History

These bright, shiny yellow flowers often bloom earlier than many other species, and will go to seed and return to a dormant state by early summer. Buttercups can be a nice source of nutrition and can be toasted or ground up and added to baked goods.

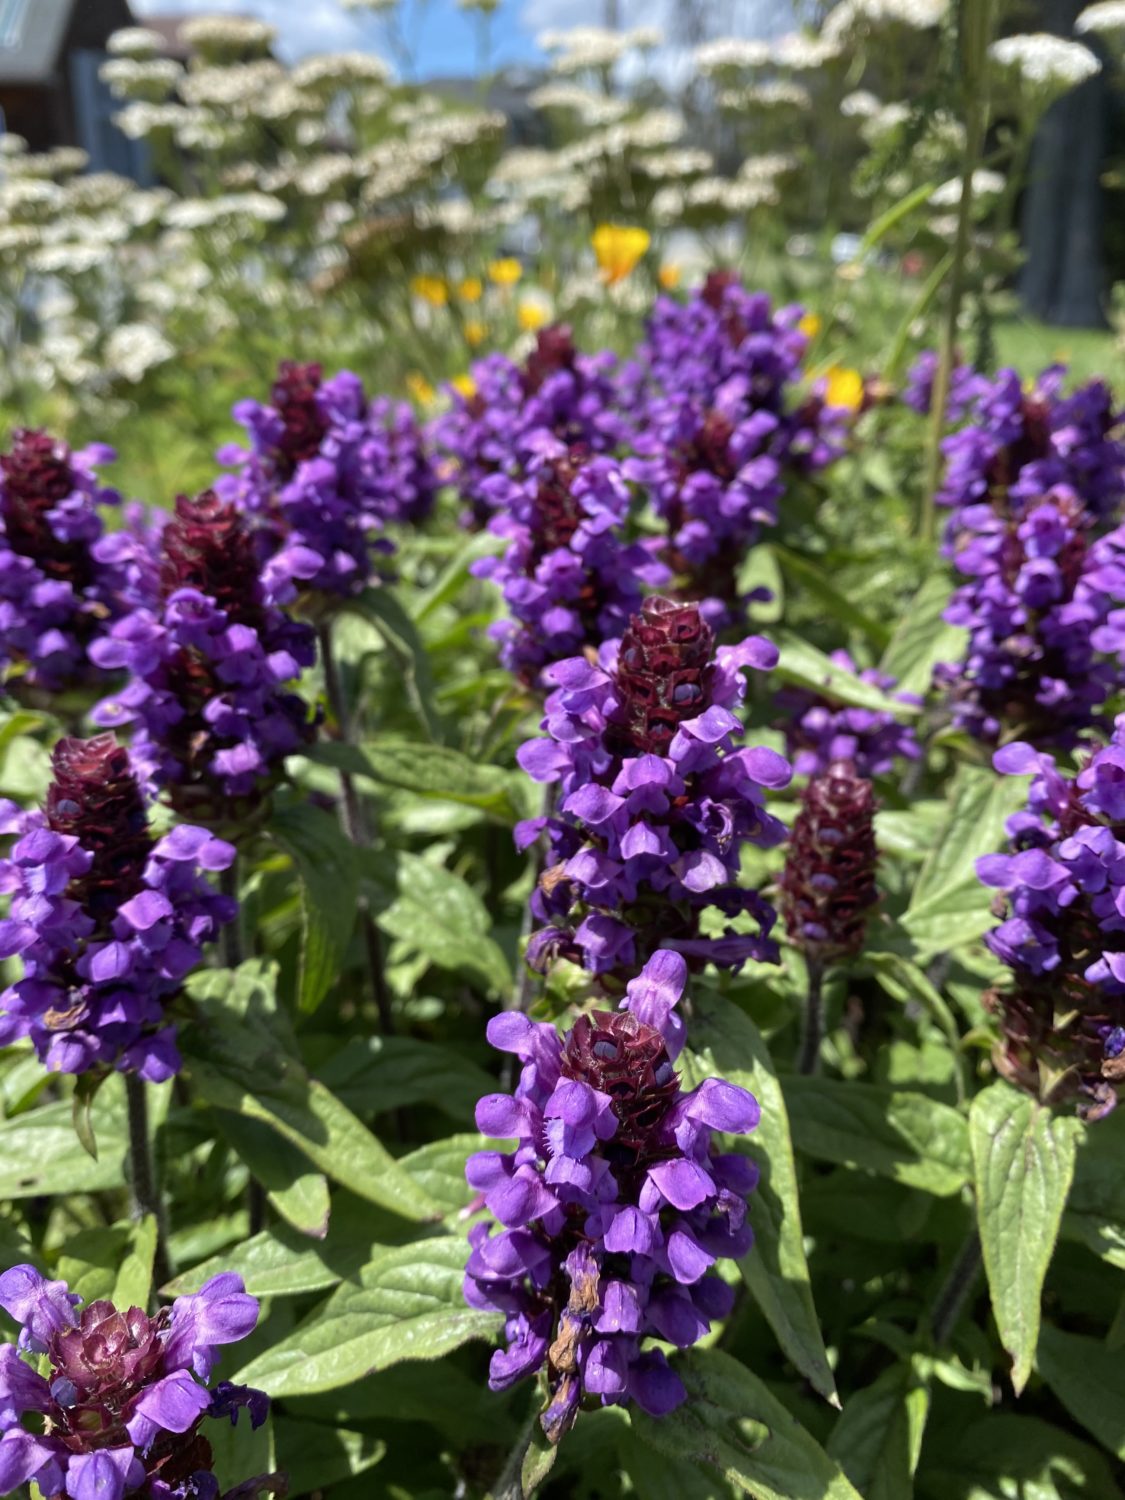
Common Self Heal (Prunella vulgarus)
Location: Santa Cruz Museum of Natural History

In addition to attracting pollinators, this edible plant has long been used as a remedy for a variety of ailments, including sore throats and muscle aches. Some of its other common names include heal-all, woundwort, heart-of-the-earth, carpenter’s herb, and brownwort.

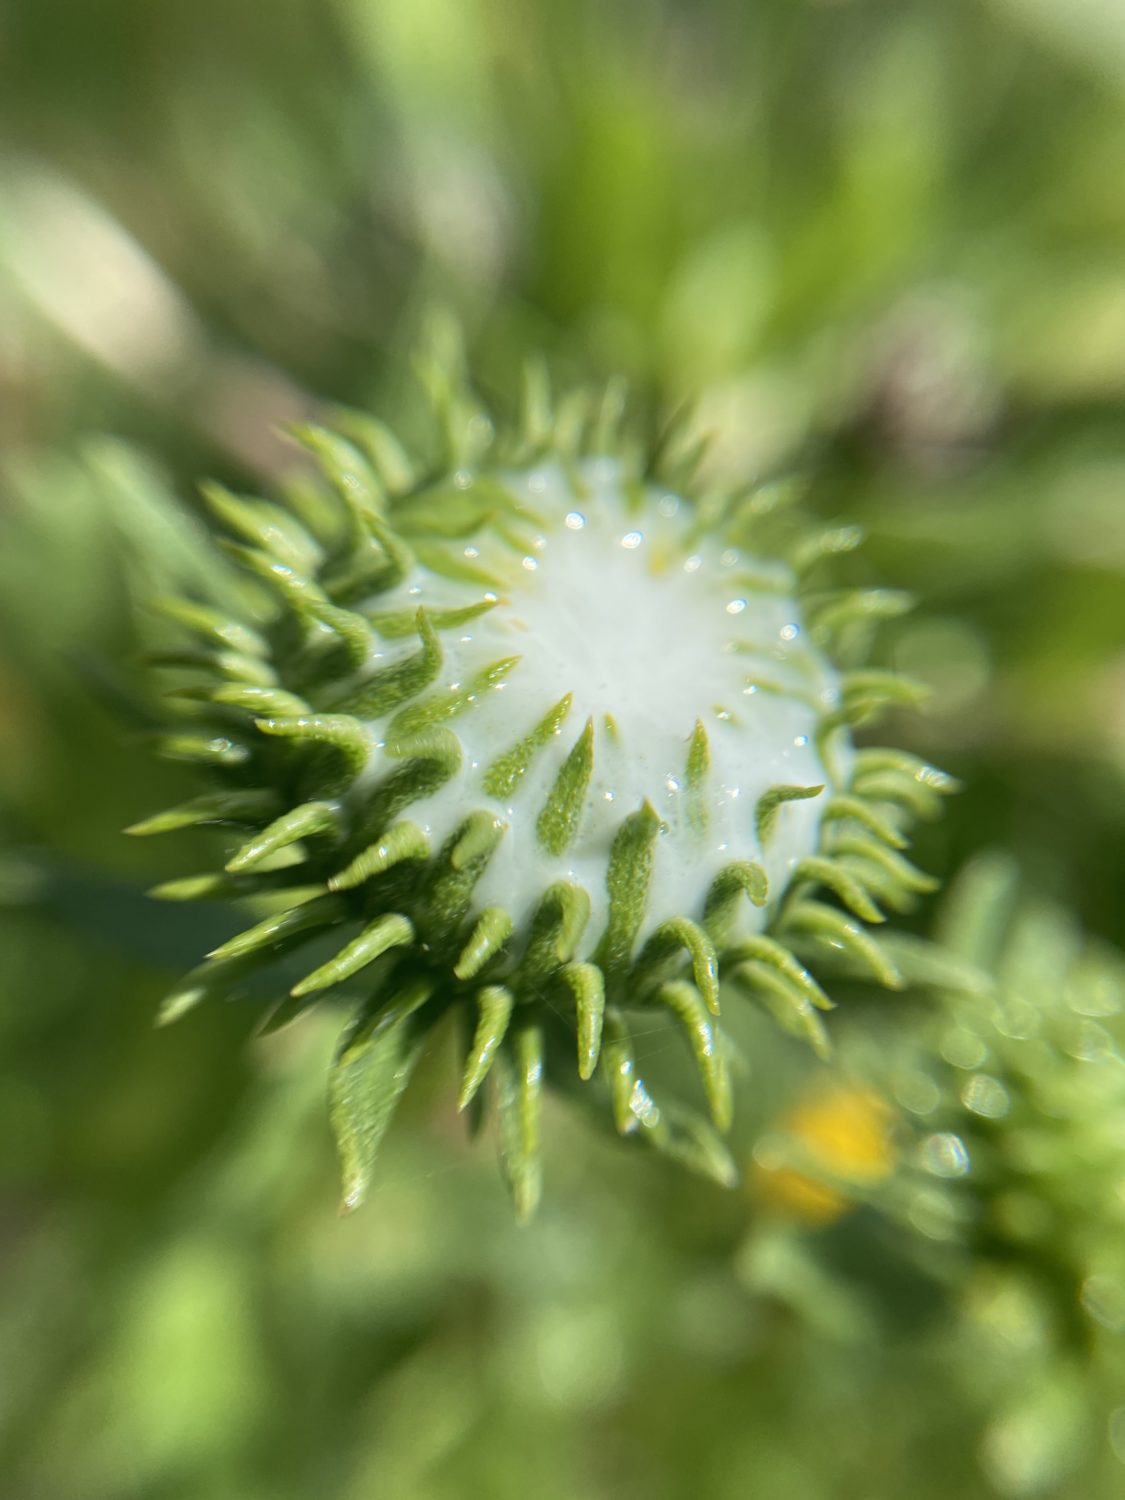
Gumplant (Grindelia stricta)
Location: UC Santa Cruz Coastal Science Campus

In the early stages of blooming, the head of this yellow aster produces copious white exudate (i.e. goo). Indigenous cultures have traditionally used this exudate as an adhesive.

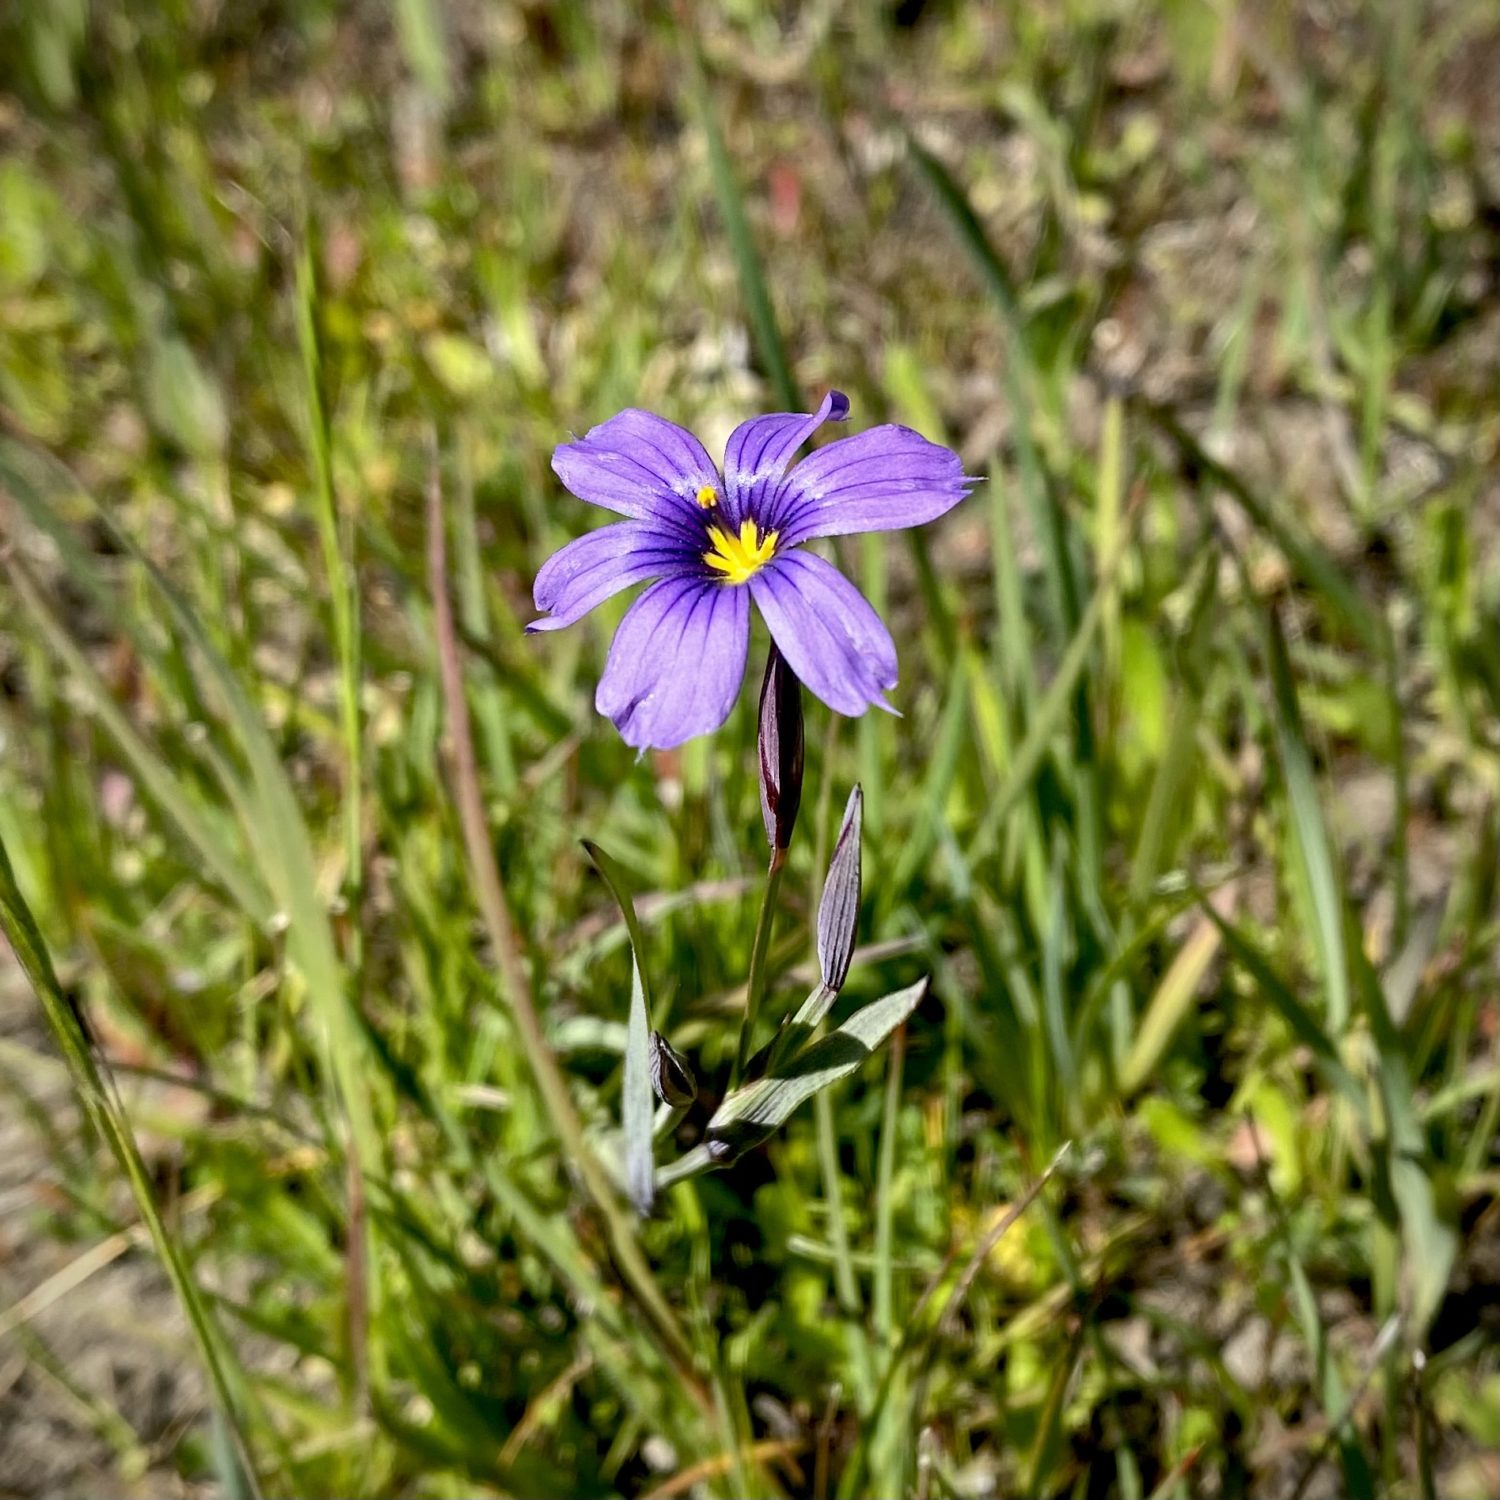
Western Blue Eyed Grass (Sisyrinchium bellum)
Location: UC Santa Cruz Coastal Science Campus

Actually a member of the iris plant family, blue-eyed grass produces deep purple flowers in late winter and early spring. The genus name means “pig snout”, referencing the sweet roots that were dug up by pigs in their native grasslands.

Explore our Guide to the Garden Learning Center


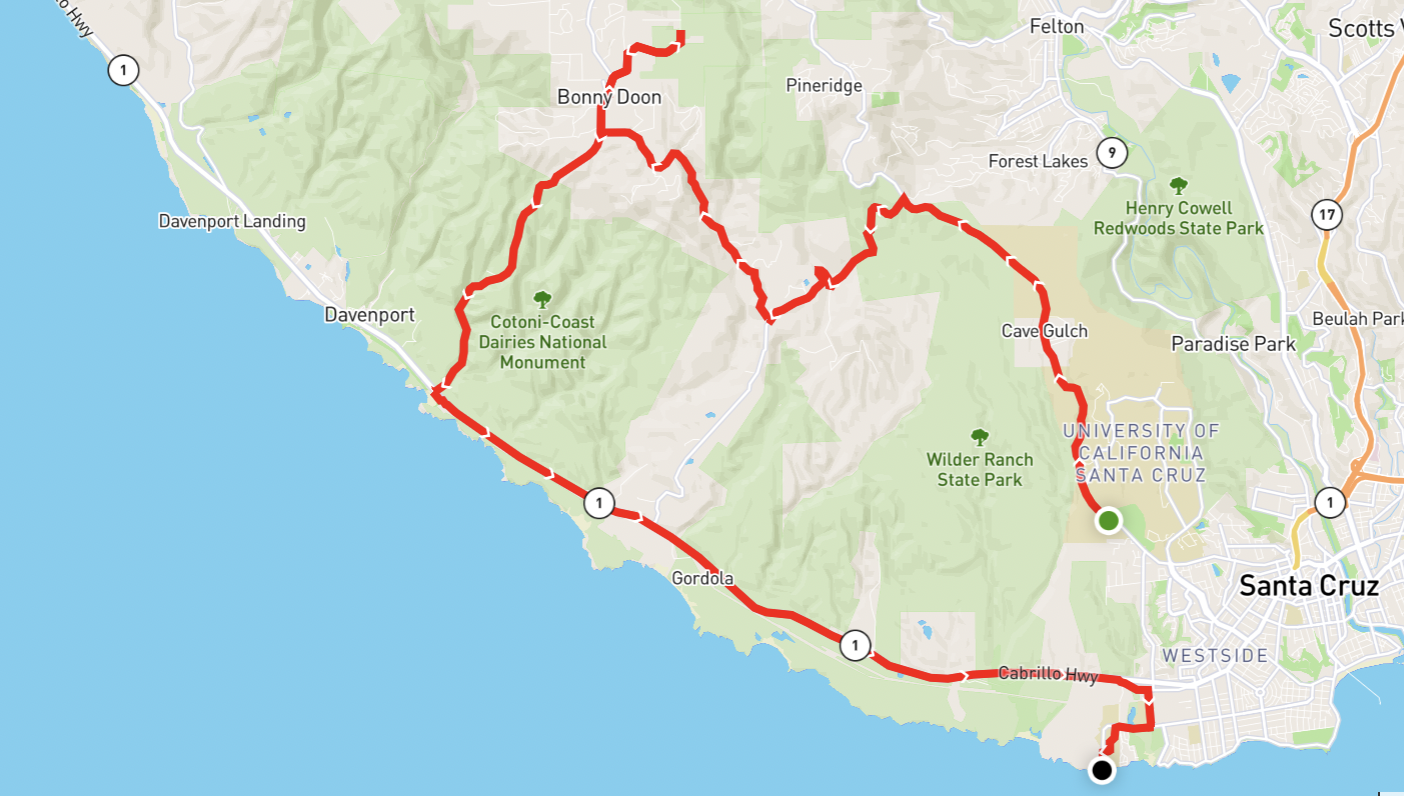
MEADOW MILES | Moderate

Sometimes you have to work a little for flowers, especially the really good ones. This route has you summiting one of our biggest in-town hills by biking up Bay St. towards campus. Part of the UC Santa Cruz Campus Natural Reserves, Mima Meadow is a coastal prairie featuring geologically interesting mima mounds and some of our most sought after flowers. Walk your bike through the paths to help protect the endangered Ohlone Tiger Beetle (Cicindela ohlone).

Getting There

All Trails Route | Distance 5.71 mi | Elevation Gain 427′
This route has you starting at the coast side of Bay St., taking it all the way to the top, then turning left on High St. and continuing on Empire Grade until you reach the closed gate to Mima Meadow on your left (just past the Arboretum). To get into the Meadow, you will need to use the steps in the fence at the fire road. Either lock your bike up at the Arboretum across the street, along the fence, or walk with it along the trails.

From here you can look down on your starting location along the Monterey Bay as you walk the trails. Stop by the UC Santa Cruz Arboretum and Neary Lagoon on your way back!

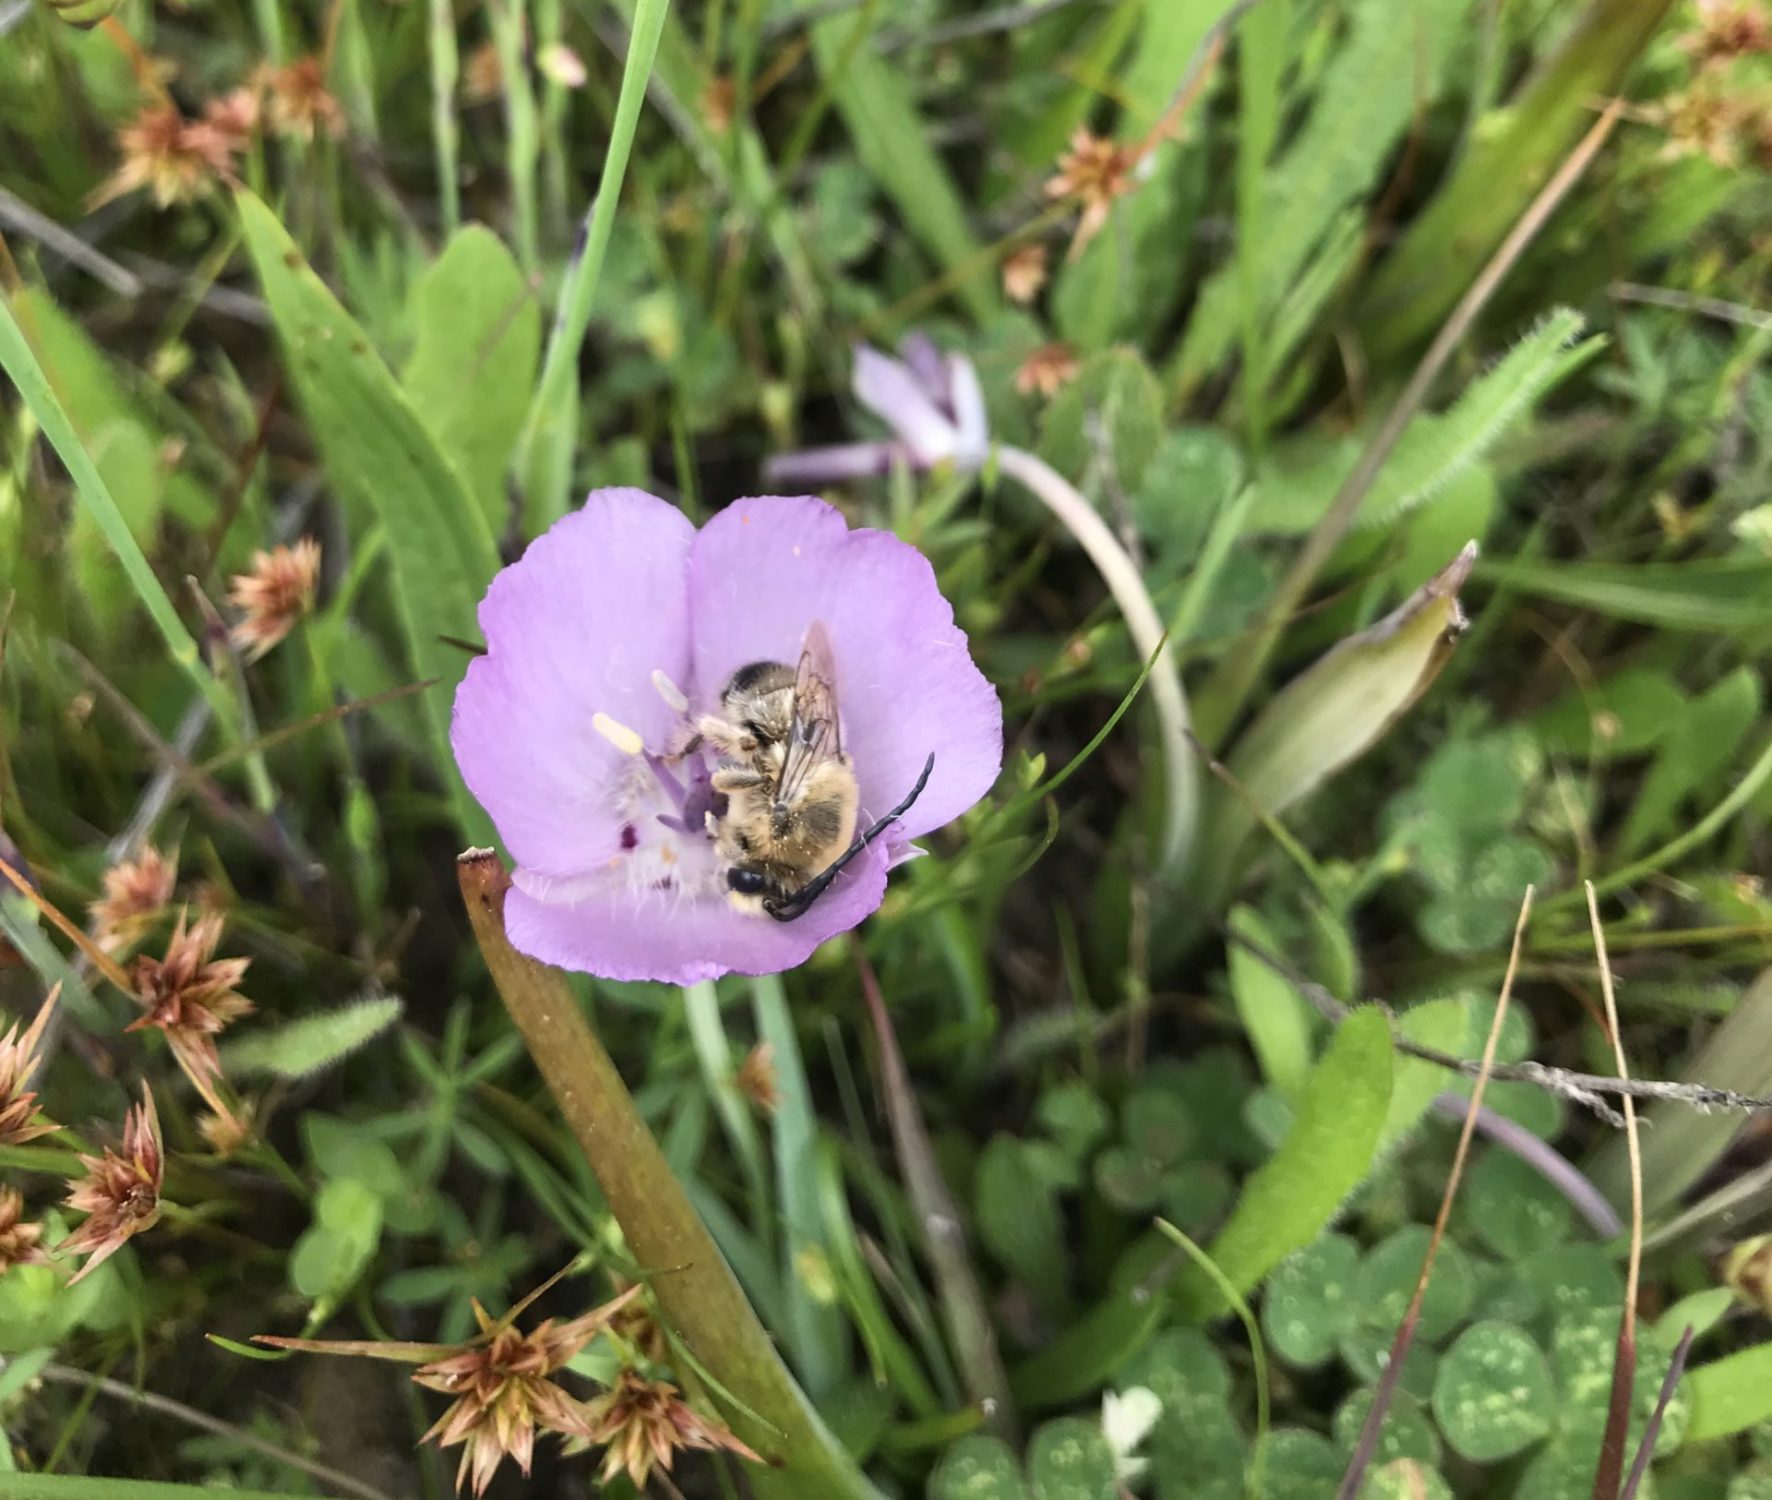
Monterey Mariposa Lily (Calochortus uniflorus)

The genus Calochortus contains some of our region’s most sought-after flowers. This rare species has grass-like leaves and upright flowers shaped like a bowl, which bees often rest in. Featured here is a longhorn bee (Melissodes sp.)

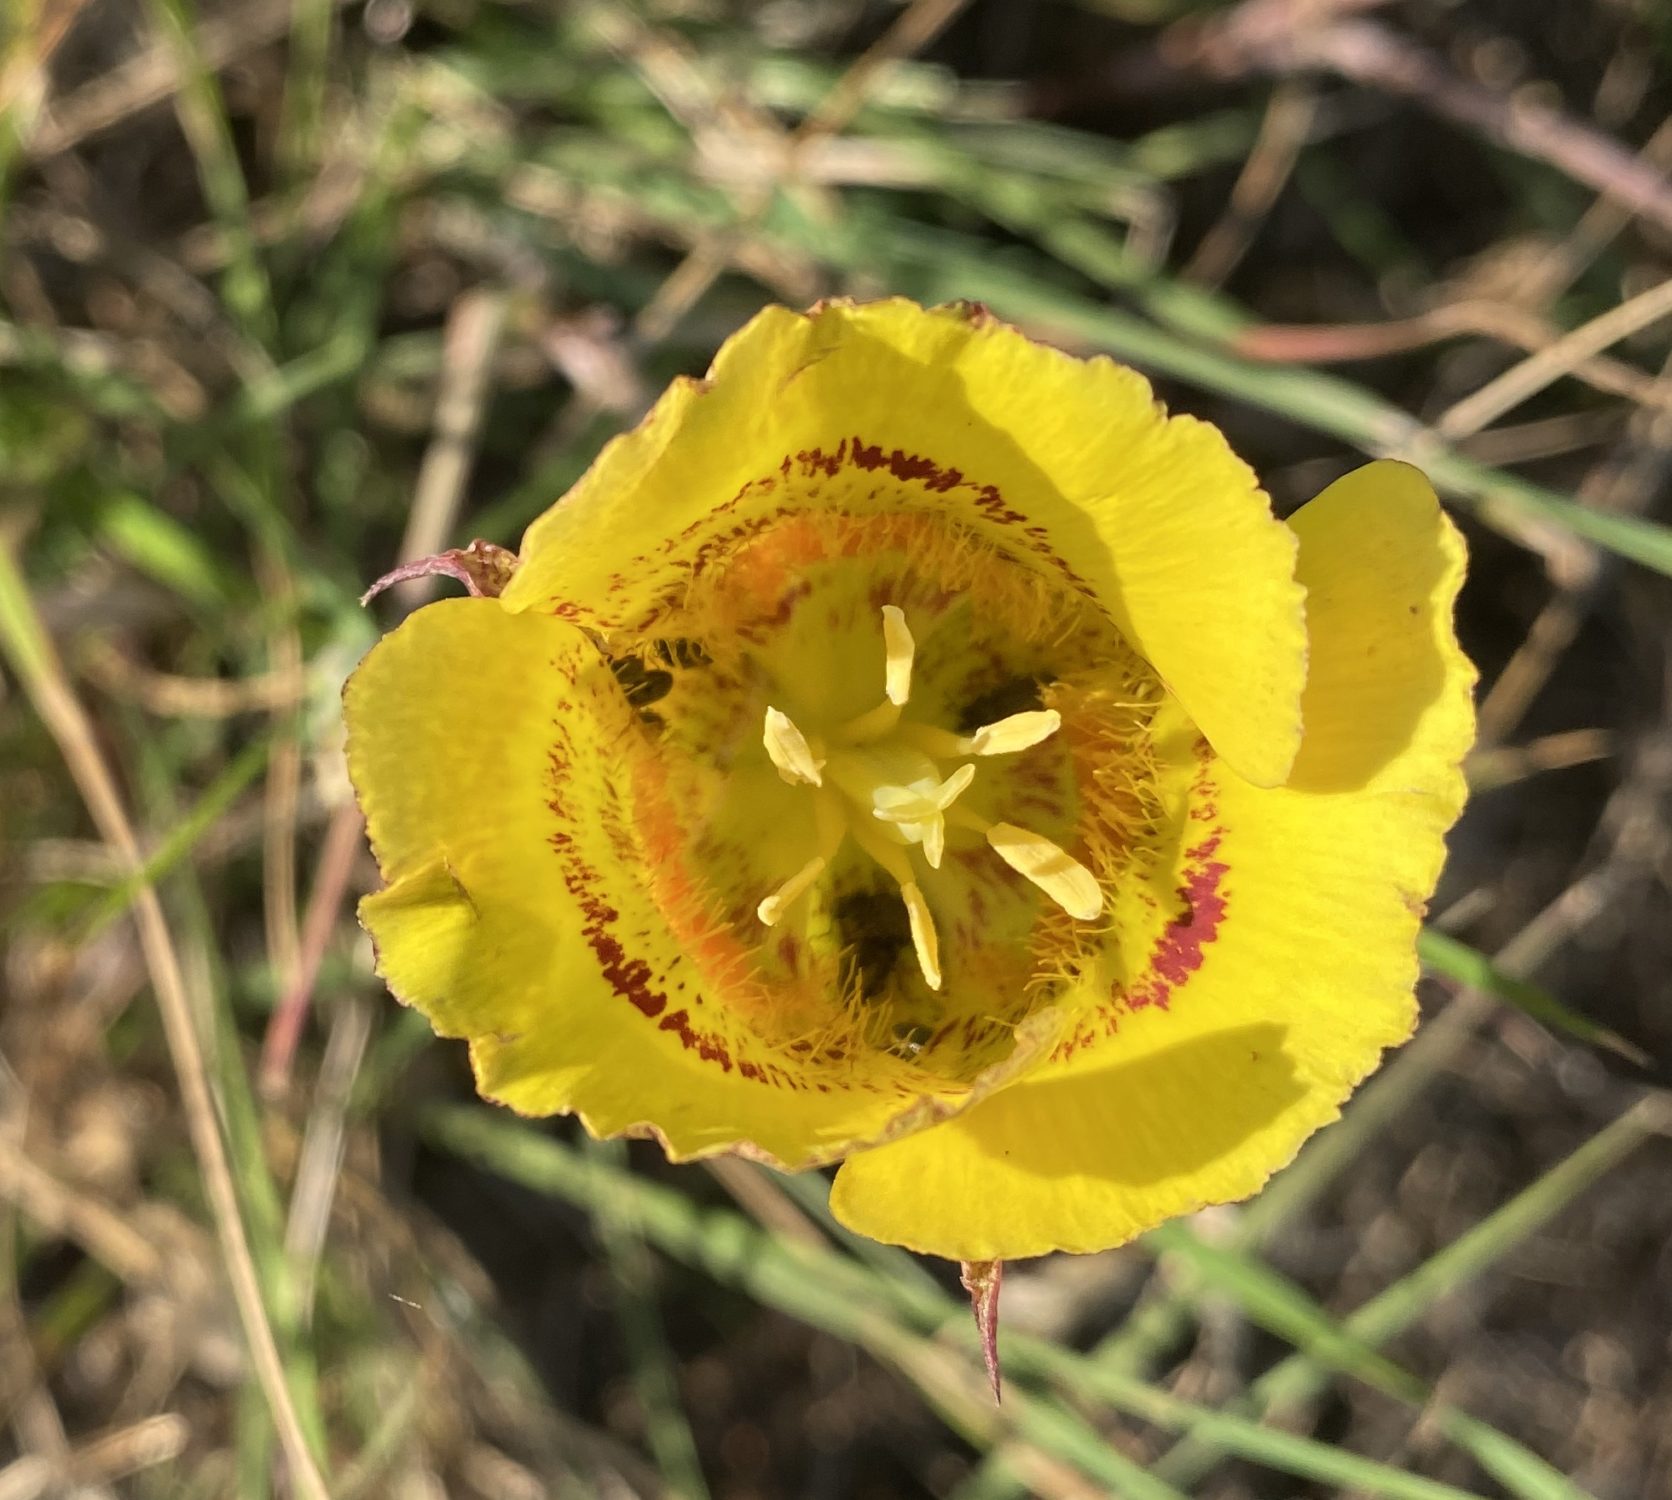
Yellow Mariposa Lily (Calochortus luteus)

Another member of the Calochortus genus, this California endemic flower is more widespread than C. uniflorus, but can still require a bit of a hunt. Conveniently, this species pops-up right near the gate to Mima Meadow. Turn right on the first trail you see and make sure you don’t discount every bright, big flower as a poppy!

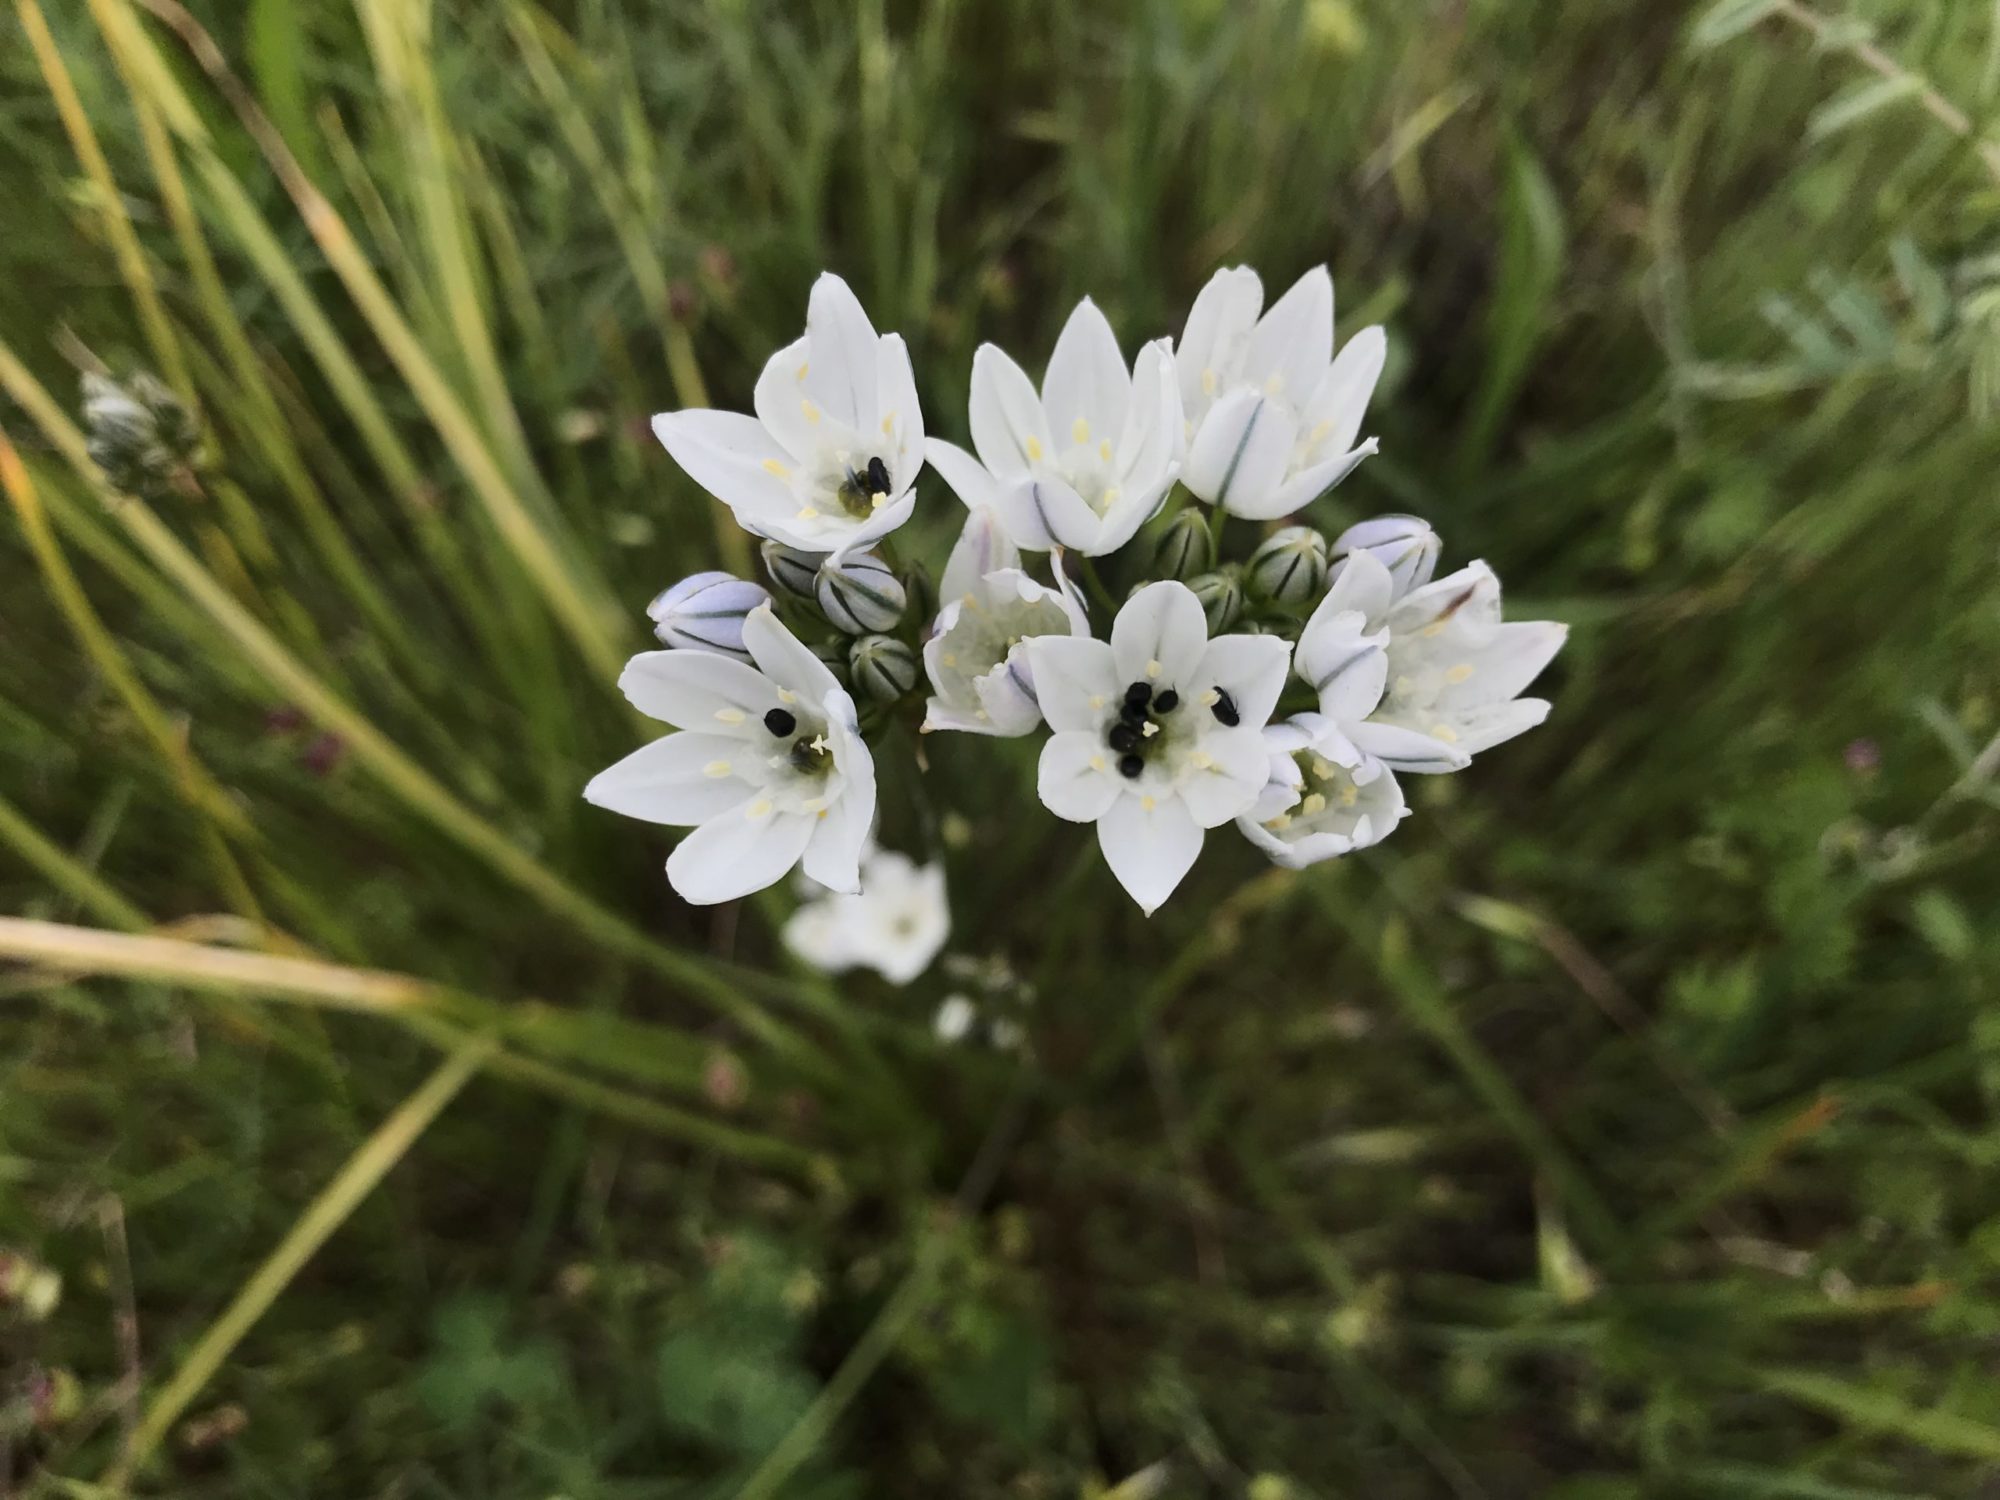
White Brodiaea (Triteleia hyacinthina)

Also known as fool’s onion, this plant has an edible bulb, though it lacks the familiar onion smell.

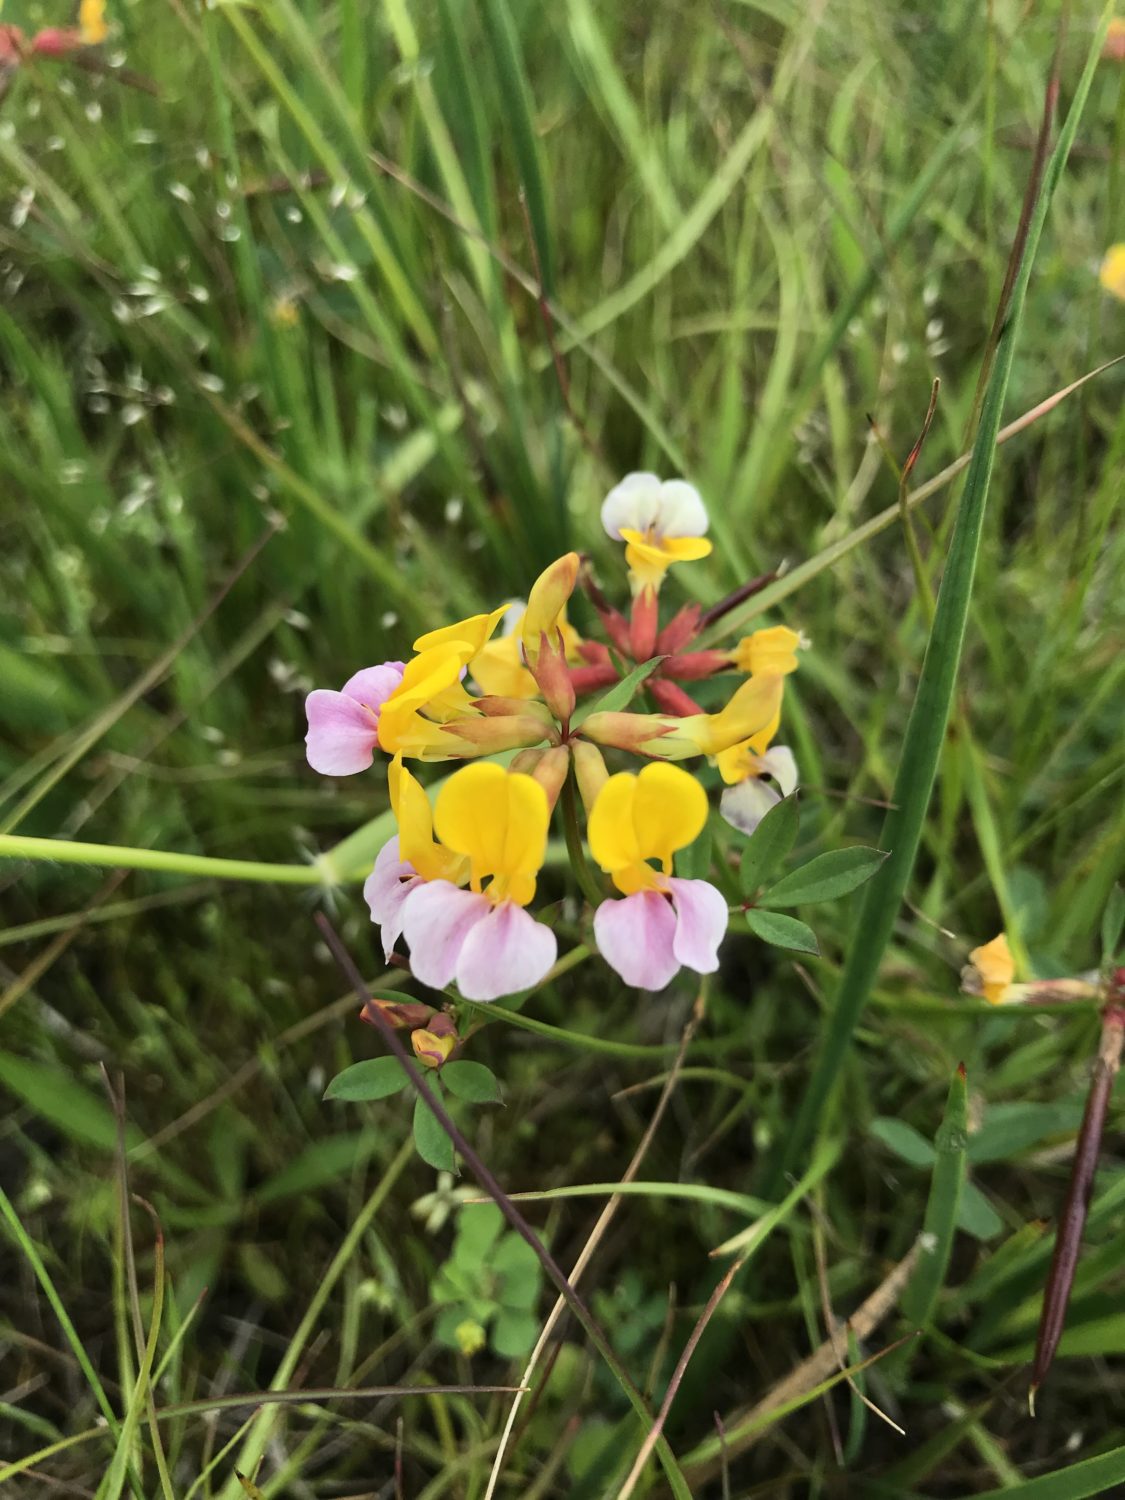
Harlequin Lotus (Hosackia gracilis)

This rare plant belongs to the pea family and is unlike any plant you’re likely to find with its mix of sherbet colors. It’s thought to be a larval food plant of the Federally Endangered lotis blue butterfly (Lycaeides argyrognomon lotis).

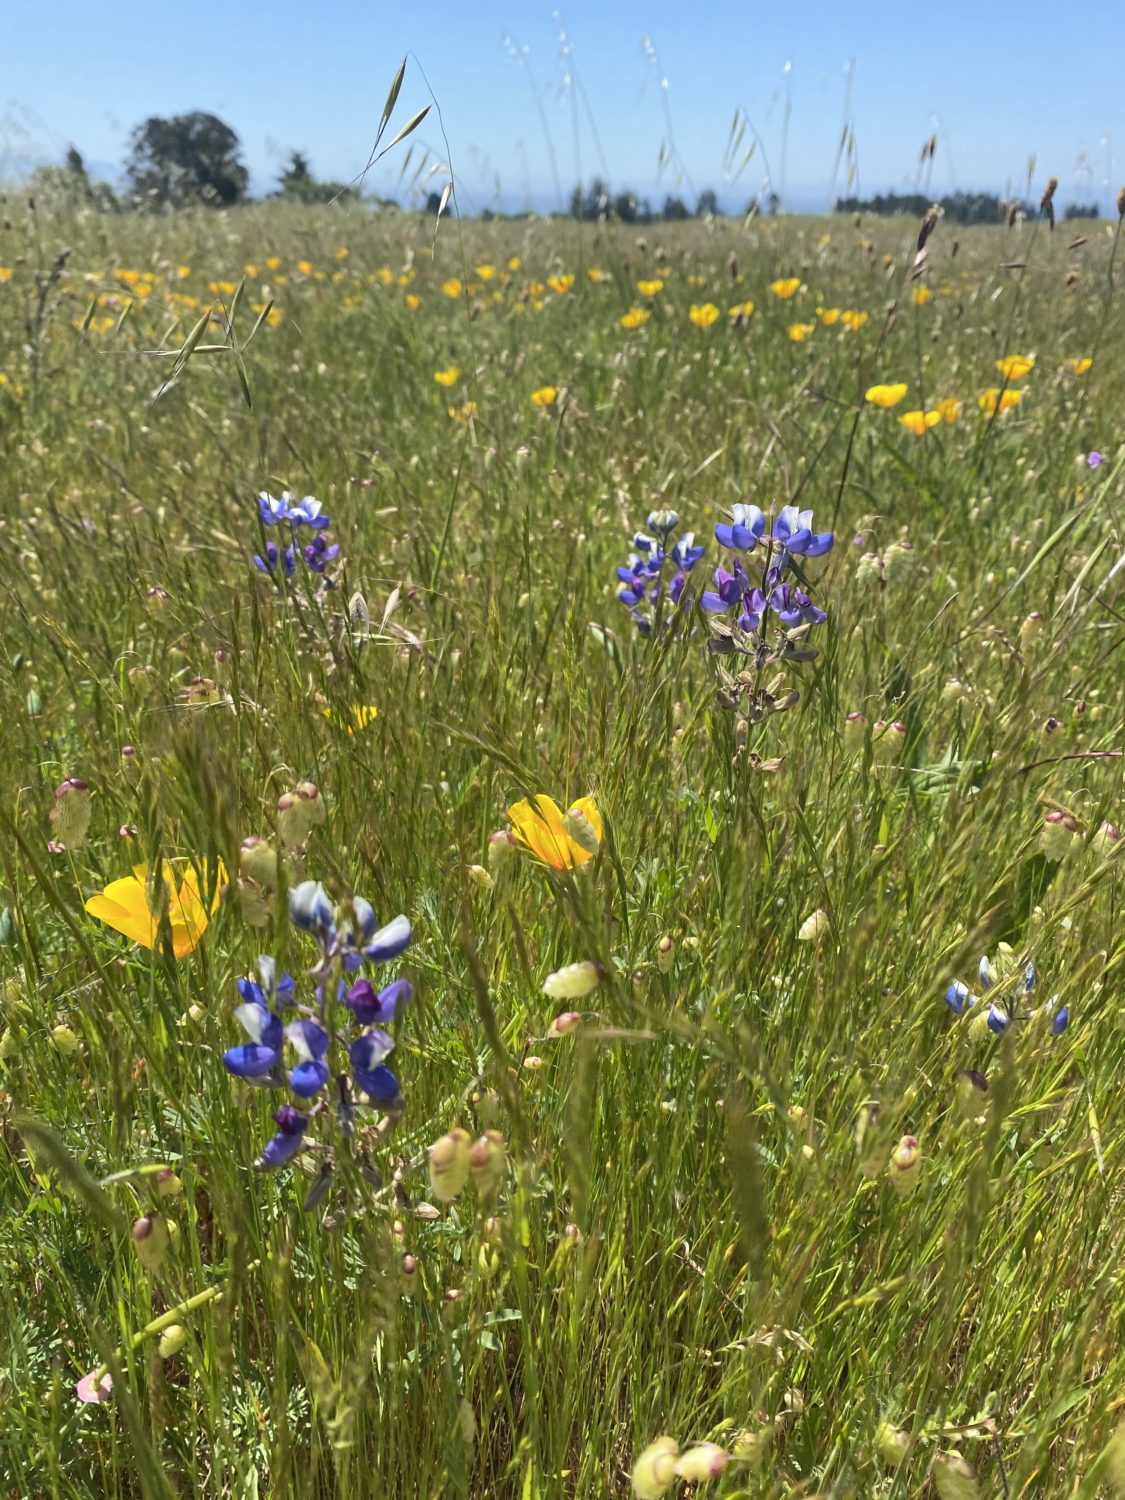
Sky Lupine (Lupinus nanus)

Our region hosts many types of lupines and they can be challenging to tell apart. Even when not in bloom you can identify a lupine by its palmate leaves (five fingered like a hand).

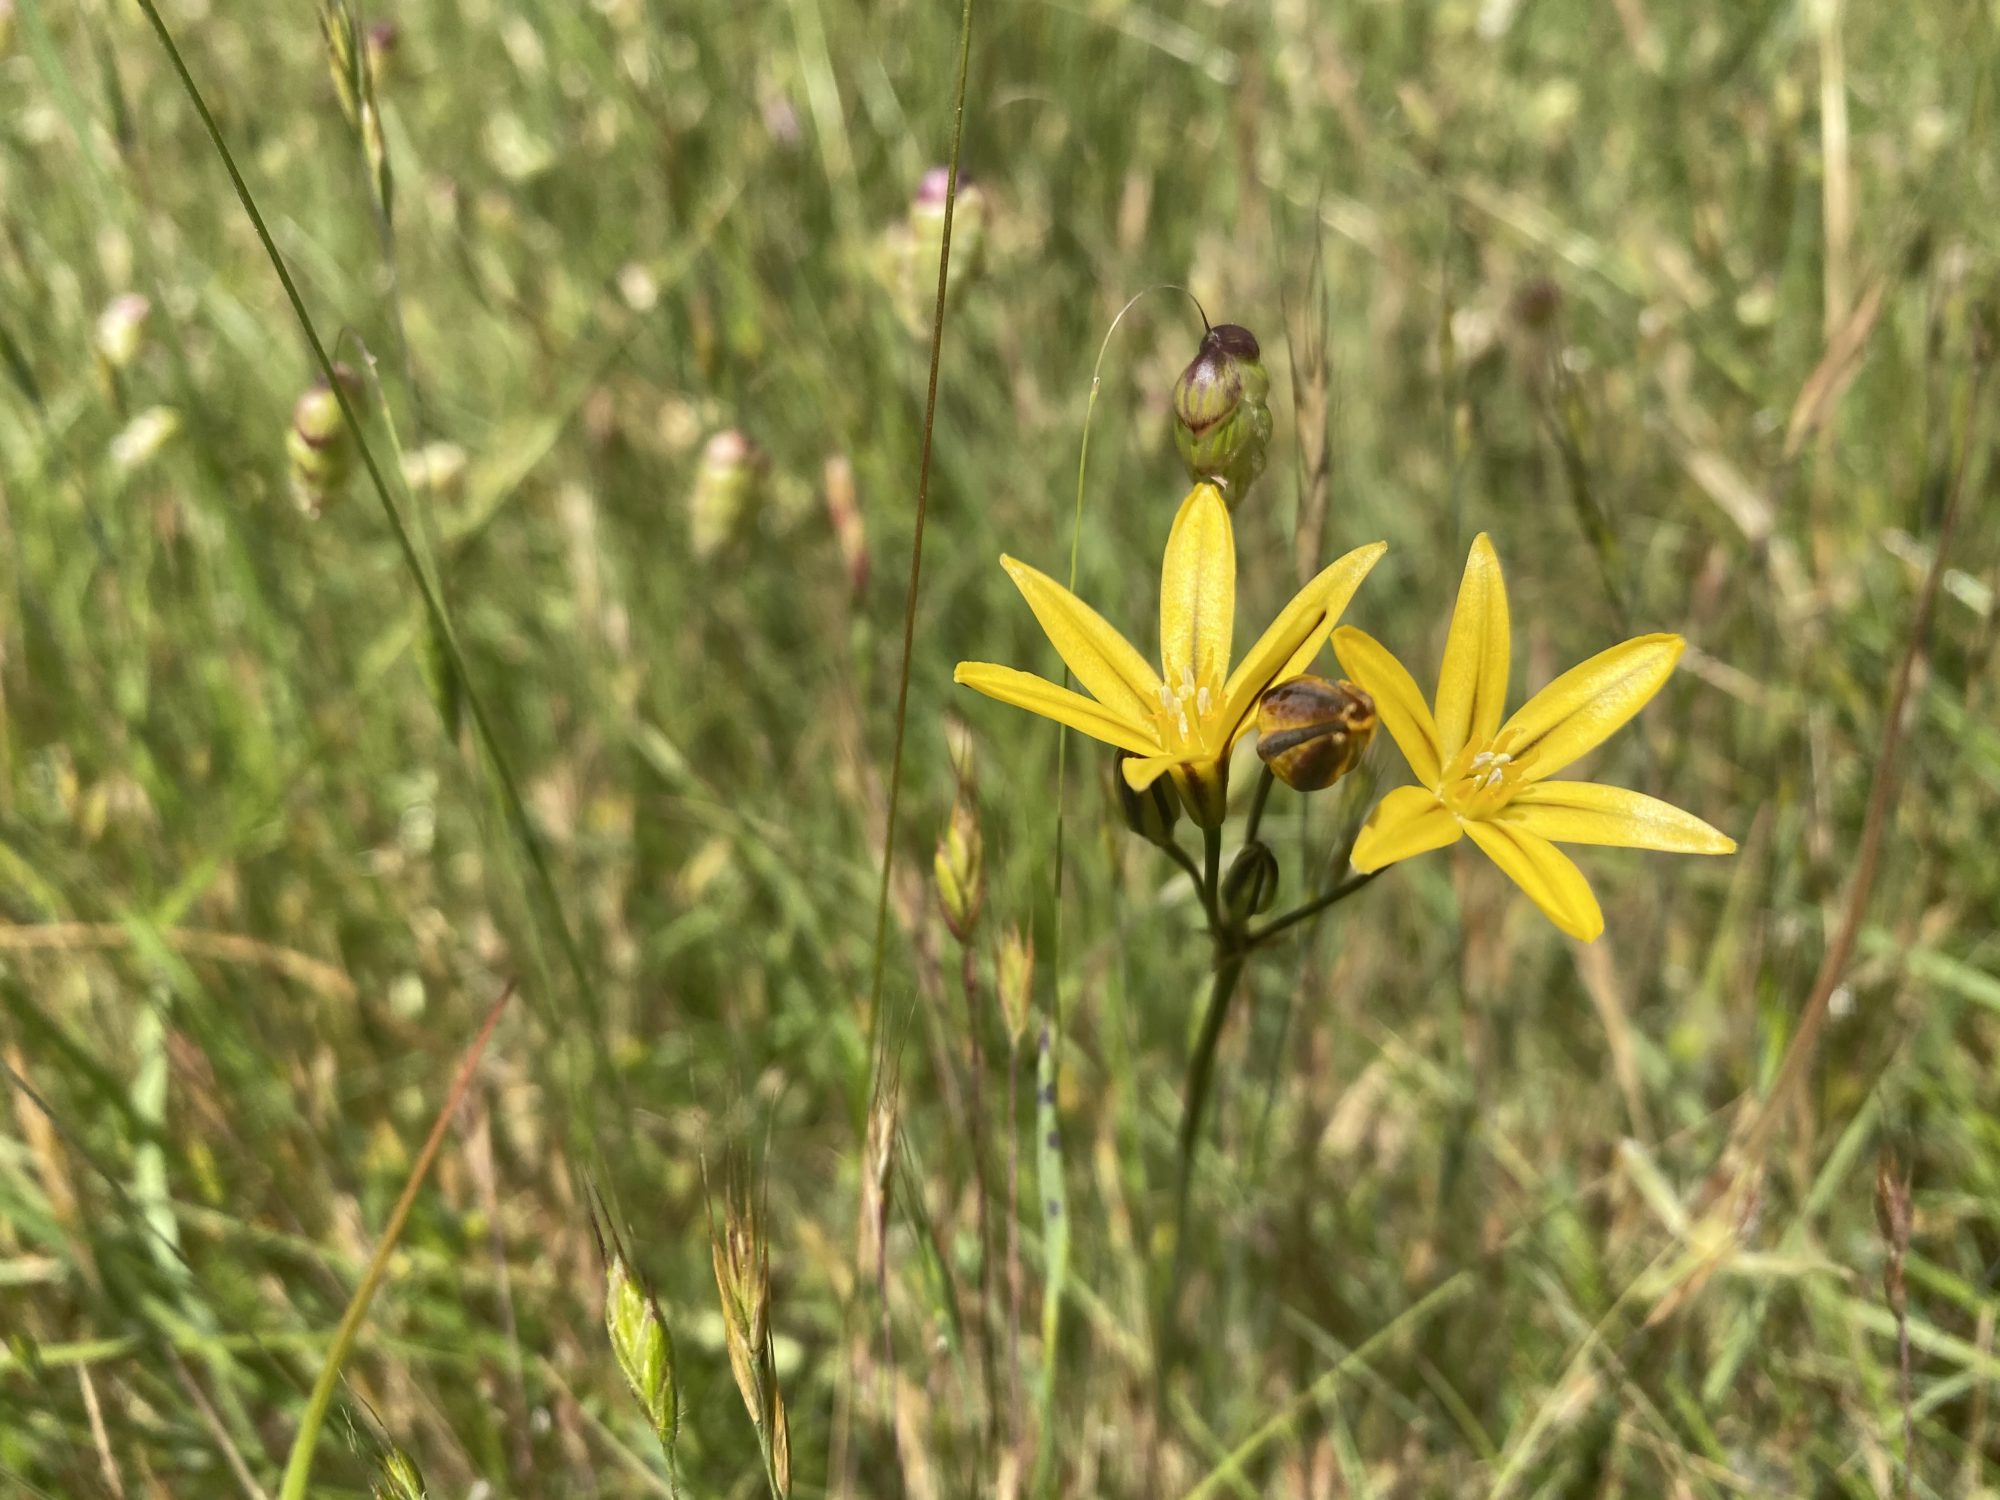
Golden Brodiaea (Triteleia ixioides subsp. ixioides)

This cheerful yellow flower is in the same genus as the white broadiaea and also grows from a bulb.


BONNY “DOOM” | Strenuous

The Bonny Doon Ecological Reserve is a spectacular location for exploring nature. An example of the rare Santa Cruz sandhills habitat, the soil is comprised of ancient seabed deposits and is very nutrient poor. For that reason, highly specialized plants grow here and nowhere else. It also burned partially in the CZU Lightning Complex fires, as well as during the Martin Fire of 2008.

Getting There

All Trails Route | Distance 24.85 mi | Elevation Gain 2,612 ft
From Mima Meadow, continue on Empire Grade. Turn left onto Smith Grade. You’ll meander through parts of the CZU Lightning Complex Burn Zone before reaching Bonny Doon Rd. Turn right and continue onto Pine Flat Rd. before taking a slight right onto Martin Rd. You’ll know you’re getting close when the habitat changes drastically, the sky opening up above you. Bike locking is a challenge, but you also don’t want to bring your bike along these trails.

When you’re done, double back down Bonny Doon Road to Highway 1 and take that back to the Coastal Science Campus for a relaxing view.

Ben Lomond Spineflower (Chorizanthe pungens var. hartwegiana)

You really have to see this flower in person to understand just how tiny it is. This rare member of the buckwheat family is found only in our local Santa Cruz sandhills habitat. You don’t have to travel far along the trail to find dense mats of this flower when in bloom.

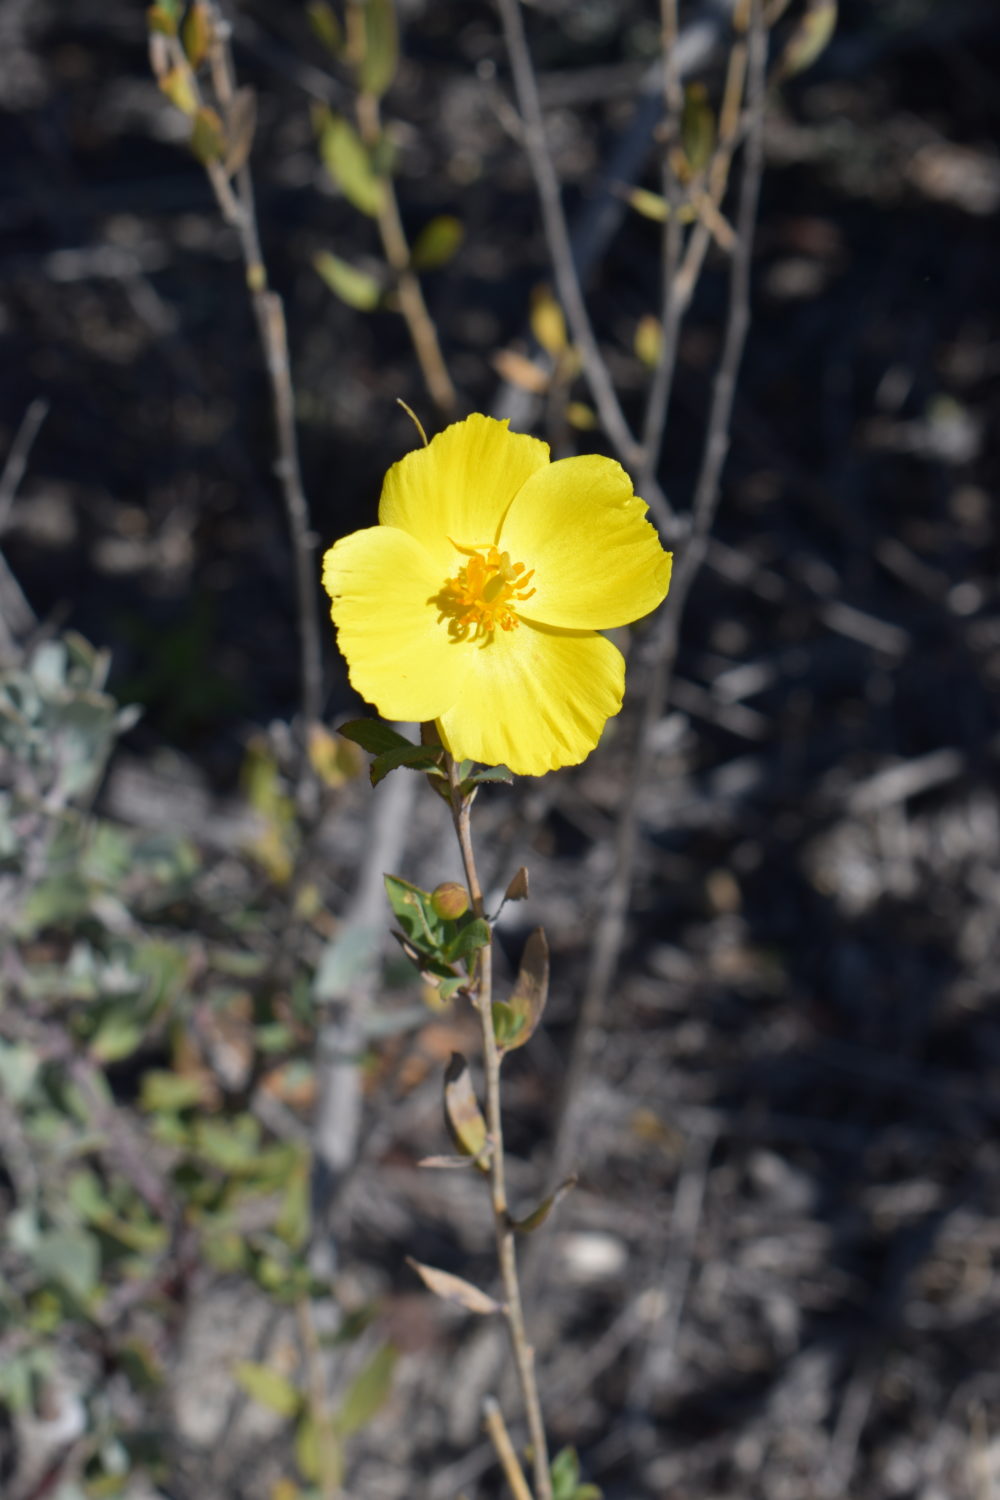
Bush Poppy (Dendromecon rigida)

This shrub offers a pop of color to the Reserve when in bloom and can reach many feet high.

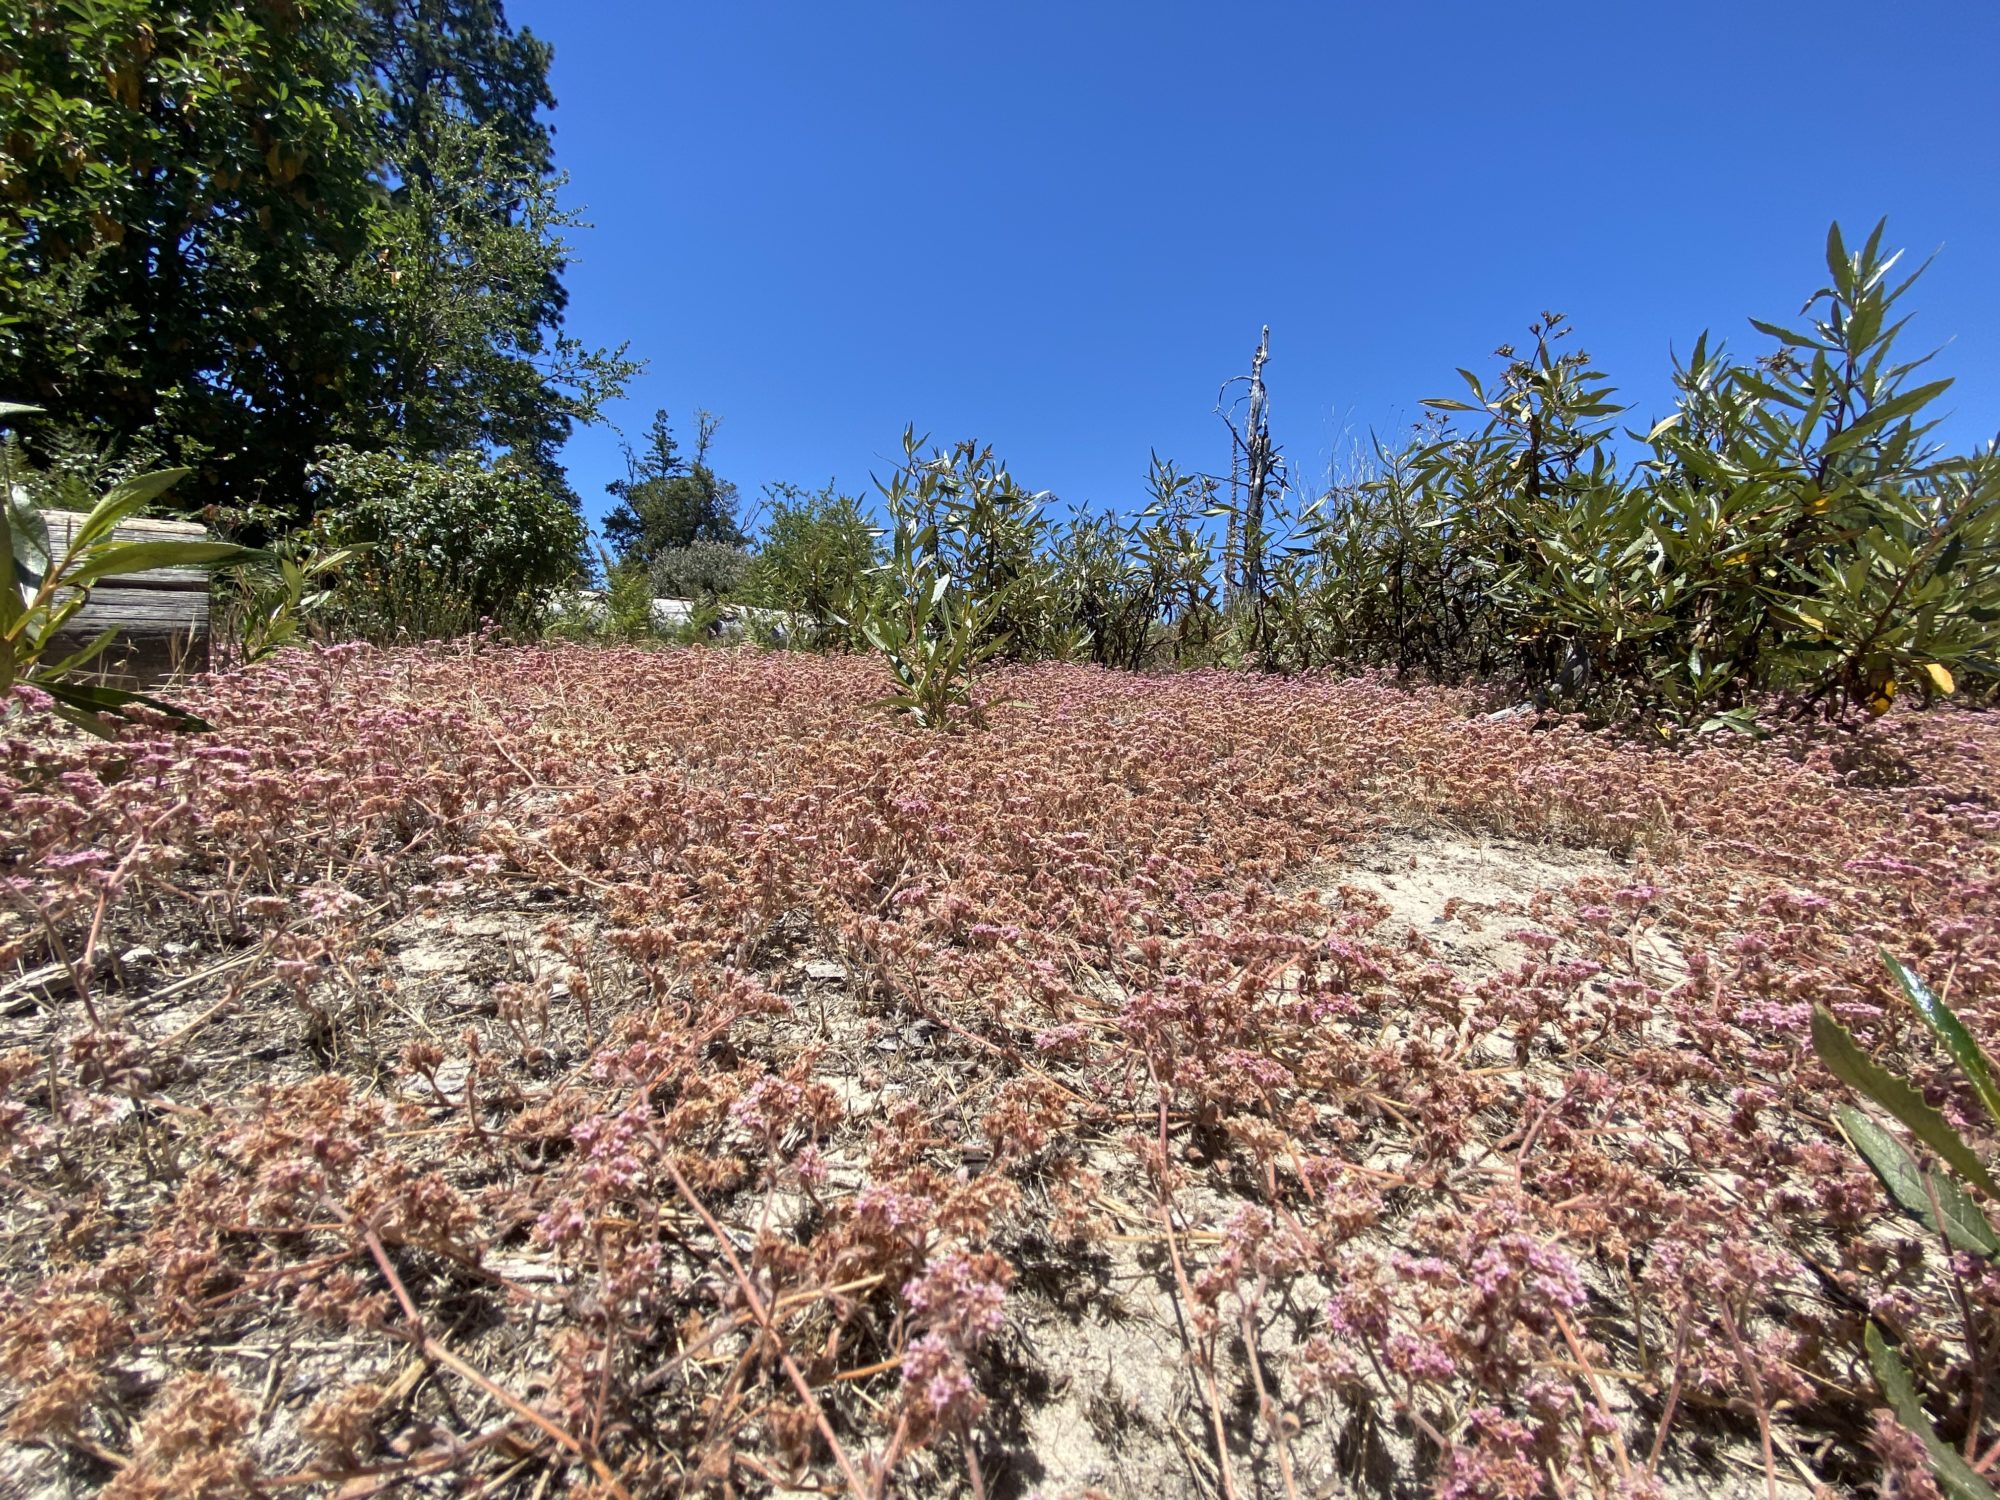
Ben Lomond Buckwheat (Eriogonum nudum var. decurrens)

Belonging to the same family as the spineflower, this variety of naked buckwheat is also rare and endemic to the Santa Cruz sandhills. Its leaves form dense basal rosettes and the tiny flowers sit atop long spindly stems.


WILDERIN’ OUT | Mountain Biking

For those who prefer dirt to pavement, there’s great wildflower peeping along the trails of Wilder Ranch State Park. There’s not a bad trail for finding flowers, but this simple route takes you straight up towards the top of the park, passing through some of the best coastal prairie grasslands in the County. On the way back you’ll pass through redwood forest and woodland habitats.
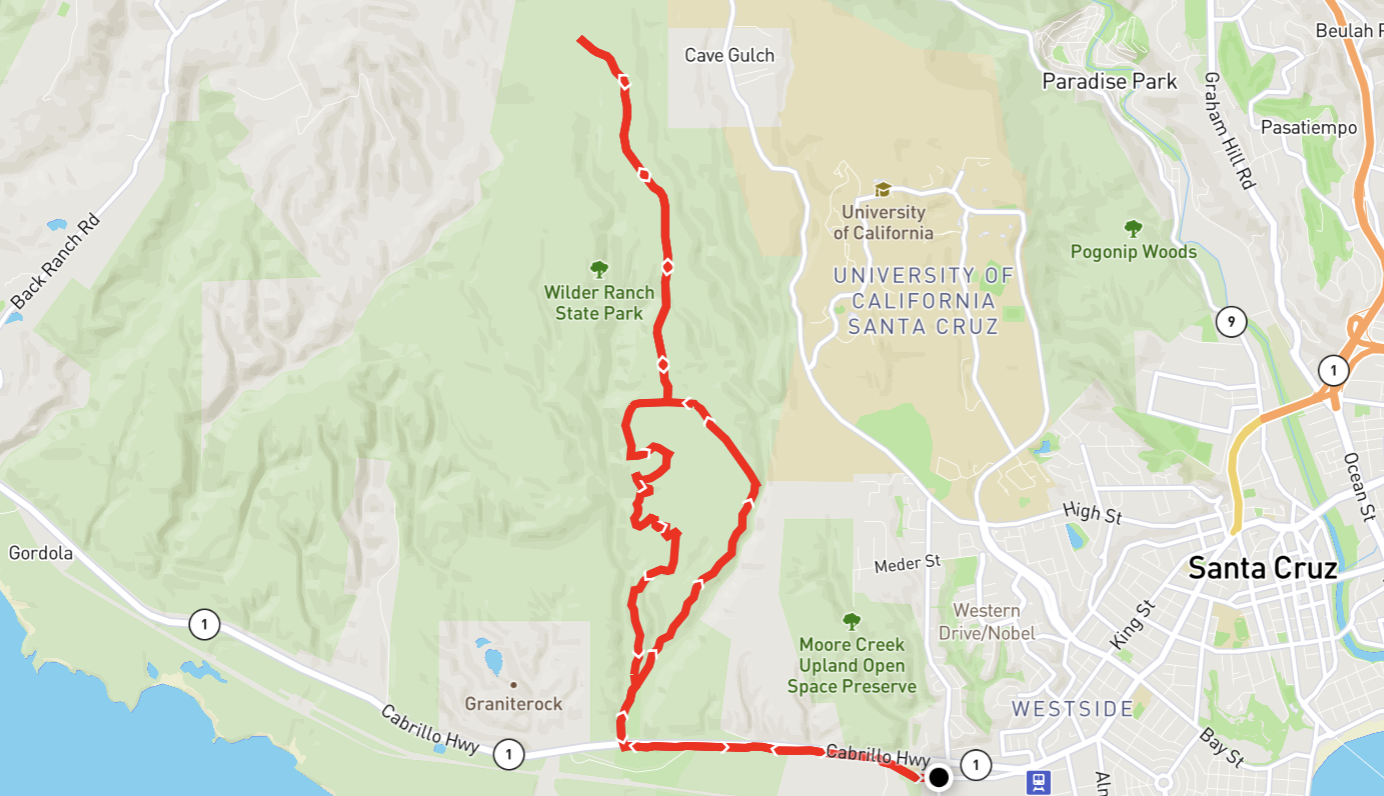
Getting There

All Trails Route | Distance 11.75 mi | Elevation Gain 1,286 ft
This route takes you along the coastal bike path past invasive plants like wild radish, marigold, acacia, and french broom. When you get to the end of the trail, turn right and head up! You’ll take Engelman’s Loop to Long Meadow Trail, then double back and take the Wild Boar Trail for a change of scene and some fun twists and turns.

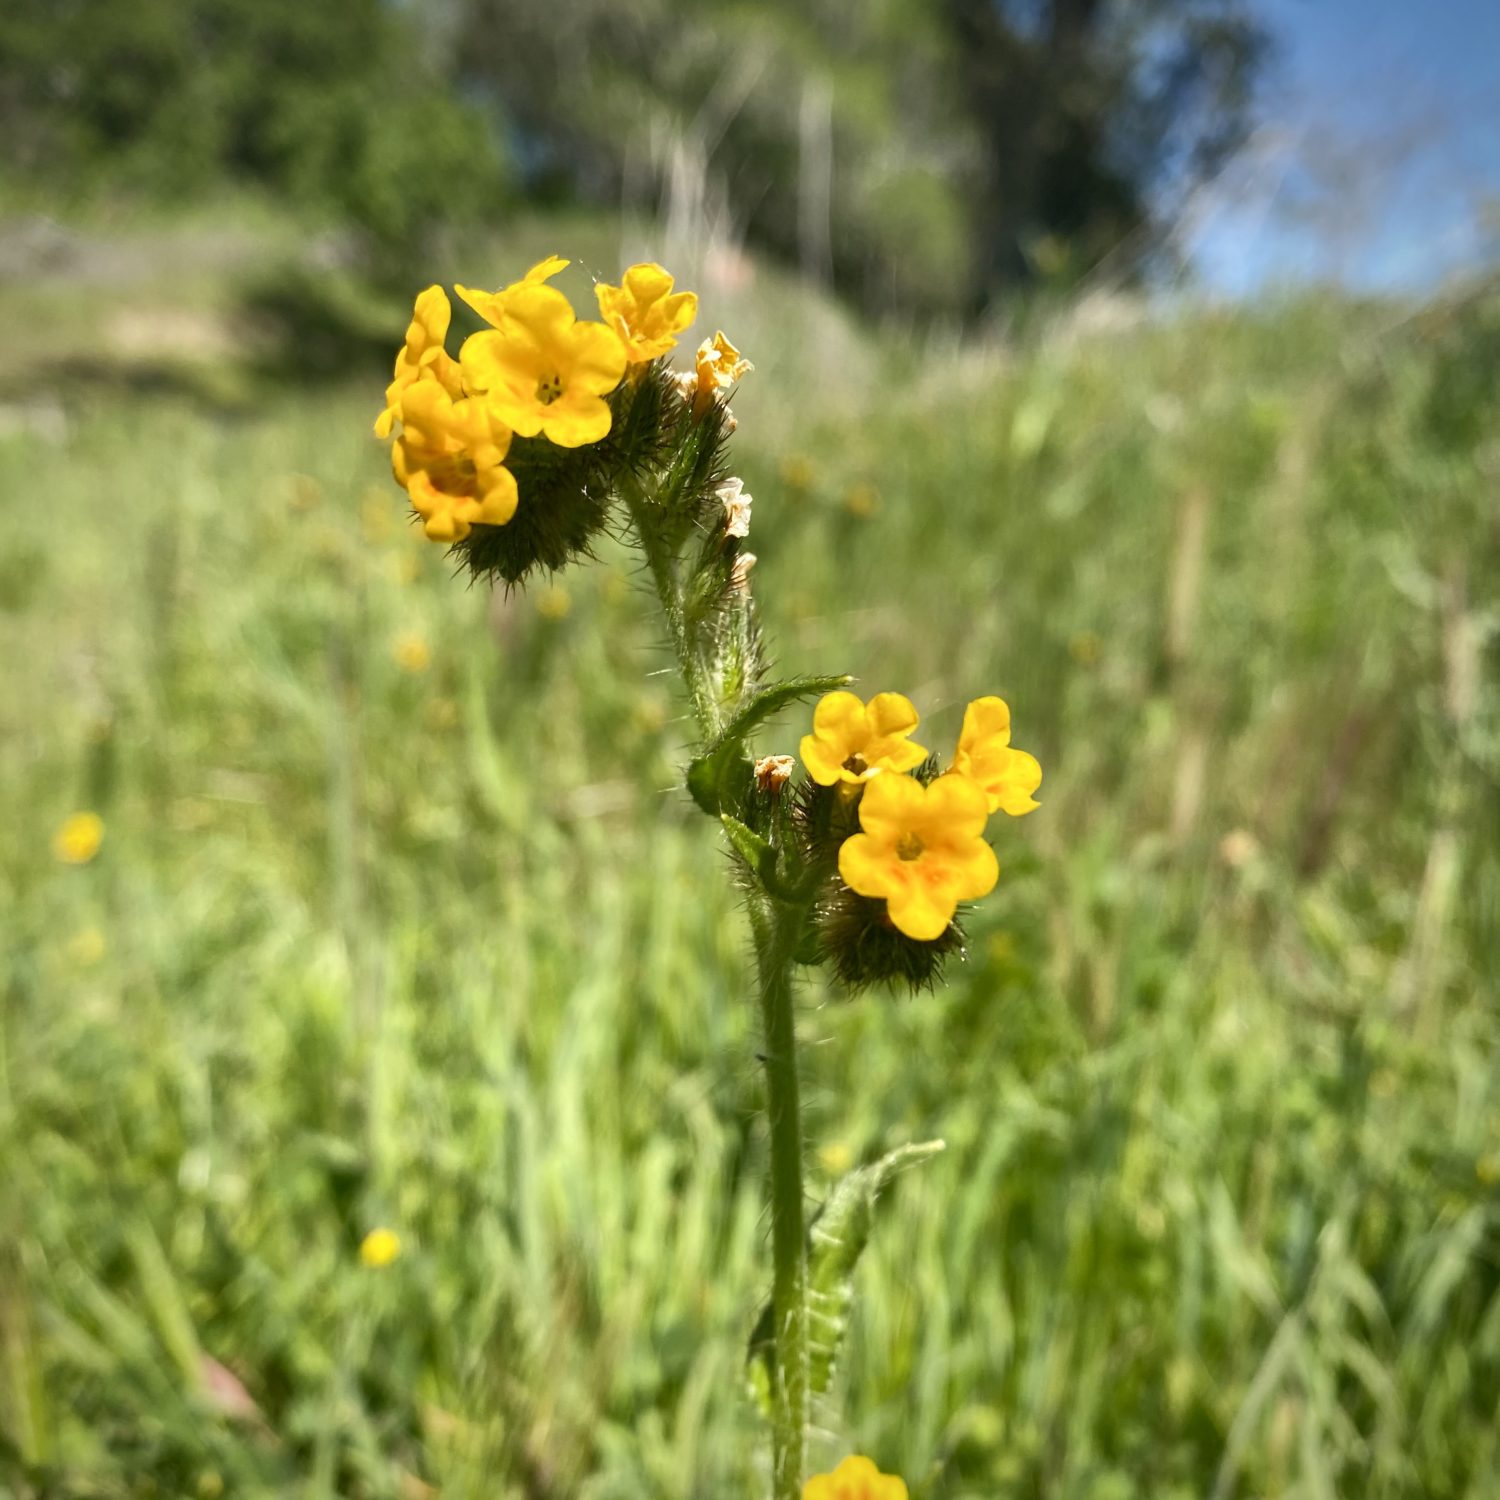
Common Fiddleneck (Amsinckia menziesii)

These early bloomers with their charmingly twisted tops will pop-up in droves. As the plant grows, the stem uncoils, and new flowers emerge, while the old flowers develop into seed pods along the lower part of the stem.

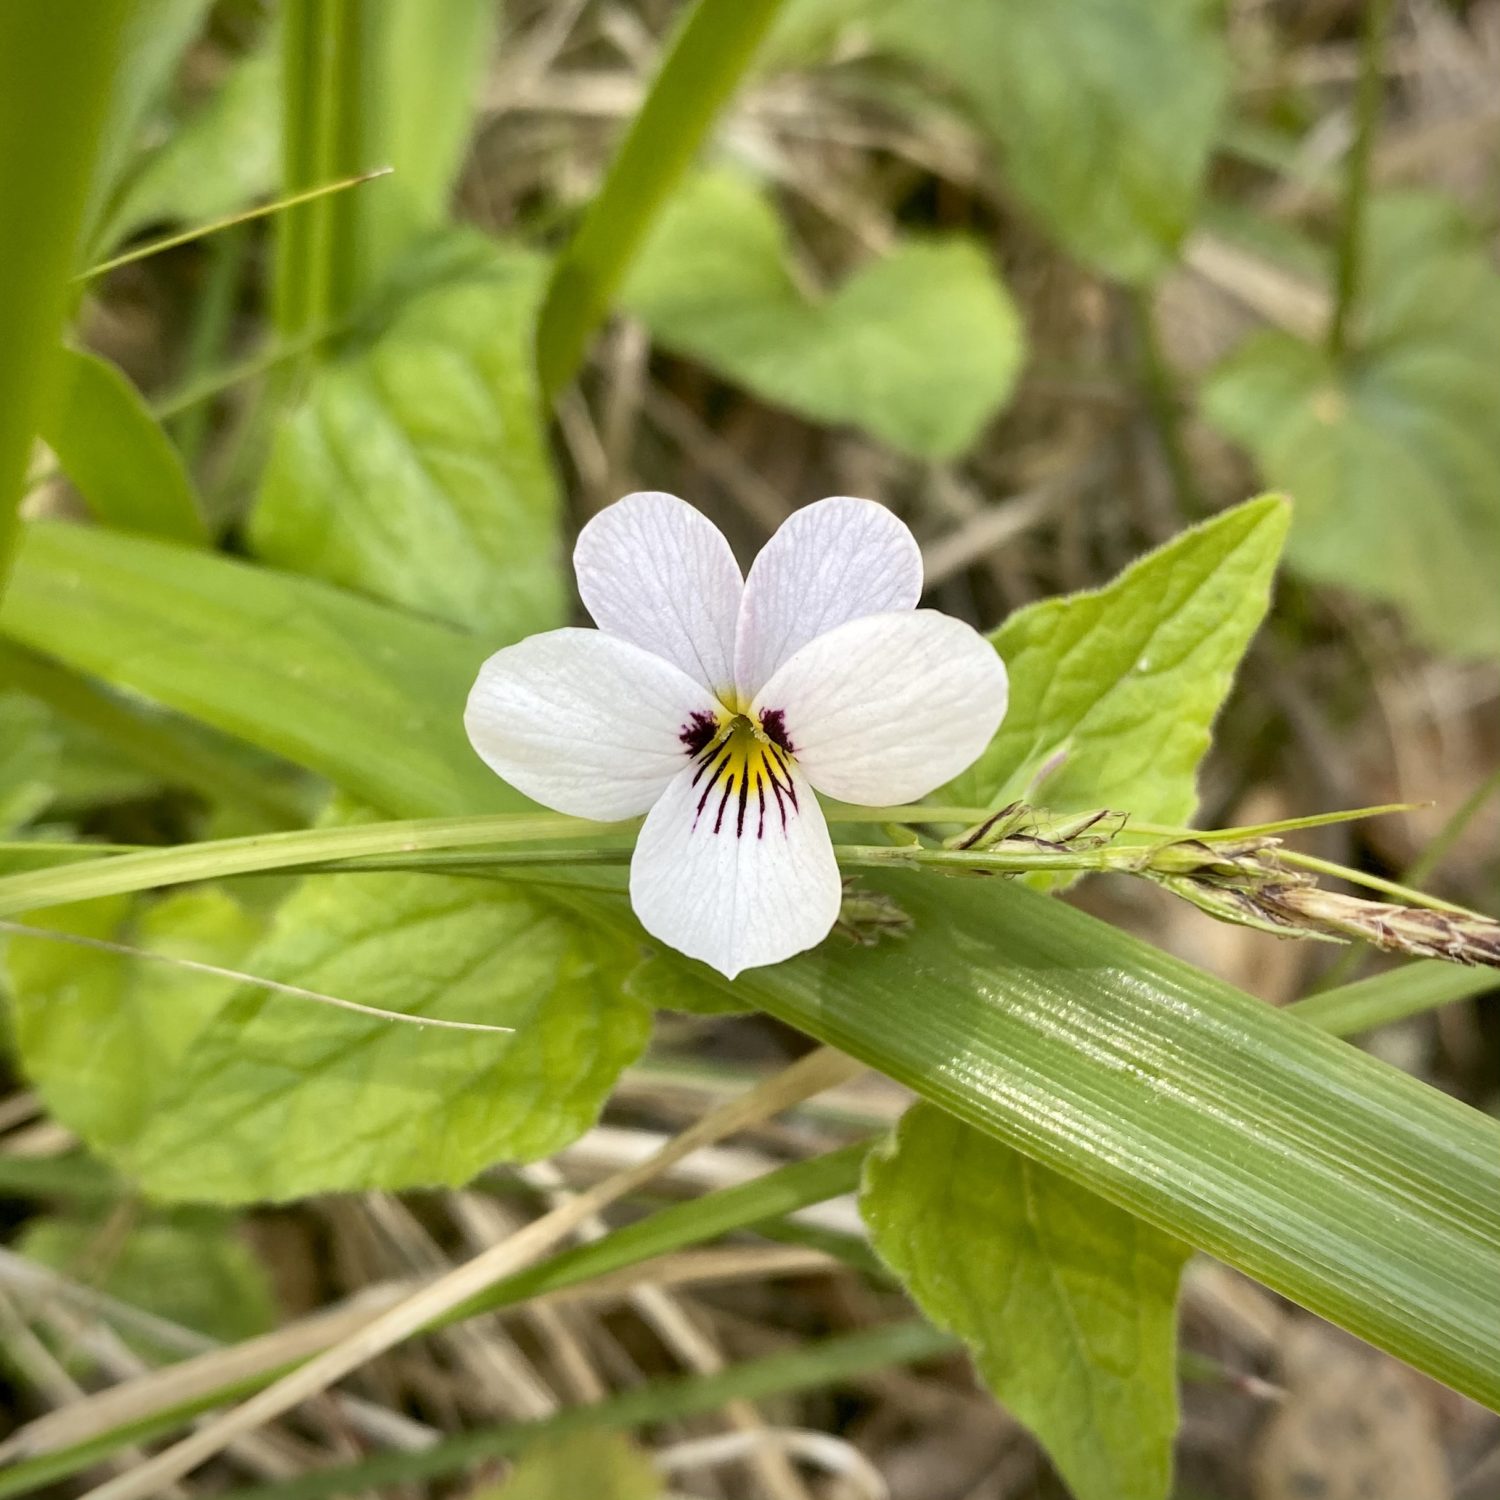
Western Heart’s Ease (Viola ocellata)

Wilder Ranch has a handful of native violets, ranging in colors from white to yellow. These are often found in the transitional zones from meadow to chaparral to redwood forest.

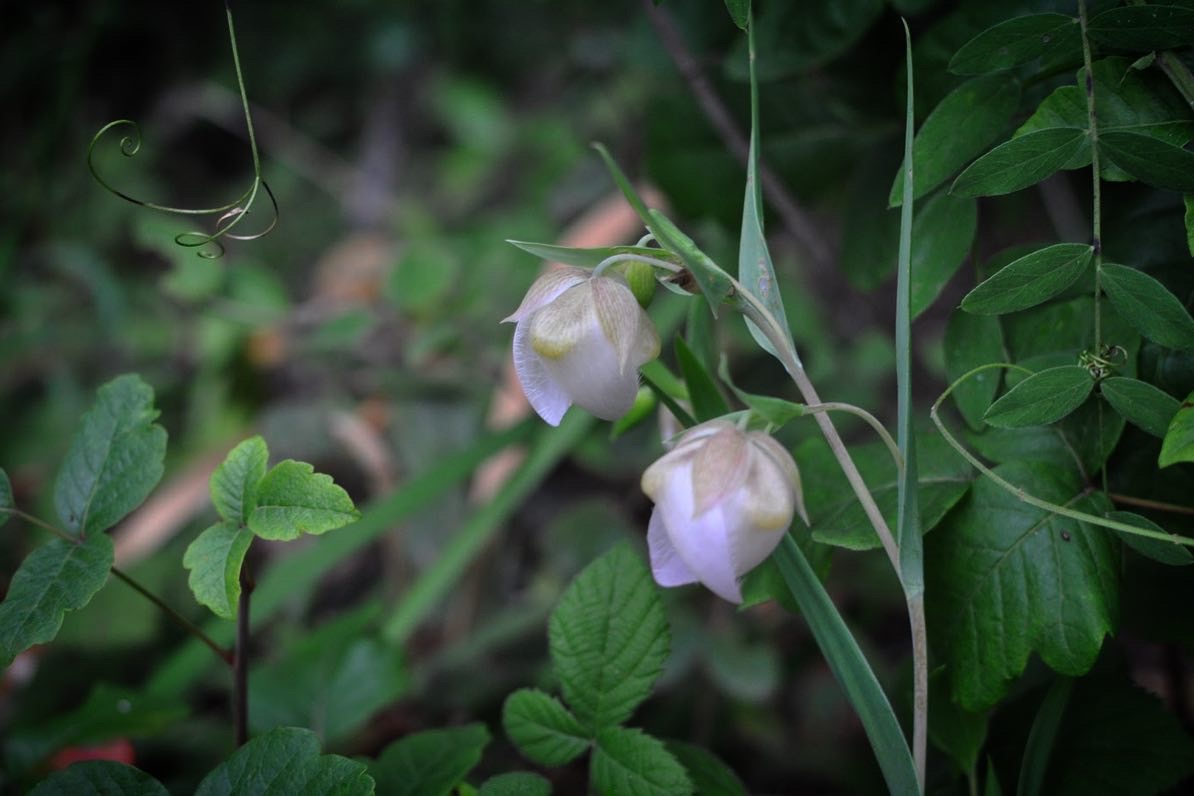
Fairy Lantern (Calochortus albus)

Another stunner from the genus Calochortus, this species has a different stature than C. uniflorus and C. luteus. Rather than a bowl shape, this species has flowers that drop like little lanterns. Find it on the edges of grassland and woodland habitats.

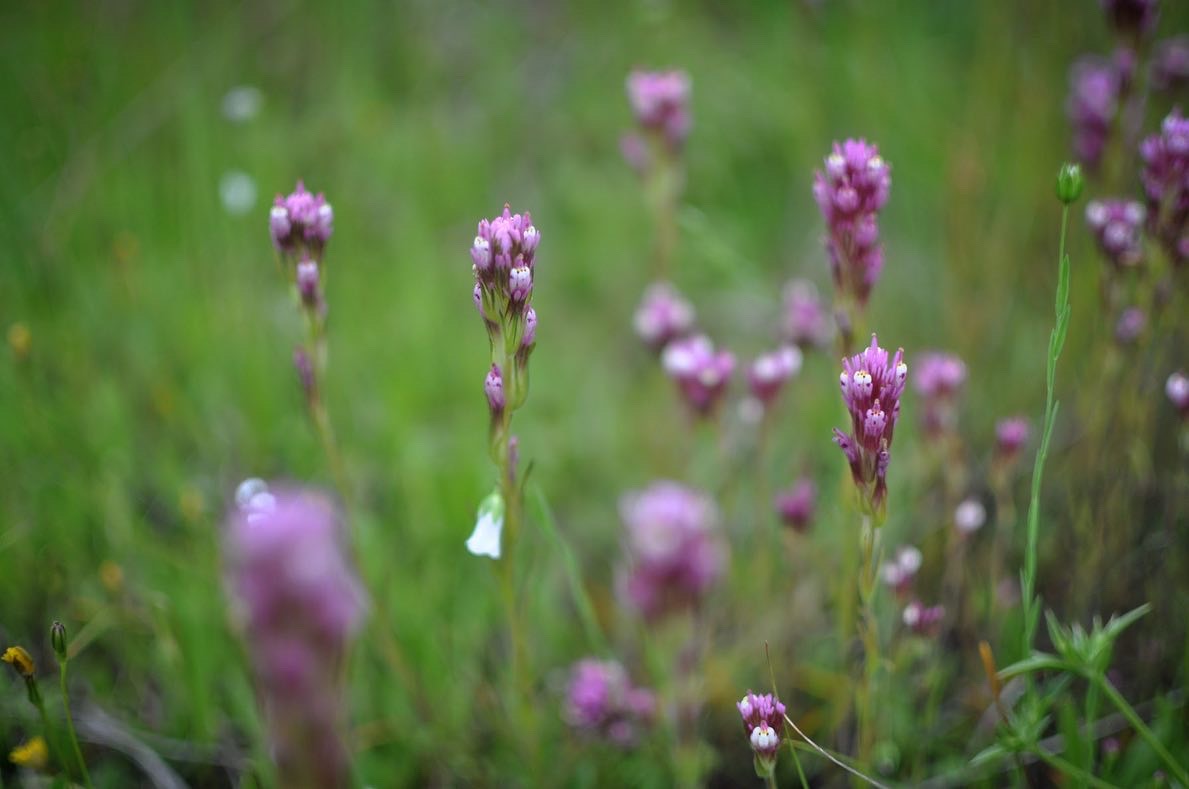
Purple Owl’s Clover (Castilleja exserta)

This species belongs to the genus Castilleja, which includes Indian paintbrushes. Like other related plants in the family, this is a hemiparasite which derives some of its nutrients directly from the roots of other plants.

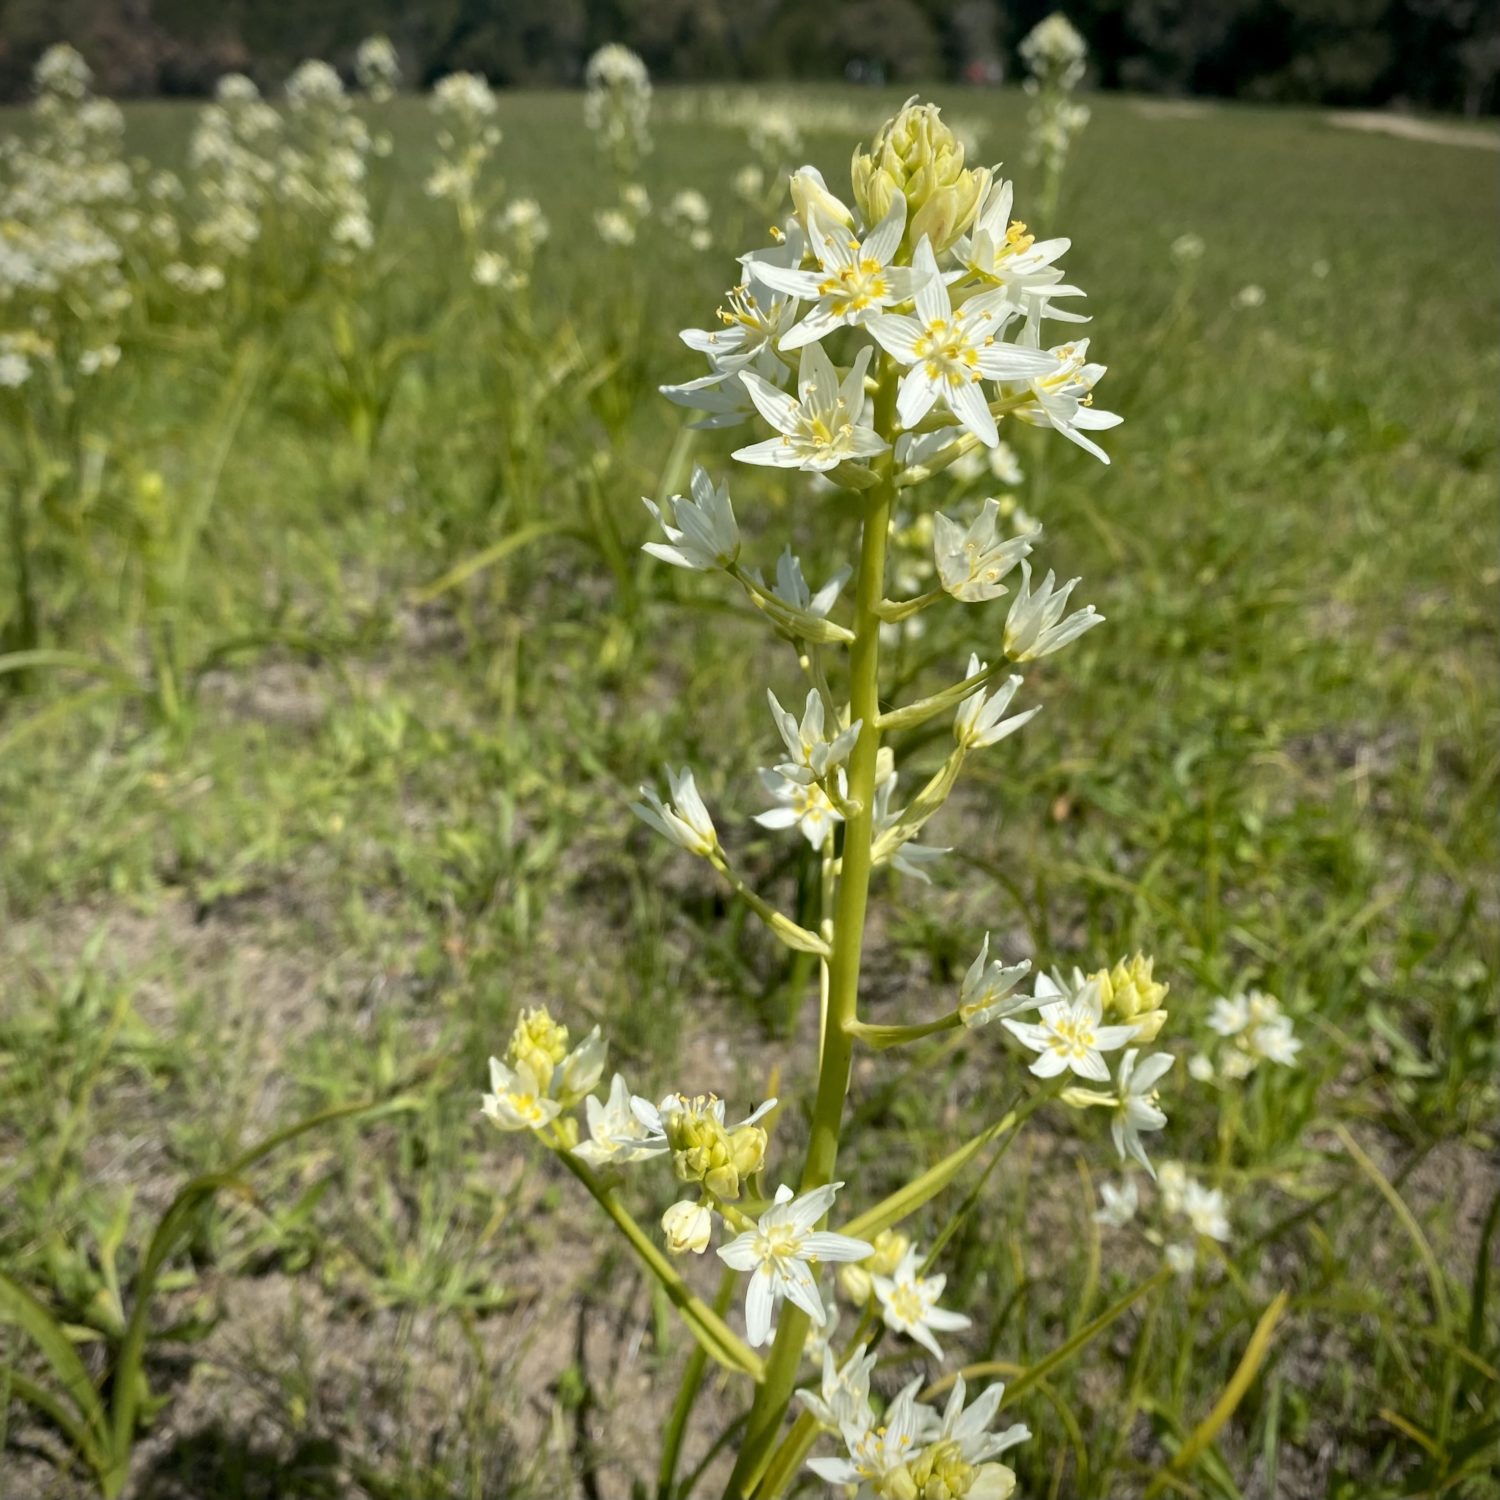
Fremont’s Deathcamas (Toxicoscordion fremontii)

This perennial plant grows back year after year from bulbs underground. It’s referred to as deathcamas because all parts of the plant contain a toxic alkaloid that some consider more potent than strychnine. 


There are so many more wildflowers to see in Santa Cruz than are included here. If you find something you don’t recognize, consider taking its picture and uploading it to iNaturalist. The app will suggest potential species and your observations will be recorded as biodiversity data, helping us better understand our natural world.

Mural of an Ohlone village by artist Ann Thiermann

These routes traverse the traditional and unceded territories of the Awaswas-speaking Uypi and Cotoni tribes. Today these lands are stewarded by the Amah Mutsun Tribal Band who are working hard to fulfill their obligation to Creator to care for and steward Mother Earth and all living things through relearning efforts and the Amah Mutsun Land Trust.

This guide was created in honor of Bike Month in partnership with Ecology Action. Learn more.

Rock Record: The Faults that Shape Santa Cruz

In this installation of Rock Record, we explore how faults shape Santa Cruz. First, a little about faults.

By Graham Edwards and Gavin Piccione (aka the Geology Gents)

Image: San Andreas Fault. Credit: Kate Borton, David Howell, and Joe Vigil.

Faults are flat fracture surfaces within rock where portions of the rock move past each other. These features are some of the most prominent ways geologic processes shape the surface of the Earth. Motion along faults is responsible for the creation of most of the Earth’s mountains and valleys; faults significantly impact how and where rocks are eroded; and motion across faults causes earthquakes. In California, the most iconic fault is the continent-scale San Andreas Fault, but faults in this area occur at a wide range of sizes and often create familiar landscape features.

The Creation of the Santa Cruz Mountains

Faults of the Bay Area. Credit: UC Berkeley Seismology Lab.

Plate tectonics drive fault motion, creating large fracture surfaces in the Earth’s crust as the plates move apart, alongside, or crash into each other. Along the San Andreas, this plate motion is primarily horizontal (side-to-side), as the Pacific plate moves North and the North American plate moves South.

Major faults like the San Andreas are not actually one single fault, and instead make up fault zones, or networks of parallel faults that take up portions of the overall motion. Regional scale plate motion, like that responsible for the San Andreas, is often taken up by branching fault networks, instead of by one single fault zone. In the San Francisco Bay Area, the North-South motion of the Pacific and North American plate is taken up by four major faults: San Andreas, San Gregorio, Hayward, and Calaveras (right).

A careful look at the trace of the main San Andreas Fault reveals that this fault is not perfectly straight, but rather curves and wiggles a little bit. This complicates the motion of the fault. It is easy to slide two flat blocks past one another, but if you add bumps to these blocks, they are much harder to move. This is because when these bumps run into each other, they catch on one another. When these bumps are small (like sandpaper) it makes the fault hard to move. When these bumps are large, like the bend of the San Andreas Fault just north of Santa Cruz, the landscape in that bend can get squeezed together or pulled apart. Given the left-to-right motion of the San Andreas, the bend North of Santa Cruz squeezes the landscape together, thickening the crust and pushing the Earth upward to form the Santa Cruz Mountains.

The Faults in our Backyard

The Ben Lomond fault is the largest fault running through Santa Cruz, starting offshore in the Monterey Bay and weaving its way up into the Santa Cruz Mountains. Geologists know this fault was last active over 85,000 years ago, since it cuts through the older Purisima Sandstone and Santa Margarita Sandstone but does not disrupt the younger marine terrace deposits. The Ben Lomond fault is responsible for the path of the San Lorenzo river, which took advantage of rock that was fractured and weakened by motion along the fault.

Geologists from UCSC mapped the fault through Santa Cruz in the 1980’s, and for this installation of Rock Record we tracked the areas where this fault is visible from West Cliff drive up through Felton.

West Cliff Outcrop

The Ben Lomond fault first outcrops (geologist jargon for becomes visible in rock) on West Cliff Dr. in Santa Cruz, at the end of Woodrow Avenue, just west of Mitchell’s Cove Beach. This outcrop is a subtle, tight notch in the cliff. When compared to other rocks along the sea cliff, the rocks in the Woodrow Ave. outcrop are much more fractured, which is a result of more intense rock deformation caused by motion along the fault. Note, the large, dark boulders along this section of the cliff were placed there to prevent erosion.


Escalona Dr. Outcrop

Because the Ben Lomond fault is younger than the marine rocks that make up most of Santa Cruz, evidence of its existence does not appear in many areas South of Felton. One exception is along Escalona Dr., where the fault creates a small notch in the north side of street on private property.


Fault Scarp on UCSC campus

While an outcrop of the Ben Lomond fault is not visible between Escalona Dr. and Felton, evidence of motion along the fault can be seen along Coolidge Dr. on the UCSC campus. On the west side of the road, there is a steep drop down into Pogonip park. This ledge, termed a fault scarp, was made by motion along the Ben Lomond fault, where the east side of the fault was push upwards and the west side downwards. 


Outcrop Along the San Lorenzo in Henry Cowell State Park

North of UCSC, the Ben Lomond fault runs parallel (and sometimes through) the San Lorenzo River. In Henry Cowell State park, just north of the “Garden of Eden” swimming hole, the Ben Lomond fault can be seen along the west bank of the river. While subtle, this outcrop has some of the tell-tale signs of fault activity. Similar to the West cliff outcrop, there is pronounced fracturing of the rock in this area. Additionally, topography on the west side of the river reaches a low-point, which geologists term a saddle, where the rocks are more eroded.

A Detour North: Año Nuevo Faults

While the faults around Santa Cruz can be subtle or hard to get to, you don’t need to travel far to see faults and evidence of their activity. Año Nuevo State Park lies on the land where the trace of the San Gregorio Fault strikes dry land again (south of here it follows the coast just offshore). The San Gregorio Fault continues on its right-ward progress, dragging the westward/seaward portions of Año Nuevo to the northwest. Looking down at Año Nuevo State Park from the air, you can see the work of the San Gregorio Fault plainly. Año Nuevo Creek, which drains out of the steep mountains here, passes right by the visitor center and creates a pleasant, sheltered beach where it meets the ocean. However, over geologic history, the last leg of Año Nuevo Creek kept getting pushed to the northwest. Eventually it got pushed so far out of the way of upper Año Nuevo Creek, that the creek abandoned the distant creek bed and found a new, more convenient route. Geologists call this streambed hopping avulsion. But the abandoned creek beds to the northwest of today’s creek show us that the San Gregorio Fault has been shifting everything to the right of their neighbors across the fault. 

With the benefit of this birds’ eye view, let’s look a little bit closer and see what’s going on at human-scale. If you go from the visitor center (Marine Education Center) down along the Steele and New Years Creek Trails, you will arrive at the southern edge of Cove Beach, where Año Nuevo Creek reaches the ocean. If you continue southeast a short distance you come across a beautiful fault slicing across the sea cliff (below). This small little fault is not the San Gregorio Fault, but actually related to the nearby Año Nuevo Creek Fault which slices up the valley the creek flows down. As faults damage the rocks they cut through, they weaken the rock there, making it easy prey for an erosive mountain stream to chew into.

First creek fault.

We can even do a little geologic sleuthing. The fault clearly slices through the ancient sandy beach deposits on the top of the cliff, so we know the fault must be younger than those. Those sandy deposits are less than 100,000 years old, so we know this fault has moved in the last 100,000 years.

Let’s return to the creek, and look southeast toward Santa Cruz. Here you can see two different rocks pressed together There are light-colored pebbly rocks that meet with the familiar brown sandstone of the Purisima Formation along a jagged, sloping line of contact. The zig-zags of the contact are old stream banks where the ancient creek chewed into the rocky bank. Those pebbly rocks above the old stream banks are ancient deposits of Año Nuevo Creek. This means that today the Creek is now eroding back into them! If we get up close to the rocks, we can even find a variety of rocks including some charcoal that came from ancient fires and was washed away with rainwater before getting caught up in these streambank deposits. 

Some of these chunks of charcoal have been dated using radiocarbon and give an age of around 10 thousand years old (unpublished data from this report). Since these deposits have 10,000 year old charcoal in them, they cannot be any older than 10,000 years. That is super young in geologic terms.

If we travel to the northwest toward Pescadero on Cove Beach we can follow these young creek deposits on the cliff and even see a few faults that cut through the rocks of the cliffs. As you come level with the “Pond” a few trees tower at the edge of the cliff. If you look closely here, you can see that the light pebbles fade into a messy zone of jumbled rock and eventually back into familiar Purisima sandstones. That messy zone of jumbled rock is none other than the Frijoles Fault. Since this fault slices through those 10,000 year old stream deposits, the fault must be younger than 10,000 years. Once again, in geologic terms, this is a young and active fault.

The sea cliffs along Cove Beach are a great place to do geologic detective work. Just remember that these sea cliffs are zones of active erosion and rockfalls may happen unexpectedly. When looking at rocky cliffs, always be careful, aware, and safe!


Rock Record is a monthly blog featuring musings on the mineral world from Gavin Piccione and Graham Edwards.

Graham Edwards and Gavin Piccione are PhD candidates in geochronology with the Department of Earth and Planetary Sciences at UC Santa Cruz. They also host our monthly Rockin’ Pop-Ups as “The Geology Gents”.

Rock Record: Guide to the Swift Street Outcrop

By Graham Edwards and Gavin Piccione (aka the Geology Gents)

Santa Cruz is an ideal place to explore marine and coastal geology, with millions of years worth of geologic history exposed along its sea cliffs. One of the Gent’s favorite outcrops in Santa Cruz is along the cliff face on West Cliff Drive, at the end of Swift Street.


Getting to the outcrop

Park at the end of Swift Street and cross West Cliff Drive. Take one of the paths through the ice plant and walk down onto the coastal platform. Be careful, in some areas the path down to the outcrop can be steep.

To find the Swift outcrop on a map, the latitude and longitude are:
36˚56’58.72” N
122˚02’49.22” W

Download our West Cliff Rock Walk guide to help you get there!


A guide to the rock formations

The Swift Street outcrop contains over 9 million years worth of geologic history of the coast of Santa Cruz. Familiar formations found at Swift Street include the Purisima sandstone and the Santa Cruz mudstone, along with younger beach deposits that make up the top layer of the outcrop (pictured right). Each of these layers are separated by sharp erosional contacts (geologists call these disconformities) that represent missing time and material in the rock record.

Watch our Rockin’ Pop-Up on Santa Cruz Formations.


Ancient Methane seeps within the Santa Cruz mudstone

The bulbous, light-colored features found at and near the Swift Street outcrop are the geologic remnants of methane seeps, also known as “cold seeps” (pictured below).

Bulbous fossilized “cold seeps” at the Swift Street outcrop.

These formed while the Santa Cruz Mudstone was still mud in deep waters off the coast of California between 7-9 million years ago. The rock accumulated as sediments, including the bodies of perished sea critters, fell to the sea floor. As the bodies of phytoplankton and other marine microorganisms decayed in this mud, they released gases that slowly worked their way up to the surface. As these gasses followed cracks in the firmly packed sediment, they gradually widened these conduits and cemented the walls with carbonate minerals (the same thing limestone, chalk, and marble are made of), creating a sort of chimney to release these gases and fluids out of the seafloor.

Diagram of how the fluids and methane seeped their way from deep below the seafloor up through mudstones like the Santa Cruz mudstone. The original research on these fossilized methane seeps was done by UC Santa Cruz researchers and students! (Image source: http://citeseerx.ist.psu.edu/viewdoc/download?doi=10.1.1.151.216&rep=rep1&type=pdf)

Seeps like these that bring methane gas and fluids from deep below the seafloor can be found today out in the deep regions of Monterey Bay. In millions of years from now, these same chimneys may find themselves on a new coastal outcrop!

Seafloor methane seeps like the ones preserved at Swift Street occur in the Monterey Submarine Canyon today, providing nutrients for mini ecosystems on the seafloor, like these red-orange microbes that form mats around the seeps. (Image from the Monterey Bay Aquarium Research Institute)

Layers of the Santa Cruz Mudstone

While the fossilized cold seeps tend to get a lot of the attention, the tough Santa Cruz Mudstone around them is itself a fascinating piece of rock. In this area, the Santa Cruz Mudstone hosts alternating layers of pale mud and blocky porcellanite (pictured right), a rock that gets its name from its close resemblance to unglazed porcelain. This rock is very similar to chert, a glassy rock formed at the seafloor from the accumulation of the glassy skeletons of diatoms. Porcellanite, like that found at the Swift Street outcrop, has a bit more clay and calcite (probably from critters that make chalky skeletons) giving it its more porcelain-like appearance.

The layers of porcellanites have a distinctively blocky texture. This results from the very brittle nature of the rock type. Just like pieces of porcelain, when these were squeezed and warped by tectonic pressure, rather than bending like the softer, more ductile mud layers, the porcellanite essentially shattered in response to those forces. Yet, even in its shattered state, the porcelanite rock is remarkably strong and durable. For this reason, Santa Cruz Mudstone with its rugged porcellanite layers makes up many of the flat bases of the sea cliffs around West Cliff as it stands up against the erosive force of the waves that more easily cuts into the sands and sandstones of the overlying cliffs.

The highest visible layer of the Santa Cruz Mudstone is a thick (almost 1 foot-thick) light-colored mud layer (pictured left), that has old clam burrows on its surface and is overlain by Purisima formation with large chunks of porcellanite from the mudstones below. This tells us that before the sands of the Purisima Formation were laid down atop the mudstone, it spent some time being eroded by waves. Those clam burrows are a testament to the time it spent as a rocky seafloor bottom over 6 million years ago.

The chunks of porcellanite just above the contact tell the story of the earliest history of the Purisima Formation as powerful waves broke down and churned up rocks that were incorporated into the first layers of the Purisima sands.


The Purisima Sandstone Formation

Above the Santa Cruz mudstone lies the Purisima sandstone, a rock formation known throughout Santa Cruz for its abundance of stark white fossils of ancient shells. Swift Street contains only a relatively small section of the Purisima Formation, but several areas within it exhibit amazing sedimentary textures. Up on the cliff, sections of the Purisima are a flat brown, with no visible fossils, and parallel “beds” or ancient sediment layers (pictured right). These areas represent long periods of constant sediment deposition, with no major storms or changes to the environment.

Elsewhere in the outcrop, shell-rich layers and features called “cross-beds” (pictured below) tell us that at other times between 7 and 2.6Ma, this area experienced large storms that created strong ocean currents. The jagged contact between the Purisima formation and the above Quaternary-aged sediments represents nearly two million years of lost time in the rock record. 


Erosion and deposition of sands on top in the last 100,000 years

The base of the uppermost layer of the Swift Street outcrop is made up of an unconsolidated matrix of fine sand surrounding large, cobble-sized pieces of the underlying sedimentary rocks (pictured right), as well as abundant shell fragments. Because this layer is made up of fairly loose sediments, as opposed to rock, we know that it has not experienced long periods of burial required to turn sediment into rock (or lithification in geologist jargon.) For large cobbles to be ripped-up from the underlying layers and deposited here, requires high-energy wave systems like those found on the modern coast. Therefore, the transition from the underlying Purisima sandstone to these sediments likely represents a time where the Santa Cruz coast shifted from deep water to a coastal zone, likely as a result of sea level fall and tectonic uplift. 


Rock Record is a monthly blog featuring musings on the mineral world from Gavin Piccione and Graham Edwards.

Graham Edwards and Gavin Piccione are PhD candidates in geochronology with the Department of Earth and Planetary Sciences at UC Santa Cruz. They also host our monthly Rockin’ Pop-Ups as “The Geology Gents”.

How to See Comet NEOWISE

This July, Comet NEOWISE is closer to the earth than it will be for another 6,800 years. Make the most of this moment by making thoughtful observations:

cellphone photo of the comet NEOWISE was taken at the Bonny Doon Ecological Reserve
This cellphone photo of the comet NEOWISE was taken at the Bonny Doon Ecological Reserve on July 18, 2020.

1. PICK YOUR LOCATION
Where is the best place to make observations of the night sky? How does light pollution and weather impact what you can see?

2. ADJUST TO THE DARKNESS
Look at the sky when you first arrive and make note of what you see. After a few minutes, compare what you first saw to what you’re seeing now. Has it changed?

3. USE ONLY YOUR EYES
Scan the skies for a “star” that looks different from the others. Can you find it? Here’s a hint: It will be below the Big Dipper.

4. USE TOOLS
Binoculars and telescopes magnify objects that are far away and are helpful tools for observing the comet more closely. A pen and paper are also tools to aid your observations — draw what you see and write down your thoughts. This helps to focus your observations and creates lasting memories.

5. WHAT ELSE DO YOU SEE?
There’s more to wonder about in the night sky than NEOWISE. Have fun exploring.

Explore more resources about SPACE
Explore more resources about NATURE JOURNALING
Post by Marisa

What’s In a Naturalist’s Backpack?

Who is a naturalist?
It doesn’t take much to be a naturalist – anyone can be one! A naturalist is someone who enjoys spending time in nature, exploring aspects of the natural world, and making observations about the things that they see. Does that sound like you? If so, you are a naturalist! A naturalist is CURIOUS, EXCITED about learning and discovering, and RESPECTFUL towards all living and non-living beings in the world.

What do you need to be a naturalist?
Your most important tools are the senses you have available to you. Those senses may include: SIGHT, HEARING, TOUCH, SMELL, and TASTE. You can use these “tools” in so many ways to observe your surroundings and to discover patterns in nature!There are some other tools that naturalists bring with them to investigate nature more closely. Many of these tools can fit right inside a backpack, meaning that you can take them anywhere! 

Safety first!
Before we talk about WHAT you can bring on your adventure in nature, it’s important that we go over a few things to help keep you and the environment safe.

  • During Corona Virus Shelter-in-place orders: maintain a safe distance of 6 feet and explore the outdoors close to home rather than traveling far away.
  • Some essentials to pack: appropriate layers depending on the weather where you live, water to stay hydrated, a snack to fuel you through your day, and a first aid kit. If you’re going for an adventure further from your house, these things are very important!
  • Kids – make sure to take a trusted adult on your nature exploration. 
  • Avoid touching, picking, or eating plants that you are not familiar with. Even if you think you know what something is, it’s important to ask an adult and get an I.D. confirmation first. Never attempt to touch or approach a wild animal. 

Journal and Art Supplies 
A great place to start is with paper and pen or pencil. An important part of being a naturalist is taking notes and recording the things you see! 

A page full of notes and sketches of plants from a naturalist's journal

Why do you think it’s important to record observations in this way?

If you like to draw, you can take your favorite art supplies with you to make sketches of the things you see. There is no wrong way to nature journal! Ask questions in your journal, get creative, make graphs – it’s up to you! 

If you’re stuck on what to write about, you can try “I Notice, I Wonder, and It Reminds Me Of”. All you have to do is choose something you  see in nature and finish those sentences based off of the observations that you’re making with your senses! 

Some good resources to help you with nature journaling:

A page of notes relating to the definition and functions of a field guide

What’s That?
Have you ever been on a walk in nature, saw something AMAZING , and wondered, “What IS that?”. This is where field guides come in handy! A field guide is a book or handout that helps you identify things that you can find in the natural world. There are so many field guides out there in the world – whatever you are interested in, there is definitely a field guide for it! 

Field guides are great to use after you have spent time with your organism, making observations about what you notice about it. They can tell you the name of the organism as well as any other cool information about it! 

There are a lot of helpful books to get you started on your identification. Field guides can be foldable pamphlets, too – easy to carry around in a backpack! There are also so many field guides online that you can download to either print or view. You can even create your own field guide!

A pair of binoculars resting on a log

Look Closer!
Up close or far away – there are a lot of tools we can use to help us focus our eyes on the things we see in nature! Here are just a few.

Binoculars
Look! There’s a bird perched high up in that tree. One way to look at it a little more closely is by using a pair of binoculars. Binoculars are tools that have two lenses for your eyes that help magnify your vision.

How to Use Binoculars 

  • First, focus on the object you want to see more closely with just your eyes. Then, slowly raise the binoculars to your eyes. 
  • Adjust your binoculars. If it is blurry when you look through the lenses, you can adjust your binoculars to make them more clear. Your binoculars should come with a set of instructions on how to do this – often there is a knob at the top or around the lenses you can rotate.
  • Use binoculars only when standing still, not walking – you could trip and fall! Make sure to never look at the sun through your binoculars – this could cause permanent damage to your eyes.
A naturalist magnifier

Magnifying Glass or Hand Lens
These tools help us see details up close- like the scales on a butterfly wing, tiny hairs on a fuzzy plant, or tiny organisms swimming around in the water! Peer into a magnifying glass or hand lens and see what you can find.

 Good places to find these tools:

A bug net being held outdoors

Gettin’ Buggy!
Watch a spider spinning its web, follow a butterfly from flower to flower, or watch a worm wriggle in the dirt! There is so much to learn about these tiny creatures – they are not to be overlooked! 

There are ways we can safely look more closely at insects. An insect net is a tool that helps you safely capture insects so that you can make observations. You can carry some small jars with holes in the lid or sides to create a temporary home for the insect while you take a closer look. It is always better to just look with our eyes when we find insects, but if we are careful, we can use these tools to get a better understanding of our six-legged friends.

Remember! Never pick up or touch an insect you are not familiar with. Make sure to be gentle when using your net to observe living creatures. Always release insects in the same place you found them after you are done making observations! 

Now your bag is all packed and you’re ready to explore! 

  • Your senses, curiosity, and excitement will help you make observations and discoveries on your way.
  • Your field guides will help you go deeper and learn more about plants and animals that you find.
  • Your insect nets will encourage you to notice the similarities and differences between the insects you may see.
  • Your binoculars, hand lens, or magnifying glass will give you an up close view of nature.
  • Your journal will help you record your findings, take notes, draw pictures, and ask questions about the things you find along the way!

Who knows what wonderful surprises you’ll find out in nature?

Post by: Ellen

Create Your Own Field Guide

Creating a field guide is a great way to become an expert on a location. It is also a great way to share information with others. Choose a location to become an expert on! It can be your backyard, neighborhood, or any other outdoor spot that interests you. Once you have chosen your spot you may choose to focus on plants, animals, or both! Depending on how much time you have and what makes you most excited about learning. 

Recording data in an observation journal
Record your observations with writing, drawing, or by taking pictures.

Step 1: Bioblitz!

  1. Before you can make a field guide, you have to know what lives in your spot–start with a bioblitz! A bioblitz is when you try to find and identify all the species in a certain area over a short period of time. Bring with you a camera or journal to record what you find. You may also bring along field guides, or a smartphone to look up things on the go. Another option is to take pictures or sketch organisms you find outside to look up later. 
  2. On your bioblitz it is important to pay close attention to everything. Taking pictures or drawing what you find will be a helpful resource to look back on. 
  3. After the bioblitz you can do research using the online resources listed below to identify species that you don’t know. Once you have identified all the species you can start creating your field guide!

Making your field guide

  1. Choose your materials. Your field guide can be handmade with pen and paper or it can be typed on the computer. If you make it on the computer, it will be easier to share with others via email or posting on social media.
  2. Organize your field guide to make it user friendly.
    1. Make a table of contents and include page numbers 
    2. If you chose to include both plants and animals you should group those accordingly (plants in one section and animals in the other)
    3. Having images or a detailed description of what the species looks like
    4. Information or facts about the species such as where it is found, what it does, and what seasons it is around.
  3. When you finish your field guide, share it with your community! Then others can use your field guide to learn about creatures and plants in Santa Cruz. “In the end we will conserve only what we love, we will love only what we understand, and we will understand only what we are taught”- Baba Dioum

Post by: Elise

Geology of West Cliff Drive

Use this handout as a guide for your walk along West Cliff Drive. (PDF | HTML)

Stop at a few geologically significant locations and see if you can notice where Purisima Formation sandstone meets the Santa Cruz Mudstone, learn to identify concretions, and ponder how erosion might impact the future of the Santa Cruz Lighthouse.

Handout for exploring geologic landmarks while walking West Cliff Drive
Learn more about local geology with our Rockin' Pop Up video series.
Explore all things geology and fossils in our Online Museum Store.

Post by: Marisa