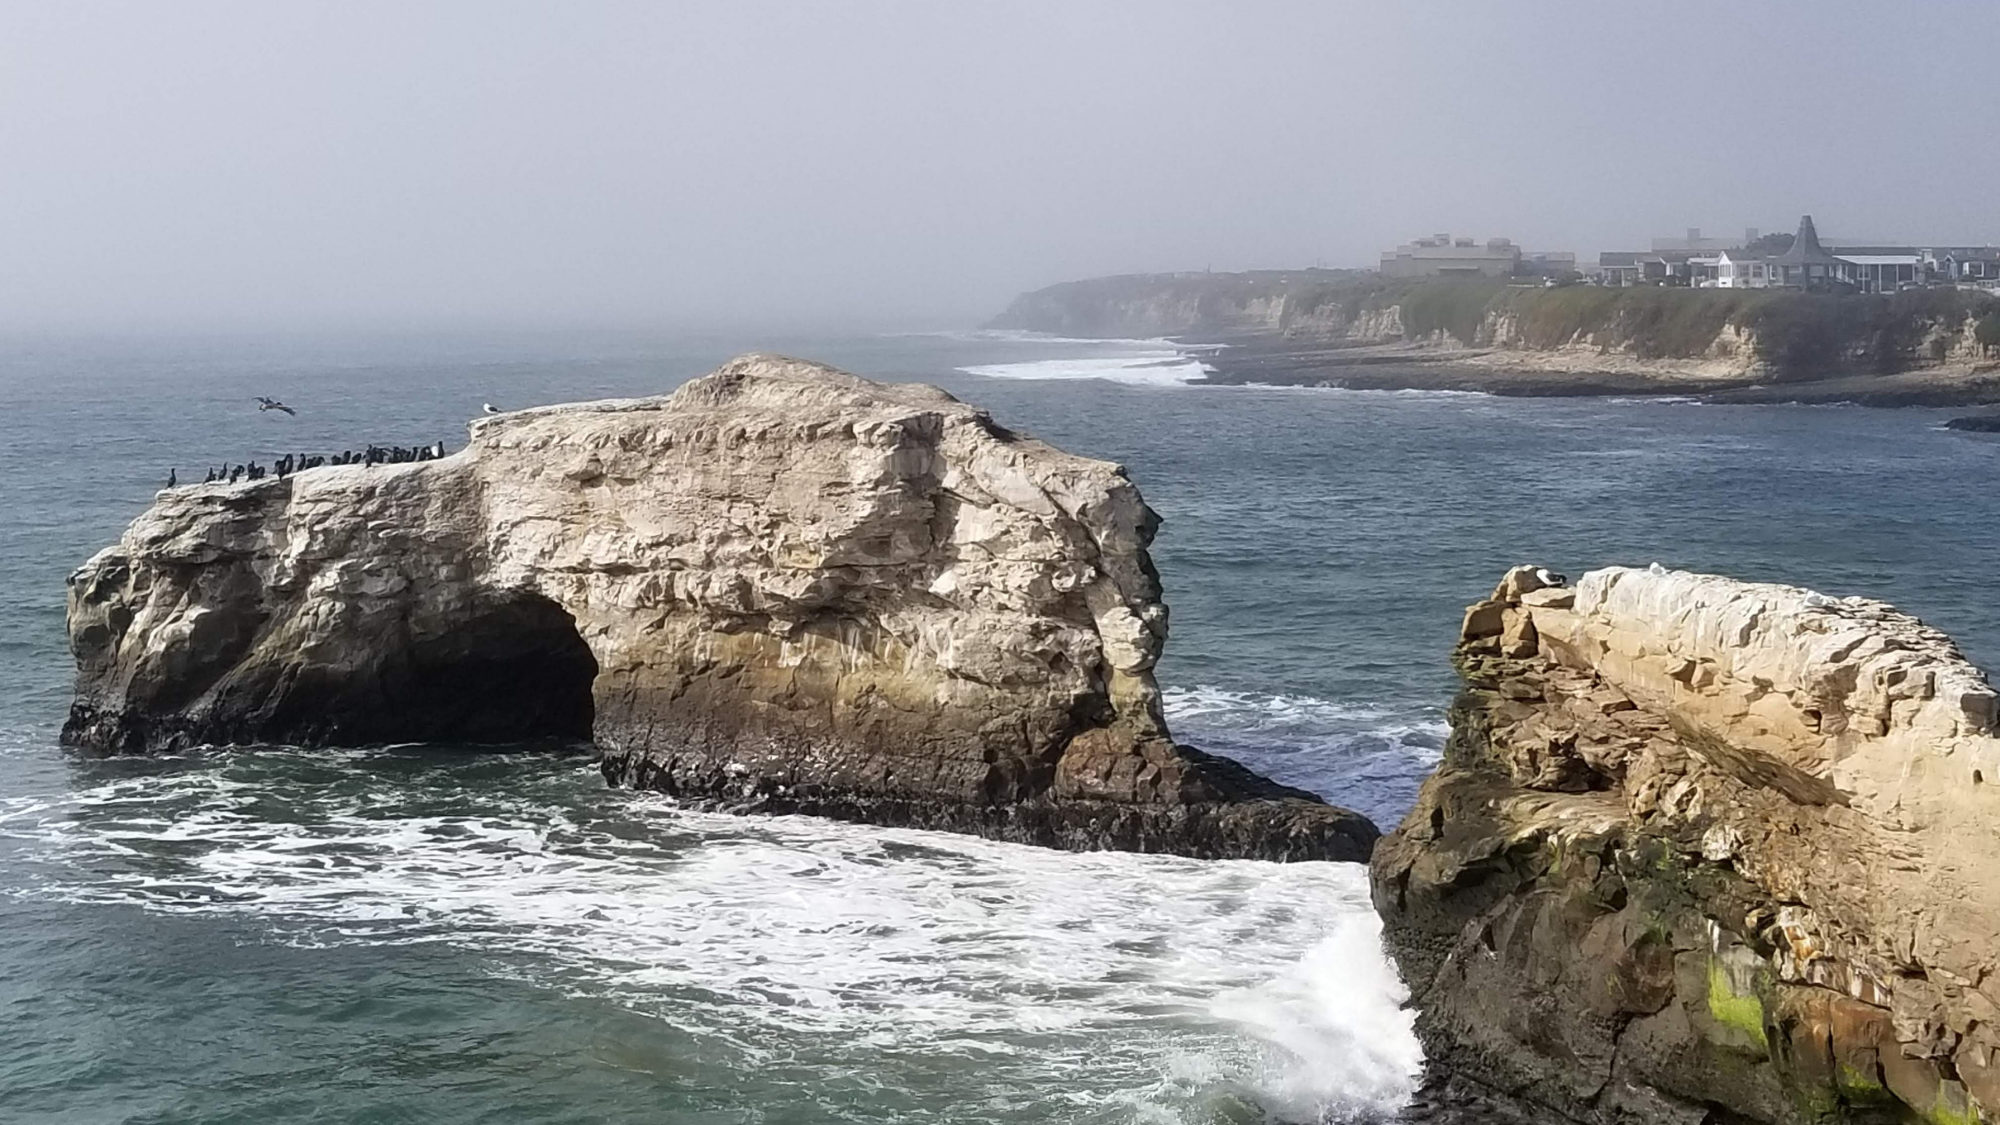
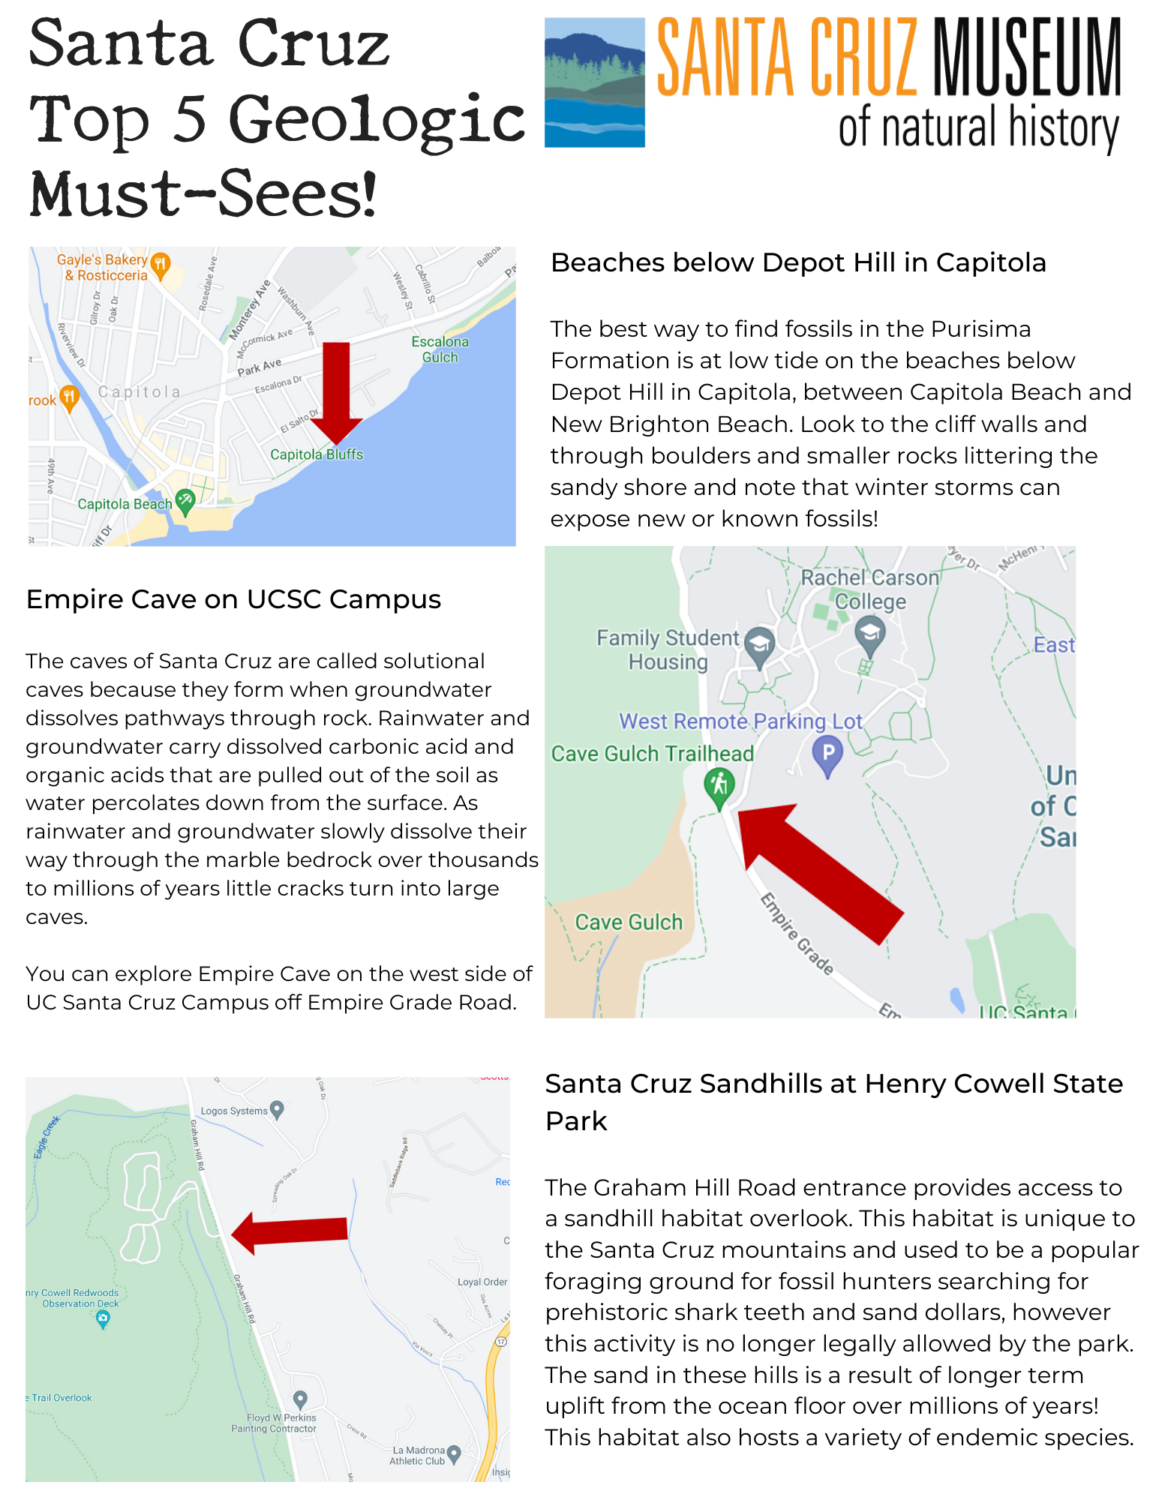
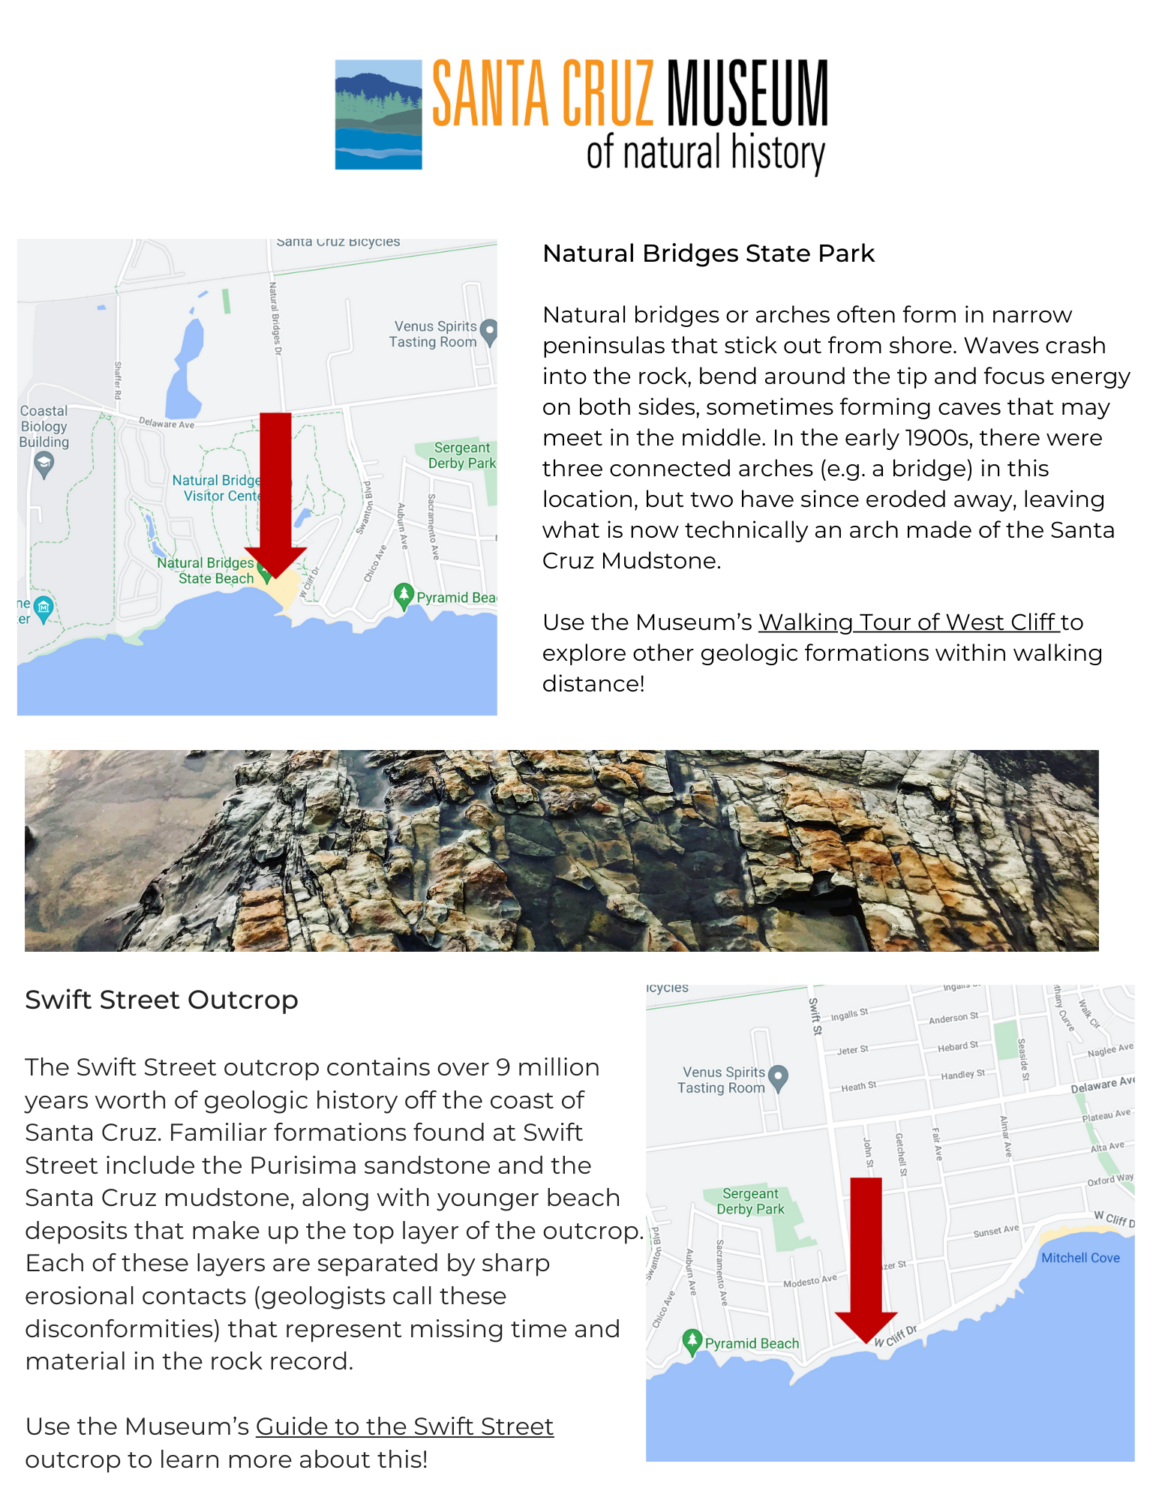
Santa Cruz is an area of geologic interest with a complex history of processes that shaped the coastline, bluffs, terraces, and mountains we see today! Use this map as you walk, bike or ride your way across the county and explore some of the geologic must-sees our area has to offer. Visit our online Guide to the Rocks of Santa Cruz County to dig even deeper into the geology of the region.
Happy Summer Solstice! What better way to celebrate than creating art with sunlight? Follow along and harness the power of the sun to create your own sun prints using objects found in nature, construction paper, and sunlight.
Astronomically, the June solstice marks the first day of summer for the Northern Hemisphere, but many cultures consider this event to signal midsummer. This year, solstice occurs at 2:34 p.m. PDT on Saturday, June 20, 2020, which is the exact moment that the Earth’s North Pole is leaning most toward the sun.
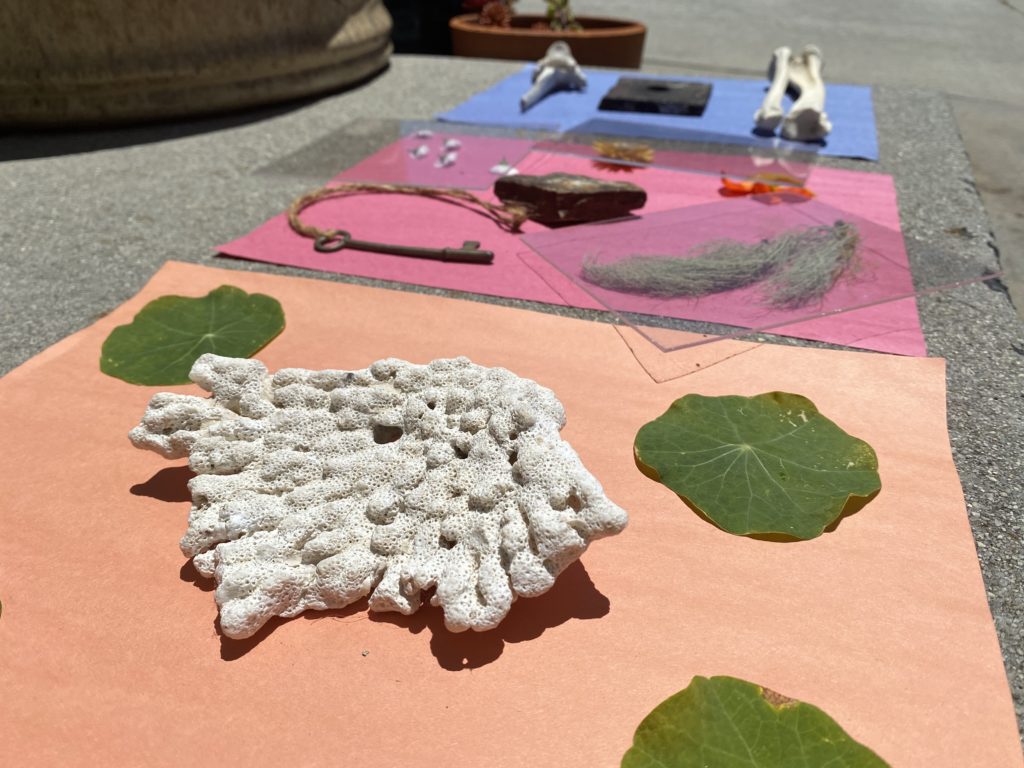
Materials: Construction paper Nature objects
Optional: Saran wrap Plexiglass Tape Scissors
Place object(s) on construction paper. If your object is heavy, like a rock, move on to step two! If it is lighter, like a feather or leaf, you may want to tape it down (masking tape works best), or put a piece of saran wrap or plexiglass over the paper (glass won’t work because it will block the UV rays from the sun, which we need to make our prints). You can also cut paper into shapes and tape them to your construction paper.
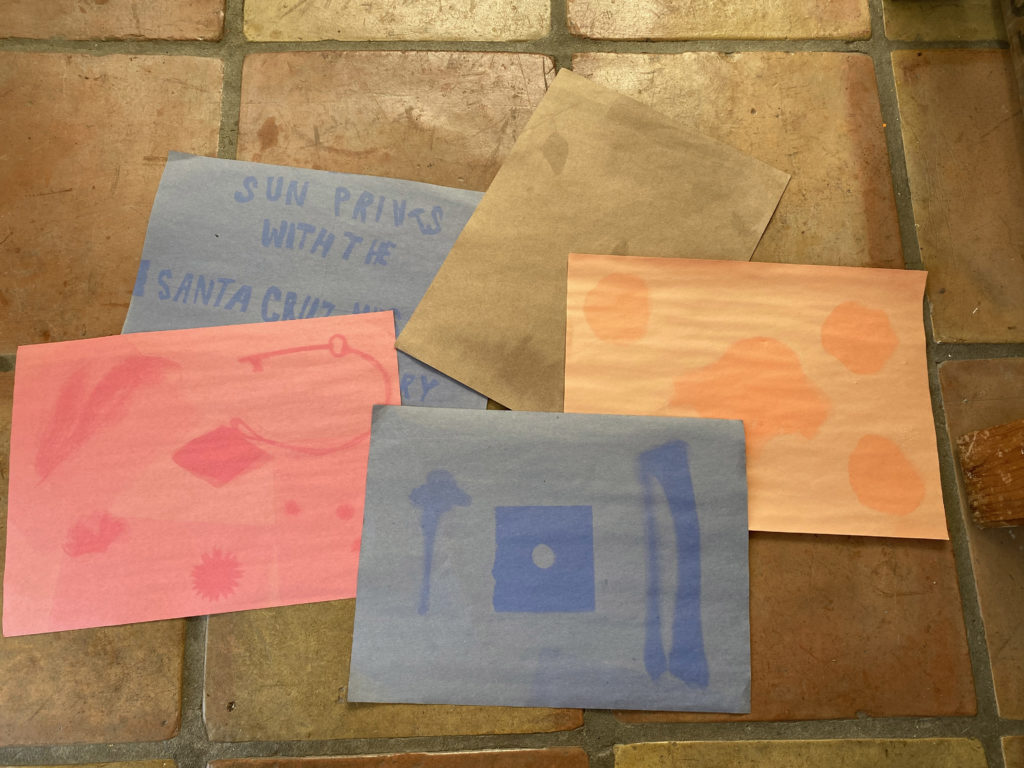
Place paper under the sun. Since we’re doing this on the solstice, we’ll have many hours of daylight — more than any other day of the year! Hopefully we also have sunny skies with few clouds, which will make our project go faster. If not, however, that’s okay. Just leave your paper out longer. Give your project at least two hours in the sun. Place your paper on the ground and make sure everything is secure so that the wind won’t blow anything away.
Remove objects and enjoy your artwork! Why do you think the sun changed the color of the paper? Why did the paper not change color where the objects were placed?
There’s more to sourgrass than its lip-puckering powers. Dig a little deeper with this natural dye video tutorial.
Sourgrass (Oxalis sp.) is a plant of extremes: children love its strong flavor, pollinators gorge on its abundant nectar, many adore its ability to overwhelm a field when in bloom, and many still detest the invasive qualities of some of its species. Oxalis pes-caprae, native to South Africa, has made itself comfortably at home in California, forming dense mats that outcompete native plant species for light and space.
Whether you love it or can’t stand it, sourgrass has an interesting hidden quality that is both useful and exciting: it dyes fabric a vibrant, neon, highlighter-yellow color. Watch our video tutorial to learn how to play with its pigment and explore more resources below:
Explore science illustration with artists featured in our annual exhibit, The Art of Nature, and get tips for how to make your own science illustrations at home. This post is from Megan Gnekow, recipient of the Museum’s 2019 Laura Hecox Naturalist Award.
I make scientific illustrations because I want to inspire folks to look closely at the world around them. I want to make complexities and relationships more clear, helping people understand that all organisms are connected to each other. — Megan Gnekow
Prompt: Sequential Observations
There are so many great ways to use a nature journaling project to connect to your local habitat(s). One of my favorites is sequential observations — making notes and sketches about an organism you observe over time. Spring is a great time to do this because there are so many visible changes happening in our environments.
Choose an organism that you can observe regularly over a period of time (the period of shelter-in-place is a good place to start!). Observe the organism you have chosen as frequently as you are able to and make notes and sketches about what you observe. Note date, time, location (macro-habitat and micro-habitat). Use as many of your senses as you can and record what you learn!
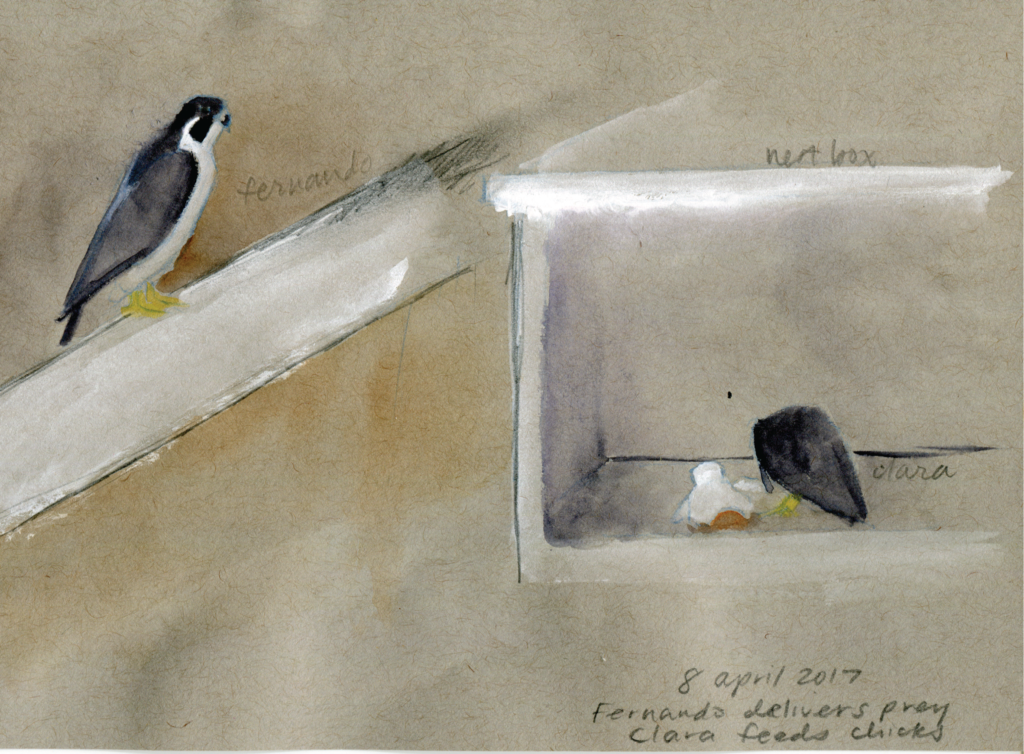
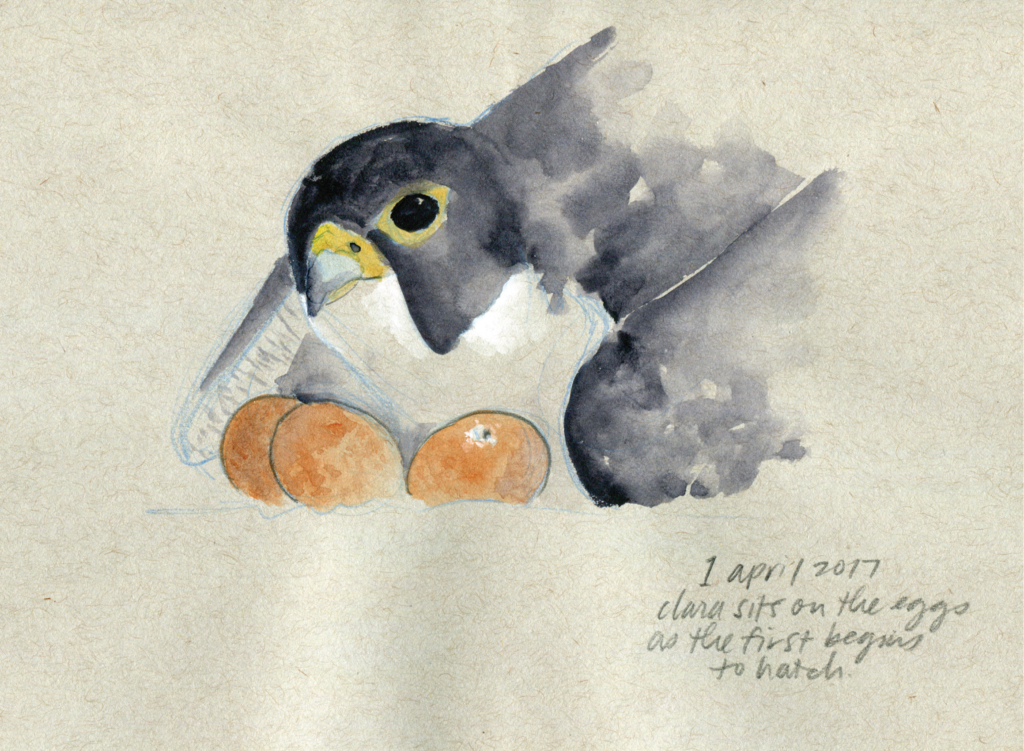
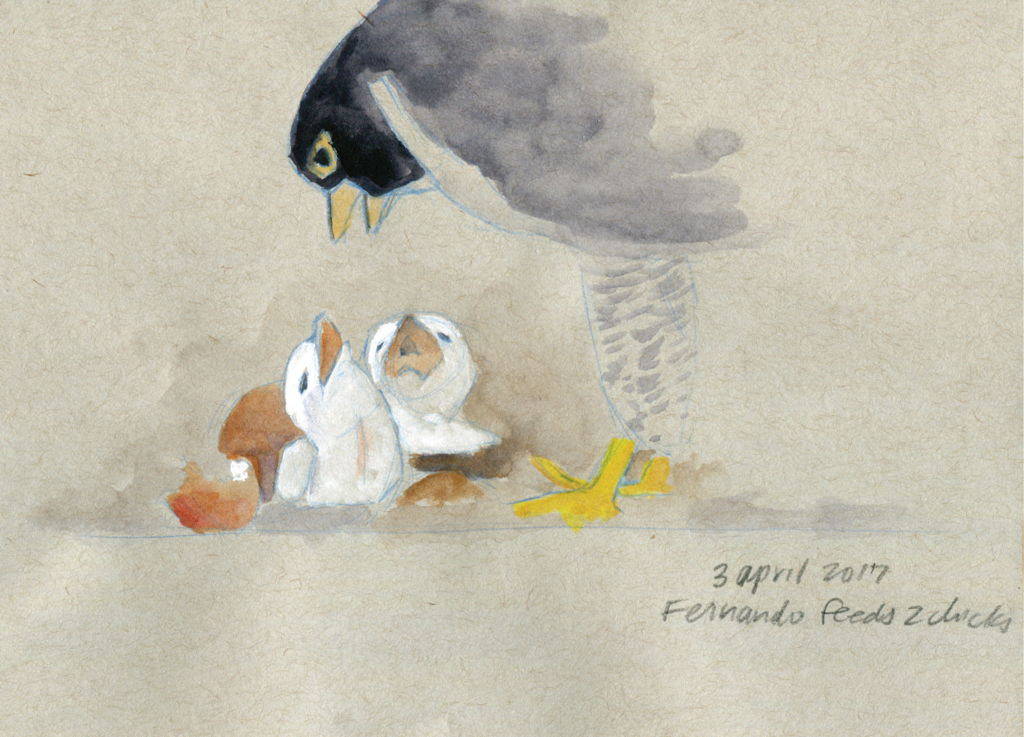
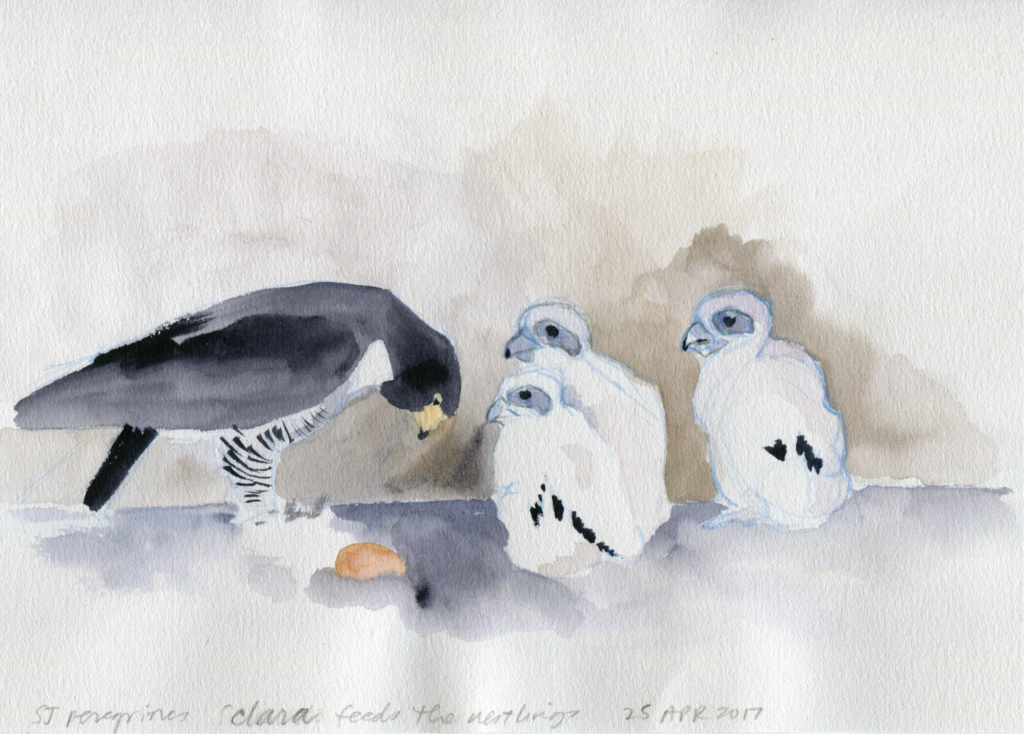
Illustrations by Megan Gnekow using the San Jose City Hall peregrine falcon nest camera hosted by the Predatory Bird Research Group in 2017.
Recording your observations over time gives you insights into an organism and the environment in which it lives. Hopefully this plants a seed for further observations and exploration. Don’t worry about making beautiful drawings. Just sketch and/or note what you observe!
If you can’t get outside or have other limitations to observing organisms, there are plenty of webcams available to inspire you — I would suggest a bird camera hosted by the Cornell Lab of Ornithology or the falcon cam at UC Berkeley.
Read more about Megan Gnekow here and visit her website here. Explore all of her illustrations from this peregrine falcon series here.
Experiment with creating art from nature! Many plants and rocks have pigments inside of them that you can paint or draw with. You can even go one step further and try making your own paint brush from found natural materials!
How to find materials
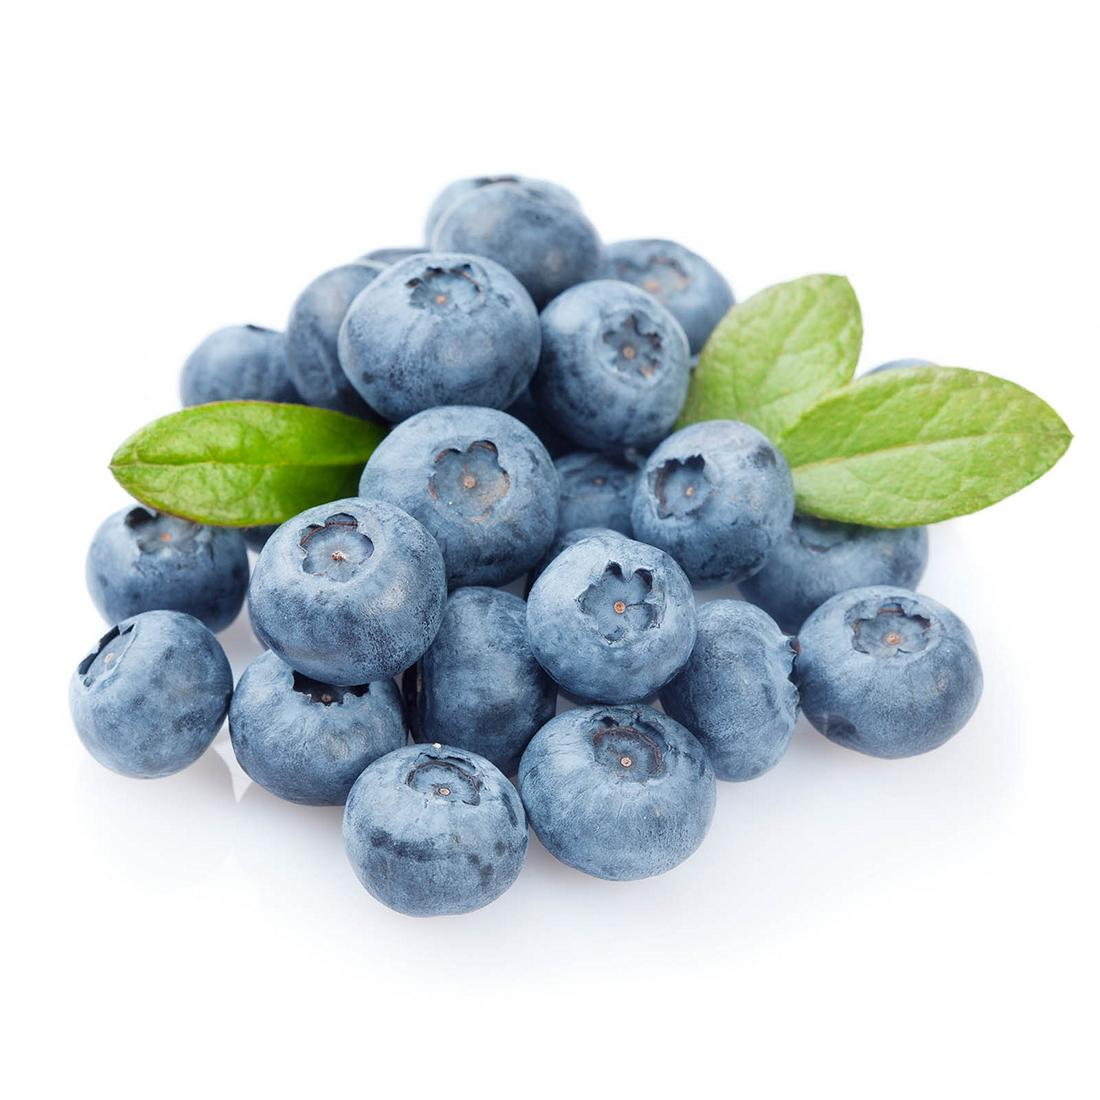
Look in sidewalk cracks for leaves or flowers and look in dirt patches for different types of rocks. Look on bushes or trees for berries, flowers, and leaves. My favorite is oxalis, more commonly known as sourgrass (pictured to the right). It is a yellow flower that is common in Santa Cruz and makes a highlighter yellow color when used as natural paint. Bonus: this plant is invasive and is often considered a weed that you could completely remove.
Look in your kitchen for pigment materials!
On the other hand if you want to create art from nature but want to stay inside you can do that too! Some of your food can be used to paint and draw. For example, you can use colorful spices such as turmeric or paprika to create paint by mixing the powder with water. Beets, purple cabbage, and berries will also work – they often turn my cutting board different colors when I am chopping them! If you have a fireplace you can even use the small pieces of burnt wood that are left behind to draw with or you can grind it up and mix with water to create black paint.
Collecting plants
Be respectful of the plants you collect
Only take what you need or take less than 10% of a plant (If there are 10 leaves on the plant, take only 1 and find other plants to pick from if you need more)
Collect with permission on private property and do not collect in State Parks
Stay away from harmful plants such as poison oak and stinging nettle
Creating Paint
Use your hands or a spoon to grind up the plants or rocks
Try adding water or soaking items in warm water to soften them
Be patient, making your own paint is an experiment and it will often give you interesting surprises! See what happens if you add baking soda or vinegar- sometimes this will change the color of a paint!
Questions to ponder
What colors do you predict will be created from your items?
Did any of the colors surprise you? Why?
How did the colors change over time?
How did the colors change when you added different things (like baking soda or vinegar)?
Beach cleanups are a way we can all enjoy the outdoors while serving our community. Whenever you’re walking along a beach, river, or other waterway, you can help keep it clean. While there’s a lot we can all do with reducing our own waste, cleanups can prevent some of it from going into our oceans. (As with all activities, remember to practice good social distancing!) Here’s what you need to know about conducting your own beach cleanup:
Helpful Tips and Suggestions
Never touch anything with your bare hands. Be sure you’re wearing gloves. As for me, I use gardening gloves. The best thing is that they are washable, so I can keep reusing them. I also recommend close toed shoes.
I use a bucket instead of a plastic bag to reduce my waste. A reusable shopping bag is also effective.
Do not touch anything sharp or organic. If you find dead animals or waste (poop), just leave it. If you find a biohazard, like a syringe, do not pick it up. If you want, you can call the police and tell them exactly where the biohazard is located, but you are not obligated to.
If you see any living wildlife, give it plenty of space and do not disturb it. Even if that elephant seal is sitting right on top of a piece of plastic, let it be. Also, remember that all Marine Mammals are protected under the Marine Mammal Act.
Both the city and the county of Santa Cruz have specific but different criteria for what constitutes trash or recycling. I highly recommend you take a look at those before you start your cleanup:
Pay attention to microplastics, or plastics that are smaller than 5 mm. Microplastics are by far the majority of the plastics that make it into our oceans. Just like larger pieces of plastics, any microplastic that gets ingested can’t be digested. And that’s not just for ocean animals. It’s estimated that we humans eat about a credit card’s size worth of plastic every week. Learn more here!
And lastly, remember to have a good time. Take a moment to enjoy the waves and the fresh air. We are so lucky to live in a place with gorgeous forests, a healthy ocean, and, most of all, with wonderful people.
Learn about different types of clouds, recording daily observations of clouds on your cloud chart, making weather predictions, and an experiment to make your own cloud at home!
What are clouds?
Clouds are made up of water droplets or ice crystals that float in the sky. We can learn a lot about the weather by looking at clouds.
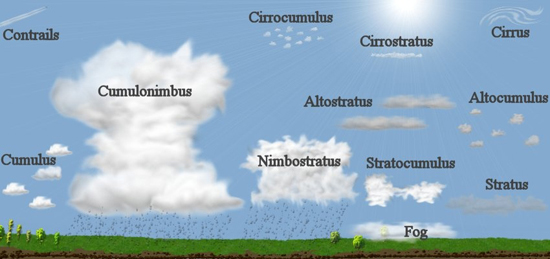
Types of Clouds
Go outside and observe the clouds. Based on the diagram above, which clouds do you see today? If there are no clouds in the sky think about why that might be. Identify your clouds using this NASA Cloud Chart (Guía de las Nubes en español), and learn more about each type of cloud here.
Each day go outside and observe the clouds for one week and record your observations in this downloadable cloud chart. Make weather predictions based on what you have learned about different types of clouds. At the end of the week you can look back on your weather predictions and reflect on if they were correct or not. Use your data to see which clouds were most common during that week.
Download and print this worksheet to aid in your observations — or make your own!